
• Metric wrenches and sockets (torque wrench recommended)
- H&R End Pin bolts: 19mm, 22Nm
- H&R end pin nuts: 17mm, 22Nm
- Bushing brackets: 13mm both sides, 21Nm
- Chassis brace bolts: 16mm x4, 8mm x3, 13mm x2
- End link bracket: 13mm nut x2, 17mm bolt x2
• Recommend having two sets each of metric box wrenches, and metric sockets and ratchets. You’ll also need some ratchet extensions (3”, 6”, and 9” in reach) and a wobble adapter (not sure if this is the right term, but it’s the ratchet adapter that looks like a U-joint).
For my procedure, I was able to finish the job without needing to put the car on jack stands or removing the rear wheels. Using the ramps seemed advantageous as it kept relatively little force on the OEM sway bar (which made disassembly and reassembly fairly non-problematic). I did re-use the OEM end links and bushing brackets. There was a good deal of blind wrenching, just a little frustrating at times. If I didn’t explain something clearly, just let me know, and I’ll be happy to answer any questions. I did my best with taking pictures when I could, but just didn’t remember to take pics for everything.
Steps:
1. Position car’s rear wheels on ramps. Take extra care when doing this to avoid injury, and I strongly recommend doing this with a friend, in case anything does happen and to have an extra pair of hands (they’ll be helpful). Put the emergency brake on, and use wheel chocks under both front tires. Make sure the car is cold. You’ll be working very close to the exhaust, and you don’t want to be touching a hot exhaust.
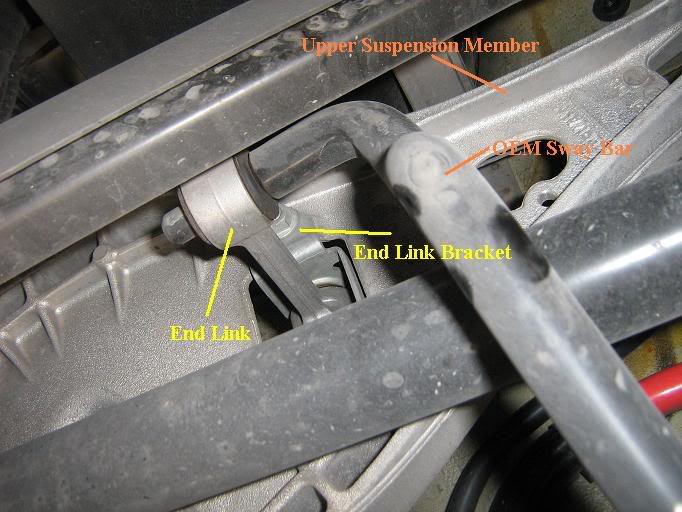
2. Once you get under the car, it should become pretty clear what you’re facing. See pictures of the OEM setup.
3. Remove the chassis braces, by removing all of the attaching screws/bolts/nuts. It may not seem necessary at first, but when you try to get the OEM bar out of the car, you’ll understand. These have a 17mm bolt at each end (one at the middle-rear near the differential, and one under the rocker panel near the jack point one the side. The right side brace has two 8mm screws securing it to the large protective shield, and the left brace has one. Each brace also has a 13mm nut connecting the brace’s midpoint higher up in the chassis (you’ll need a 9” total extension to reach these, and I needed the wobble adapter for the right side one).
4. Remove the end link brackets from the upper suspension member. The exposed nuts are 13mm, and the bolts on the top side (which you can’t see) are 17mm.
5. Disconnect the bushing braces from the chassis. The 13mm nuts that are visible have 13mm bolts on the back side of the brackets. There’s only one nut/bolt assy on each bracket at the top, and the bottom of the bracket is secured by a metal tab. Once the bolt is removed, you’ll be able to push up on the bar to release the metal tab. Due to the exhaust heat, you may find that the rubber OEM bushings have become fused to the sway bar and their brackets. Don’t worry, the brackets are easy enough to break loose, and make sure you don’t damage them if you intend to reuse them. You should have new bushings with any new sway bar you install which have a diameter matching your new bar.

6. At this point, the OEM sway bar should be loose. For me this next part was tricky, but not too surprising considering I’ve never done this before. Remove the end link brackets from the end links. My friend and I were able to get the left side off first, and more easily than the right. Unfortunately, I do not remember the sizes of the nut and bolt which secure the link to the bracket (probably 13mm each). You will need to wrangle one side of the bar such that the entire end link bracket is visible below the upper suspension member. Once you manage this, you’ll have clear access to the bolt.
7. Now the next step is to get the old bar out of there. At this point, the bar should have no more on it than the plain end links (with no bracket) and maybe the OEM bushing if they were fused. Make sure you have taken off the bushing brackets to give the bar that extra clearance. You should be able to move the end links on the OEM bar with some force. Swivel them to best suit how you are able to get the bar our. I was able to get the right side down first, and then manage (by twisting at several angles) to pull the bar out from the ride side just clearing the exhaust with the left end link.
8. Now that you have the bar out, you’ll need to remove the old end links if you intend to reuse them. Twist, twist, and keep twisting. They will turn off like screws after a half a dozen or so turns.


O.k. everything else now it re-assembly, and for me and my friend, it went much faster.
9. Your new sway bar should have bolts that need to be pressed into the end links. A bit of grease will make this very easy. Do this, and re-assemble the end links with the brackets removed in step 6.

10. Position the new bar (no bushings, no end links) into place in reverse fashion, fishing the left side in first around the exhaust.
11. Bolt in the end link assemblies from step 9 back into their original positions when they were removed back in step 4. Do not tighten them. Get the bolts and nuts in place, but leave them loose.
12. Position your new sway bar end bolts into whichever hole on your new sway bar you choose. For my H&R bar, it has three position holes on each side, and I installed in the middle position on each side. Put the new sway bar nuts onto the bolts, but leave them loose, to be tightened later.

13. Now that the bar is approximately in place, but still a bit loose, you’ll need to get the new bushings on. The new bushings should be split so they’ll be easy to press into place on the bar from under the car. Press the bushing brackets onto the bushings as well. Locate each bracket’s metal tab back into its slot from step 5, and bolt them back in tight (to torque spec if possible).

14. Tighten the end link brackets to the upper suspension member.
15. Tighten the sway bar end bolts to torque spec if possible.
16. Re-attach the chassis braces.
17. Optional step. Protect the emergency brake cables. For my H&R swat bar position, I noticed that they come into contact with the e-brake cable on each end of the sway bar (see pic). The wear between these parts (for my driving style anyway) should be minimal, but I decided to add some rubber tubing to the e-brake cable. Black rubber hose is fine, with an inner diameter about the same size as the cable. I don’t know what size this is, as I just had some hose available.

18. Drive slowly off the ramps (after removing the chocks), crack open a cold whatever, stand back and admire your work.