Some notes from my own stab at this
http://www.zpost.com/forums/showthread.php?t=307269
I looked at this post from "WhamZ" (Thanks Bro) and then made my own ( I have the speeding ticket Red Zed4Si at the bottom of the post). I thought it was a fun project.
A few folks believe LEXAN is the superior product. It is if you are worried about stopping bullets and are willing to get min 3/4" thick that would be right, but for scratch resistance and optical clarity Acylic is superior. It is a harder product making it more resistant to scratches. The amount of suface loading at speeds of 130-140 mph or less is well handled by 1/4" acrylic. If I wanted to go that fast on a regular basis, I'd proabably have a Coupe though.
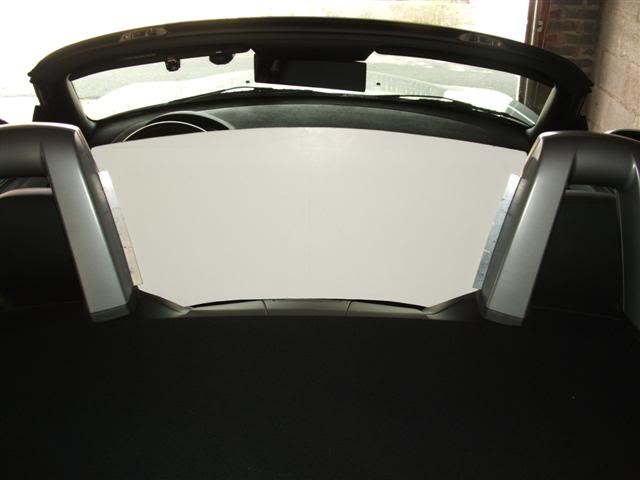
The shield is well seated with a 3 point mount. I have had no vibration or worries about the wind breaker coming loose. I absolutely love what its done for the cruise. The sound of my wife screaming at me when I push the sport button and bury the accelerator has acheived a new defintion of sound quality that was previously missing.
Pretty much all you need in the way of tools are:
1. Jigsaw or Bandsaw
2. Stationary drum or belt sander
3. various grits of sand paper to 120 through 1000 (for smoothing the edges by hand) after you have the shape just right.
4. Orbital polisher and plastic scratch remover of your choice. (I like Meguiars PlastiX)
Materials:
1. 1/4" acyrlic
2. 1/4" Aluminum U channel
3. Thin black felt
4. 3M auto moulding/trim tape (NOT the foam tape) This is similar to a solid putty on a nice roll with a release cover on one side
5. Spray glue (able to bond cloth to metal) something like a contact cement
6. 1/2" wide Auto body moulding trim
7. 2-4" wide painters tape (bigger is better).
8. distilled water
9 microfiber cloth
Pretty much anyone with a little woodworking experience could do this from scratch in a day. Once you have done the first, any additional are cake.
1. The big trick is getting the template just right, working just the BOTTOM and the SIDES thats just a little cut, tape and fit with cardboard first, then transfer that to a foam core poster board. Be sure to account for mounts (I put the PLAIN (no felt attached) mounts in place temporarily (just use some small pieces of the moulding tape) and then test fit the template in them. It should fit the mounts with very little (1/16" to 1/8") side to side slop. The slop will go away when the felt is put inside the mounts. Then draw a 5 foot radius accross the top of the foam core poster board.
2. Other than that BEFORE you cut out the 1/4" Acyrlic, clean it with a little distilled water and a new microfiber cloth, THEN cover the entire surface, both sides, with painters tape.
3. If using a jigsaw put a towel under the acrylic before cutting (careful not to get it caught up in the blade)
4. Draw the outline on the acrylic and cut it out with 1/8" relief.
5. Make sure the table surface of the stationary sander is clean and smooth - if not tape some carboard over it.
5. Use the stationary sander (120 inital and 150 grit final) to dial in the outline. Wipe down the table in between passes, EVERY time. Then polish out the edges with the various grits of hand sandpaper until all the edges are scratch free.
6. Pull the painters tape off. Carfully inspect the acrylic. If you still manage to scratch the acrylic it can be polished out with the orbital and a good plastic polishing compound. I did this anyway.
7. Glue some thin black felt on the inside of the mounts. (I used spray glue on the aluminum, folded the felt over a scrap piece of acrylic and firmly shoved it into the u channel)
8. Apply some 1/2" wide auto moulding to the outsides of the aluminum U channel using the 3M tape again, cut to fit.
9. Put all 3 mounts on the acrylic.
10. Clean the aluminum channel and the points on your Zed where the mounts will end up with rubbing alcohol.
11. Put moulding tape on all 3 mounts but only pull the tape cover off the tape that is for the BOTTOM mount. It will be attached to the Zed first.
12. Carefully put the windbreaker with all three mounts slipped on it into position on your Zed. Keep the bottom mount from contacting at this time.
13. When you like the location of the bottom mount push down firmly on the entire assembly to get the moulding tape to attach.
14. Now move the Assembly back or forward form the top until you have it positioned correctly. Use a fine tip marker to identify where the side mounts will be placed. Test the marker in an inconspicuous location first to make sure it will come off with rubbing alcohol .
15. Now use one hand to hold the bottom mount down and still. Use the other to gently work the acrylic free.
16. Remove both side mounts from the acrylic and attach them where you previously marked.
17. Carfully replace the acrylic into the mounts. Once in push it down firmly.
18. Put in all in place and allow the moulding tape to do its job. THAT means wait 2 days before you put the top down. The glue in that tape needs time to bond.
19. Once in place I have found no need to remove the windbreaker. It can be cleaned in place with distilled water and a microfiber cloth. Top goes up and down very nicely with it in place.


