OEM Bluetooth Installation
Posted: Sat Oct 22, 2011 7:19 am
Hi all,
Well since the forum was so helpful in the investigations leading up to my going ahead with this, I decided it was only fair that I document the process and share
So several weeks back I was investigating the installation of a Multifunction Steering Wheel upgrade kit when I discovered that the buttons also include phone and voice recognition control. Now although I'm not a big gadget junkie, I am a car tinkering junkie and the thought of adding OEM bluetooth and voice recognition really captured my attention. A peek under the boot trim revealed that my car was in fact pre-wired for phone - all I had to do was add the necessary components. Here's where I'll start my How-To!
Preliminary Work
Like I said, I only went ahead with this because the car was pre-wired for phone - it would otherwise have been a pretty massive headache to do this. I initially suspected that the car was pre-wired because I had the rectangular bulge on the left hand side of the bulkhead in the boot. From what I've read this should be a pretty good indication, however I still highly recommend taking a peek under it to confirm that the connectors are there before taking the plunge. I also confirmed that the wiring for the microphone was present (next to the overhead lamp in the cabin - remove the light panel to check) before proceeding.
My Car
Just to be clear: my car is a September 03, E85 2.5i in Australia. My hunch is that Australian cars, like US cars, all come pre-wired for phone, however this is yet to be confirmed. Some will be interested to know that I have a Dension Gateway 300 installed, which has not caused any compatibility issues with the bluetooth.
Parts Sourcing
I did a bit of research and Googling which led me to understand that I needed three components to get me going:
- ULF module (the electronic controller)
- Microphone
- Bluetooth antenna
Now initially I had planned to source a secondhand ULF module. This complicates things however: there are actually 13 major revisions of the ULF. Although they are all compatible with the car, apparently only the later 10 generations have voice control and for maximum compatibility with the maximum number of phones you want as late a generation ULF as possible. Some say greater than Gen 7 is best. Bimmernav has a lot of information on the different modules and their corresponding part numbers, although note that they say you can only order a 1st gen unit, which isn't true.
Secondhand ULFs (even very early generation ones) are generally listed with pretty high prices on eBay. So much so in fact that I decided it would be justified spending a little more to get a brand new 13th gen unit. Actually, even the microphone and bluetooth antenna were pretty expensive on eBay so I bought them new too. I used my new favourite parts supplier theBMWpartStore and got a really good deal. Because I also bought the MFSW retrofit kit at the same time Mike gave me a further discount and I ended up paying around US$450 for the ULF (not bad considering the BMW list price is $800!).
So the final parts list was:
84316938762 Hands free microphone
84506928461 Bluetooth Antenna
84109154358 13th Gen ULF module
Obviously you also need the mutifunction wheel...
Microphones
Since my Zed is an earlier model, the microphone is mounted at the top of the windscreen next to the interior lights. Later E85s (and as far as I know all E86s) have the microphone mounted on top of the steering column. This apparently gives better performance (especially with the top down), however I wasn't keen on rerouting the microphone wiring so decided to run with the default overhead location. I can always upgrade later if I feel it necessary.
I should also point out that the microphone itself received an upgrade at some point for better noise cancellation. The part number I quoted above (84316938762) is the later (newer) part. For reference, the part number for the old microphone is 84 31 8 380 319 and apparently the back of it is green.
Installation Procedure
So you've got your new parts in your sweaty little hands and are ready to install? Here's how I went about it! Actually, most of this is covered by the instructions on the Bimmernav site, I just wanted to include my own version here. Having two versions helps, as they generally include instructions that the other doesn't
Bulkhead Access
OK so we need to access the ULF mounting location on the rear of the bulkhead. I followed the instructions from my TIS, however they were for the complete removal of the bulkhead rear carpet, which entails a lot more work than we require. We just want to undo the bottom half of the carpet so that we can lift it up out of the way:
First remove the floor carpet:

Now unscrew and disconnect the roof tray floor sensor. Other instructions (including the TIS) specify removal of the tray floor first, however if you're careful you can remove the sensor without that extra effort.

Now separate the screw clips and lift up the carpet. I wedged it up using an appropriately sized skinny cardboard box.

And that brings use to here (although I had already removed the ULF mounting bracket and installed the ULF in this photo):

The ULF is pretty simple to install: it has a multipin socket on one end and a coaxial antenna socket on the other. The corresponding plugs are connected and you're good to go! I didn't disconnect the battery for this, however it's probably a good idea to. I'm an electronic engineer so I tend to take more calculated risks with stuff like that
Here's the ULF installed. The multipin connector is on the end opposite the coaxial connector. Note also that I've installed the bluetooth antenna onto the coaxial cable that is taped away underneath the centre console boxes. There's only the one matching connector in there so it's pretty hard to stuff up!

Now we need to install the pairing button into the "eject box" connector. My car has storage compartments behind the seats rather than subwoofers (from the premium sound package), but regardless of what's there the easiest way to access the eject box connector is by pulling out the right hand side compartment. You just kind of grab it and pull forward and it pops out, leaving you with this:
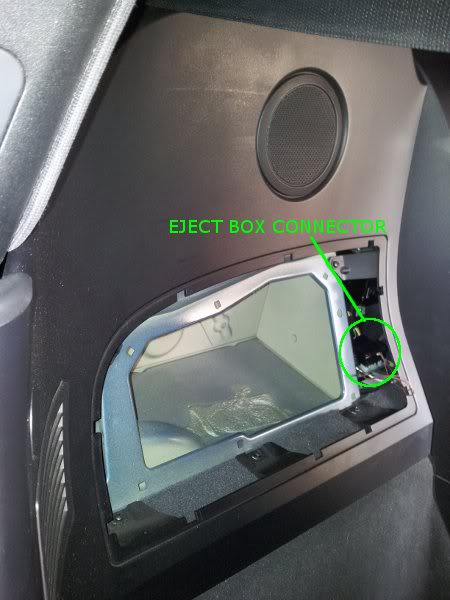
Note that next to the eject box connector is another coaxial connector. This is for the antenna connection that a phone snap in adaptor would provide to the eject box, but is of no use to us, so ignore it. It's the opposite polarity to the Bluetooth antenna connection, so you definitely can't get the two confused!
The eject box connector is fixed to a little bracket. To remove it, simply rotate about 30 degrees and it will then pull up and off the bracket.
Segue: Eject Boxes
You know how the door of the centre compartment has a big empty spot in the middle? This is designed to have an "eject box" mounted. The eject box is kind of like a mounting plate into which a "snap in adaptor" would fit. The "snap in adaptor" is a special piece specific to a single phone model (so there are a bunch of different ones) which allows a phone to be charged, have an external antenna (for better reception) and provide hardwired connections for phone control.
The eject box also features an important function of the bluetooth system: a pairing button. It's through this button that the car bluetooth system is entered into pairing mode.
Now with regards to the pairing button you have two options: fork out $75 (from theBMWPartsStore; nearly double that from Bimmernav) or (assuming you have some basic soldering skills) make one yourself. While $75 isn't going to break the bank, it's a bit crazy spending that much for the whole eject box when all you need is one tiny button. Although the OEM aficionados will be happy to pay it (don't be surprised if I end up picking one up for my install). Oh for reference, the eject box is part number 84109168940.
Back to Work: Pairing Button
For the time being (until I source a suitable button to use or decide to fork out for the eject box) I have installed a temporary DIY pairing button. It doesn't exactly have to be heavy duty as if all goes well you won't actually operate it again!
I soldered a pair of thin wires to the switch on and ran the cables iunderneath one of the boxes in the centre storage compartment. I know it looks pretty average, but like I said its just temporary. And being such a tiny button it's fairly inconspicuous.

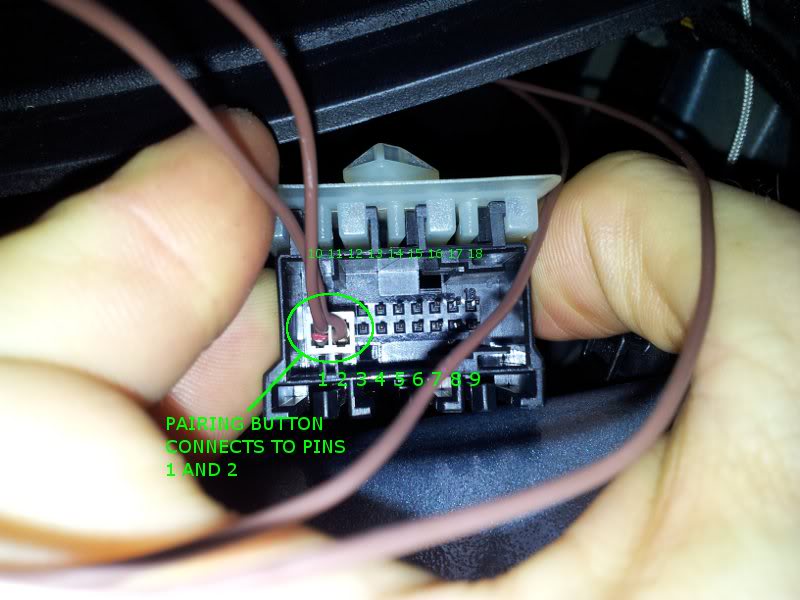
The pairing button connects between pins 1 and 2 of the eject box connector. Since BMW's engineers are so awesome and decided to use nice, standard pin pitches on their connectors, we can use a standard, run of the mill, 2-way 0.1" (2.54mm) pitch locking header plug. I just grabbed one I had lying around, but most electronics (as in electronic components) shops should have them. Here's a link to one from an Australian supplier - cheap as chips!

One side of the plug has a pair of aligning keys on it - I simply trimmed them off with a knife. Looking inside the eject box connector you can see pins 1, 9, 10 and 18 labelled. You want to plug onto pins 1 and 2:
Install the microphone (this step is so simple I didn't take a photo). The connector only plugs onto the microphone one way, and the microphone only clips into the panel one way (arrow pointing forward IIRC). The microphone is directional so it would be a bit useless if it was pointing the wrong direction!
Testing
It's now time to test everything!
Make sure you have your phone handy, with bluetooth switched on. Oh and reconnect the battery if necessary. To put the car into pairing mode follow this procedure:
1. Put your keys into the ignition but don't turn anything on.
2. Press and hold on the pairing button
3. About 2 seconds later turn the keys to the first position (accessory) so that the head unit turns on
4. Continue holding the pairing button on for another 3 seconds, then release it
The head unit display should now display "BT PAIRING" and if you scan for bluetoth devices with your phone the "BMW ULF" (or something like that) should show up. Click connect and then enter the four digit passkey written on the side of the ULF module (yes, at this point I jumped out of the car and raced around to the boot to read if off the ULF module).
At this point the bluetooth system will probably transfer the phonebook to the ULF. Mine seemed to lock up, however switching the ignition off and back on again set it right.
Now it's time to pack up and clean up.
Mount ULF to bulkhead
The ULF doesn't come with any mounting screws. I used some 5mm metric (M5) phillips head screws, nuts and star washers (to prevent things from rattling loose) on the three ULF mounting points to fix it to the ULF bracket. The bracket is then fixed back onto the bulkhead using its nuts and an 8mm socket (with extension). Make sure that all of the wires are kept tidy.
I just used a bit of double sided tape to fix the bluetooth antenna to the left side of the centre compartment boxes.

The carpet is all put back in the reverse order of removing it. Pretty simple - just be careful with that roof tray floor sensor.
Operation
I'm not going to describe how to operate the bluetooth here. Instead I'll just link to the BMW manual in PDF (at E38.org): http://www.e38.org/ULFOwnerManual.pdf
Voice Recognition
Again, here's a manual link: http://www.e38.org/BMW-03_00-Voice-Control-en.pdf
Conclusion
I'm still getting the hang of the voice command system (I think it struggles with my Australian accent - the voice is an English accent), but the bluetooth operation thus far has been fantastic. The sound quality is excellent - I keep getting into the Zed to make phone calls (mainly for the novelty!). For reference, my phone is a new Samsung Galaxy S II, running Android 2.3.3. I know this is probably ultimately no better than an aftermarket bluetooth solution (like a Parrot), however I just love having OEM stuff, since it integrates so seamlessly. I was initially worried that the Gateway 300 might compete with the ULF for the display, but the two cooperate perfectly: obviously the head unit knows when it should be displaying phone messages rather than track info.
Wow this has become quite an epic post! I'll set a reply alert for this thread so if anybody has a question please don't hesitate to ask and I'll reply in thread.
I want to take this opportunity to extend a big thanks to cj10jeeper and srhutch for their help and advice prior to the project. Oh and if you stuff up its not my fault!
Zac
Well since the forum was so helpful in the investigations leading up to my going ahead with this, I decided it was only fair that I document the process and share
So several weeks back I was investigating the installation of a Multifunction Steering Wheel upgrade kit when I discovered that the buttons also include phone and voice recognition control. Now although I'm not a big gadget junkie, I am a car tinkering junkie and the thought of adding OEM bluetooth and voice recognition really captured my attention. A peek under the boot trim revealed that my car was in fact pre-wired for phone - all I had to do was add the necessary components. Here's where I'll start my How-To!
Preliminary Work
Like I said, I only went ahead with this because the car was pre-wired for phone - it would otherwise have been a pretty massive headache to do this. I initially suspected that the car was pre-wired because I had the rectangular bulge on the left hand side of the bulkhead in the boot. From what I've read this should be a pretty good indication, however I still highly recommend taking a peek under it to confirm that the connectors are there before taking the plunge. I also confirmed that the wiring for the microphone was present (next to the overhead lamp in the cabin - remove the light panel to check) before proceeding.
My Car
Just to be clear: my car is a September 03, E85 2.5i in Australia. My hunch is that Australian cars, like US cars, all come pre-wired for phone, however this is yet to be confirmed. Some will be interested to know that I have a Dension Gateway 300 installed, which has not caused any compatibility issues with the bluetooth.
Parts Sourcing
I did a bit of research and Googling which led me to understand that I needed three components to get me going:
- ULF module (the electronic controller)
- Microphone
- Bluetooth antenna
Now initially I had planned to source a secondhand ULF module. This complicates things however: there are actually 13 major revisions of the ULF. Although they are all compatible with the car, apparently only the later 10 generations have voice control and for maximum compatibility with the maximum number of phones you want as late a generation ULF as possible. Some say greater than Gen 7 is best. Bimmernav has a lot of information on the different modules and their corresponding part numbers, although note that they say you can only order a 1st gen unit, which isn't true.
Secondhand ULFs (even very early generation ones) are generally listed with pretty high prices on eBay. So much so in fact that I decided it would be justified spending a little more to get a brand new 13th gen unit. Actually, even the microphone and bluetooth antenna were pretty expensive on eBay so I bought them new too. I used my new favourite parts supplier theBMWpartStore and got a really good deal. Because I also bought the MFSW retrofit kit at the same time Mike gave me a further discount and I ended up paying around US$450 for the ULF (not bad considering the BMW list price is $800!).
So the final parts list was:
84316938762 Hands free microphone
84506928461 Bluetooth Antenna
84109154358 13th Gen ULF module
Obviously you also need the mutifunction wheel...
Microphones
Since my Zed is an earlier model, the microphone is mounted at the top of the windscreen next to the interior lights. Later E85s (and as far as I know all E86s) have the microphone mounted on top of the steering column. This apparently gives better performance (especially with the top down), however I wasn't keen on rerouting the microphone wiring so decided to run with the default overhead location. I can always upgrade later if I feel it necessary.
I should also point out that the microphone itself received an upgrade at some point for better noise cancellation. The part number I quoted above (84316938762) is the later (newer) part. For reference, the part number for the old microphone is 84 31 8 380 319 and apparently the back of it is green.
Installation Procedure
So you've got your new parts in your sweaty little hands and are ready to install? Here's how I went about it! Actually, most of this is covered by the instructions on the Bimmernav site, I just wanted to include my own version here. Having two versions helps, as they generally include instructions that the other doesn't
Bulkhead Access
OK so we need to access the ULF mounting location on the rear of the bulkhead. I followed the instructions from my TIS, however they were for the complete removal of the bulkhead rear carpet, which entails a lot more work than we require. We just want to undo the bottom half of the carpet so that we can lift it up out of the way:
First remove the floor carpet:
Now unscrew and disconnect the roof tray floor sensor. Other instructions (including the TIS) specify removal of the tray floor first, however if you're careful you can remove the sensor without that extra effort.
Now separate the screw clips and lift up the carpet. I wedged it up using an appropriately sized skinny cardboard box.
And that brings use to here (although I had already removed the ULF mounting bracket and installed the ULF in this photo):
The ULF is pretty simple to install: it has a multipin socket on one end and a coaxial antenna socket on the other. The corresponding plugs are connected and you're good to go! I didn't disconnect the battery for this, however it's probably a good idea to. I'm an electronic engineer so I tend to take more calculated risks with stuff like that
Here's the ULF installed. The multipin connector is on the end opposite the coaxial connector. Note also that I've installed the bluetooth antenna onto the coaxial cable that is taped away underneath the centre console boxes. There's only the one matching connector in there so it's pretty hard to stuff up!
Now we need to install the pairing button into the "eject box" connector. My car has storage compartments behind the seats rather than subwoofers (from the premium sound package), but regardless of what's there the easiest way to access the eject box connector is by pulling out the right hand side compartment. You just kind of grab it and pull forward and it pops out, leaving you with this:
Note that next to the eject box connector is another coaxial connector. This is for the antenna connection that a phone snap in adaptor would provide to the eject box, but is of no use to us, so ignore it. It's the opposite polarity to the Bluetooth antenna connection, so you definitely can't get the two confused!
The eject box connector is fixed to a little bracket. To remove it, simply rotate about 30 degrees and it will then pull up and off the bracket.
Segue: Eject Boxes
You know how the door of the centre compartment has a big empty spot in the middle? This is designed to have an "eject box" mounted. The eject box is kind of like a mounting plate into which a "snap in adaptor" would fit. The "snap in adaptor" is a special piece specific to a single phone model (so there are a bunch of different ones) which allows a phone to be charged, have an external antenna (for better reception) and provide hardwired connections for phone control.
The eject box also features an important function of the bluetooth system: a pairing button. It's through this button that the car bluetooth system is entered into pairing mode.
Now with regards to the pairing button you have two options: fork out $75 (from theBMWPartsStore; nearly double that from Bimmernav) or (assuming you have some basic soldering skills) make one yourself. While $75 isn't going to break the bank, it's a bit crazy spending that much for the whole eject box when all you need is one tiny button. Although the OEM aficionados will be happy to pay it (don't be surprised if I end up picking one up for my install). Oh for reference, the eject box is part number 84109168940.
Back to Work: Pairing Button
For the time being (until I source a suitable button to use or decide to fork out for the eject box) I have installed a temporary DIY pairing button. It doesn't exactly have to be heavy duty as if all goes well you won't actually operate it again!
I soldered a pair of thin wires to the switch on and ran the cables iunderneath one of the boxes in the centre storage compartment. I know it looks pretty average, but like I said its just temporary. And being such a tiny button it's fairly inconspicuous.
The pairing button connects between pins 1 and 2 of the eject box connector. Since BMW's engineers are so awesome and decided to use nice, standard pin pitches on their connectors, we can use a standard, run of the mill, 2-way 0.1" (2.54mm) pitch locking header plug. I just grabbed one I had lying around, but most electronics (as in electronic components) shops should have them. Here's a link to one from an Australian supplier - cheap as chips!
One side of the plug has a pair of aligning keys on it - I simply trimmed them off with a knife. Looking inside the eject box connector you can see pins 1, 9, 10 and 18 labelled. You want to plug onto pins 1 and 2:
Install the microphone (this step is so simple I didn't take a photo). The connector only plugs onto the microphone one way, and the microphone only clips into the panel one way (arrow pointing forward IIRC). The microphone is directional so it would be a bit useless if it was pointing the wrong direction!
Testing
It's now time to test everything!
Make sure you have your phone handy, with bluetooth switched on. Oh and reconnect the battery if necessary. To put the car into pairing mode follow this procedure:
1. Put your keys into the ignition but don't turn anything on.
2. Press and hold on the pairing button
3. About 2 seconds later turn the keys to the first position (accessory) so that the head unit turns on
4. Continue holding the pairing button on for another 3 seconds, then release it
The head unit display should now display "BT PAIRING" and if you scan for bluetoth devices with your phone the "BMW ULF" (or something like that) should show up. Click connect and then enter the four digit passkey written on the side of the ULF module (yes, at this point I jumped out of the car and raced around to the boot to read if off the ULF module).
At this point the bluetooth system will probably transfer the phonebook to the ULF. Mine seemed to lock up, however switching the ignition off and back on again set it right.
Now it's time to pack up and clean up.
Mount ULF to bulkhead
The ULF doesn't come with any mounting screws. I used some 5mm metric (M5) phillips head screws, nuts and star washers (to prevent things from rattling loose) on the three ULF mounting points to fix it to the ULF bracket. The bracket is then fixed back onto the bulkhead using its nuts and an 8mm socket (with extension). Make sure that all of the wires are kept tidy.
I just used a bit of double sided tape to fix the bluetooth antenna to the left side of the centre compartment boxes.
The carpet is all put back in the reverse order of removing it. Pretty simple - just be careful with that roof tray floor sensor.
Operation
I'm not going to describe how to operate the bluetooth here. Instead I'll just link to the BMW manual in PDF (at E38.org): http://www.e38.org/ULFOwnerManual.pdf
Voice Recognition
Again, here's a manual link: http://www.e38.org/BMW-03_00-Voice-Control-en.pdf
Conclusion
I'm still getting the hang of the voice command system (I think it struggles with my Australian accent - the voice is an English accent), but the bluetooth operation thus far has been fantastic. The sound quality is excellent - I keep getting into the Zed to make phone calls (mainly for the novelty!). For reference, my phone is a new Samsung Galaxy S II, running Android 2.3.3. I know this is probably ultimately no better than an aftermarket bluetooth solution (like a Parrot), however I just love having OEM stuff, since it integrates so seamlessly. I was initially worried that the Gateway 300 might compete with the ULF for the display, but the two cooperate perfectly: obviously the head unit knows when it should be displaying phone messages rather than track info.
Wow this has become quite an epic post! I'll set a reply alert for this thread so if anybody has a question please don't hesitate to ask and I'll reply in thread.
I want to take this opportunity to extend a big thanks to cj10jeeper and srhutch for their help and advice prior to the project. Oh and if you stuff up its not my fault!
Zac
