Not joined yet? Register for free and enjoy features such as alerts, private messaging and viewing latest posts and topics.

Seats: occupancy sensor transplant and leather repair

2003 - 2009, roadster, coupe, facelift
User avatar
PawnSacrifice
Lifer
Lifer
Posts: 3192
Joined: Wed Sep 30, 2009 9:21 pm
Location: South Oxfordshire

Seats: occupancy sensor transplant and leather repair

Post by PawnSacrifice » Sun Dec 19, 2010 10:36 am

I think this may be one of my longest write ups for something very few people will ever need! But I'm quite please with the job and wanted to share it.

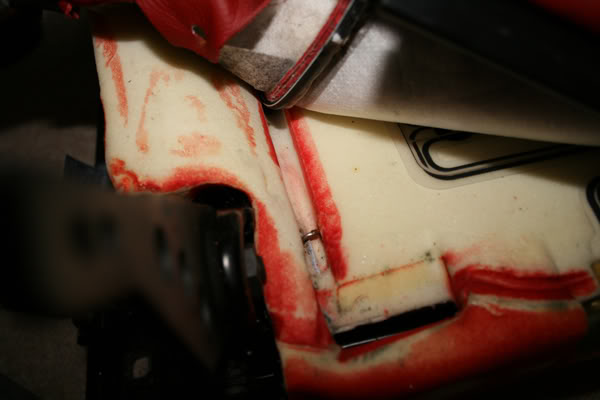
Although not original work, the hot air gunning of the seats was done without any real instruction so treat with caution! Also, be very careful if using on the door card - I damaged mine slightly.

For the easily bored / iPod generation the video is a few posts down.

Background

At the end of last month JonW kindly posted a link for some seats on eBay - they didn't look great so most gave them a wide berth...
Heads up Msport seats & trims on Ebay

So I got them! Thanks JonW!

Image
For the more pedantic among you, the seats are the wrong way around on purpose - to keep the back rests closer together, was planning a tighter shot.

They turned up a little while later and weren't as bad as they seemed, but not great. Baggy leather and some marks. I think they were from a crashed car and had been standing for a while.

Given the condition I thought I'd bought pre-facelift seats, I checked with the seller and they were actually from a coupe. I had read that this meant the occupancy sensors were not compatible from one type to the next, the options being buy a bypass kit from eBay, this tells the car the seat is unoccupied. The second option was to swap the occupancy sensor over this is only on the passenger seat, the driver's seat is plug and play - thanks dellboy for confirming that for me!

I got some quotes to get this done professionally, the quote that came back was £120, although I found more marks as I cleaned the seats initially so I could see that going up! The kit I used, from Furniture Clinic was £60. Interestingly / worryingly, of the two people that got back to me both said they could do nothing about the baggy leather.

Tasks
1. Swap the occupancy sensor
2. Tighten the leather
3. Clean the leather

This is quite a big job - for lighter work see Leather Seat Restore (scuffs and scratches)

To get the old seats out of the car read Shipkiller's How To...
How to Remove your Seats...
Last edited by PawnSacrifice on Mon Dec 20, 2010 1:00 pm, edited 1 time in total.
2003 2.5i. Info: Winter Tyres | PDF Manuals, Retrofit Instructions and Links | Modifications | YouTube | #Project924

Hey, wet-pants! This isn't the Womens Auxiliary Balloon Corps.

User avatar
PawnSacrifice
Lifer
Lifer
Posts: 3192
Joined: Wed Sep 30, 2009 9:21 pm
Location: South Oxfordshire

Re: Seats: occupancy sensor transplant and leather repair

Post by PawnSacrifice » Sun Dec 19, 2010 10:36 am

Swapping the occupancy sensor

The big issue with swapping the occupancy sensor, despite being a fiddly job, was the difference in shape between the standard and sport seats.

First job was to remove the seat cover and occupancy sensor from the sport seat.

On the sport side this is the bottom of the seat:
Image
The grey cable running up from bottom in the centre of the seat is for the occupancy sensor.

Remove the sensor cable from the power block - this is designed to slide apart to get the cable out, shown here:
Image

To remove the seat cover, pull off all the way around the base and then set about undoing the metal clips:
Image
These are tricky as they will be mostly buried in the foam seat. I used needle nose pliers to turn around so the ends were visible. I then inserted the end of the pliers into the ring and used them to open the ring up and unclip.

Under the seams of the cover are metal rails which are fastened to the base.
Image
Start at the front, work back and try not to swear too much. Lost of patience required!

Seat cover off (well as much as required) and you have the pesky sensor:
Image

Now the donor, from the standard seat.

This is the underside of the standard seat. This time the cable is black and there is a black box in there as well (from what Chris said you need this for the eBay bypass option).
Image

Again, remove the cable from the power block:
Image

Open the seat up and you have the sensor:
Image
The main section is a lot bigger than on the sport seat.

Once out I laid the standard occupancy sensor over the one for the sport seat:
Image
The problem is the channel along the centre of the seat. To allow for the channel the sensor should have a gap which is folder underneath. Putting the standard sensor in would have, IMO, put the sensor pads tight up against the section that sits in the channel - I was worried it would set it off.

To get around this I sunk the sensors closest to the channel into the seat foam, at an angle - so that the plastic comes out at the bottom of the channel.
Image

Here you can see where the sensor is buried in the foam above and below the channel (red line), probably set seen if you compare to the original pictures above.
Image

The sensor is glued, at points, to the foam. Frankly it would probably hold in place, but to be sure I put masking tape to hold it in place - and also to cover the cuts in the foam that I'd made to sink the sensor:
Image

The cover goes back on the seat and the final job is the black box that wasn't present on the sport setup. I theory I could have left this hanging under the seat but was slight concerned it would be a snagging point. Using my little Dremel type tool I drilled small slots in a bracket on the top of the box. To secure it I threaded a small cable tie through the hole:
Image

This was then attached to the rail at the back of the seat:
Image

I tested the seat base in the car - (tip) I had removed the seat back previously and left it off as it's far easier getting the seat in and out. When I turned on the ignition the airbag light went out okay. Driving off there was no false alarm. I then put a tool box on the seat and the seat belt warning sounded.

Job done.
2003 2.5i. Info: Winter Tyres | PDF Manuals, Retrofit Instructions and Links | Modifications | YouTube | #Project924

Hey, wet-pants! This isn't the Womens Auxiliary Balloon Corps.

User avatar
PawnSacrifice
Lifer
Lifer
Posts: 3192
Joined: Wed Sep 30, 2009 9:21 pm
Location: South Oxfordshire

Re: Seats: occupancy sensor transplant and leather repair

Post by PawnSacrifice » Sun Dec 19, 2010 10:37 am

Tighten the leather
Again, thanks to the forum… playalistic said he had heard that the leather could be tightened with a hot air gun! This was backed up by Daffy who had use a hairdryer on his. Oddly there wasn't a lot on the web, other than a post by steveG2 on DW.

Knowing that JonW had a spare set of covers I decided to go for it. I used a hot air gun on the low setting. Working on a section at a time I moved the air gun over the leather. Slowly it began to re-take its original shape. You have to keep the air gun moving or the leather can burn. The big problem though is becoming obsessed with getting them perfectly tight - I saw pics of others' seats and realised it will rarely be completely flat.

That's about all there is to it. If you're curious I there is some video at the start of the YouTube clip below.


Clean the leather

There is all manner of wisdom on the web as to what to use to remove marks from leather. I tried a Dove Moisturising soap, a few different leather cleaners including Gliptone, diluted APC and even covering them with the ScuffMaster dye. None worked. I phoned for a few quotes and came across Furniture Clinic, they no longer had anyone in the area but could sell me what I needed to clean the seats. They didn't have BMW Dream Red on file so I had to send them a small sample to match the colour and finish.

First I gave the seats a clean with the Furniture Clinic (FC) Ultra Clean, one of their general cleaners. The seats are then cleaned with Leather Prep, this removes the factory sealant - the method is worth mentioning. It's done with a scouring pad (supplied), but rather than applying the Leather Prep to the pad it is soaked into a cotton wool ball which the pad is then folder over, it release the liquid really well. You can see here how much colour it's removing too:
Image

Next the seats are cleaned with a FC Alcohol Cleaner - removing silicones and waxes soluble in alcohol (the Leather Prep gets those soluble in solvents).
Image

Leave for an hour for the alcohol to evaporate. Time well spent masking up the seat:
Image
Not sure how well it shows, but I put foam through the bottom hole for the backrests and then sat the backrests on it - it holds them nicely above the base of the seat.

Seat was then transferred to the ensuite which had been converted into a spray booth with the use of a £2 pack of 2 dust sheets, from Tesco. an old sheet on the floor.
Image

Next, spraying. This is demonstrated in the YouTube video, but simply:
Use the colorant (colour matched!) and apply with a sponge to the entire seat - this forms the base layer. I did 3 coats Then it's ready for spraying.

The FC kit includes an airbrush and two canisters of propellant. Spray the seats a section at a time with thin layers. Dry with a hairdryer after each You can leave to air dry but this takes longer. I put one coat over the entire seat and then focussed on the areas that needed it. Once that's done wait for an hour. Wash out the airbrush with water.

Sealing. This replaces the factory seal that was remove at the start. A gloss is applied first, this is the strongest finish and goes on whatever the end result. Then move onto the final finish, determined from the sample sent it, mine was semi-matt. A few coats and done. Use the hairdryer as before.

This was my end result:
Image
Am happy! I think I could have done a slightly better job on the sealant, but I need to leave a week before using the FC Leather Conditioner. Will see what that leaves it like.

Again, for comparison, this is what I started with:
Image
2003 2.5i. Info: Winter Tyres | PDF Manuals, Retrofit Instructions and Links | Modifications | YouTube | #Project924

Hey, wet-pants! This isn't the Womens Auxiliary Balloon Corps.

User avatar
PawnSacrifice
Lifer
Lifer
Posts: 3192
Joined: Wed Sep 30, 2009 9:21 pm
Location: South Oxfordshire

Re: Seats: occupancy sensor transplant and leather repair

Post by PawnSacrifice » Sun Dec 19, 2010 10:38 am

The Video - air gunning and air brushing

Most of you won't be too surprised to know I made a video (even before the references above). It show what can be done with the air gun and the spraying process. Enjoy.

2003 2.5i. Info: Winter Tyres | PDF Manuals, Retrofit Instructions and Links | Modifications | YouTube | #Project924

Hey, wet-pants! This isn't the Womens Auxiliary Balloon Corps.

User avatar
playalistic
Senior Member
Senior Member
Posts: 2423
Joined: Mon May 03, 2010 11:08 am
Location: Reading

Re: Seats: occupancy sensor transplant and leather repair

Post by playalistic » Sun Dec 19, 2010 11:12 am

They look good as new, top work and great write up :thumbsup:

User avatar
cj10jeeper
Lifer
Lifer
Posts: 17846
Joined: Fri Jun 22, 2007 11:50 am
Location: Lichfield, England

Re: Seats: occupancy sensor transplant and leather repair

Post by cj10jeeper » Sun Dec 19, 2010 11:27 am

Great work and excellent write up.
Never heard of the heat method to shrink leather back to shape, so you learn something new every day :thumbsup:

I guarantee you won't be disappointed once you get them in the car and see the colour and feel of them when driving
Jaguar F-Type 3.0 Supercharged V6 S, Stratus Grey, LSD, Active Exhaust, CF wheels, Performance brakes, Sports seats and mods ongoing
Gone but not forgotten Z4 3.0i SE Roadster ///M front, Red ///M leather seats, Aero sills

User avatar
paddy wright
Lifer
Lifer
Posts: 7664
Joined: Sun Jan 06, 2008 1:00 pm
Location: south yorkshire

Re: Seats: occupancy sensor transplant and leather repair

Post by paddy wright » Sun Dec 19, 2010 11:59 am

Looks great- amazing job- weren't u tempted to add seat heating while the leather was off?
Z4 2.2 sterling grey,Msport seats,retrofit cupholders,cruise,footwell lights,sound gen and mfsw,18"ellipsoids,xenons+light washers,ZHPknob,folding mirrors,3"stubby,update wheel caps,gateway300 ipod, wind deflector to keep the wife happy!

User avatar
flimper
Lifer
Lifer
Posts: 4591
Joined: Wed Jan 21, 2009 11:47 pm
Location: Hampshire

Re: Seats: occupancy sensor transplant and leather repair

Post by flimper » Sun Dec 19, 2010 12:05 pm

Good job :thumbsup:
Piano black & black extended leather. Power mirrors, tinted glass, PDC, Prof hi-fi, CD, retro-fit cruise

Darren M
Senior Member
Senior Member
Posts: 1028
Joined: Sun Dec 16, 2007 8:14 pm
Location: Devon

Re: Seats: occupancy sensor transplant and leather repair

Post by Darren M » Sun Dec 19, 2010 12:25 pm

Fantastic write up and end result, well done :)
Current 2011 X1 2.0d xDrive
2006 Z4 M Coupe Interlagos with Light Sepang interior - GONE 08/2012 - PY56 GH* - where now?
2006 Z4 Si Coupe - Montego blue - GONE approx 05/2009 - WJ56 YU* - where now?

User avatar
srhutch
Moderator
Moderator
Posts: 26959
Joined: Tue Jun 19, 2007 1:22 pm
Location: East Sussex, UK
Contact:

Re: Seats: occupancy sensor transplant and leather repair

Post by srhutch » Sun Dec 19, 2010 12:47 pm

Excellent Job Matt :thumbsup:
Image

User avatar
ga41
Senior Member
Senior Member
Posts: 2898
Joined: Sun Feb 03, 2008 5:38 am
Location: Paphos

Re: Seats: occupancy sensor transplant and leather repair

Post by ga41 » Sun Dec 19, 2010 12:58 pm

Nice how-to matey. Will definitely be useful. :thumbsup:
-- http://www.freerice.com/ For each answer you get right, they will donate 10 grains of rice to the United Nations World Food Program --
Image

User avatar
PawnSacrifice
Lifer
Lifer
Posts: 3192
Joined: Wed Sep 30, 2009 9:21 pm
Location: South Oxfordshire

Re: Seats: occupancy sensor transplant and leather repair

Post by PawnSacrifice » Sun Dec 19, 2010 1:27 pm

Thanks for the kind comments guys!
paddy wright wrote:Looks great- amazing job- weren't u tempted to add seat heating while the leather was off?
This is something that I was going to do. I went onto BMMiniParts and they had a set of heating pads for the M Sport seats, which I ordered immediately! They are the only seat heating option listed for the M Sport seats (Joe at Soper's couldn't find anything either), and they only heat the bolsters. Here's a pic of them on the seat:
Image

I wasn't sure if they were right, a few Tweets later and I determined they weren't - the heating should be on the seat and back.

I'd been speaking to JonW on PM about some heating pads he had, which I was going to buy. I did some research online and had come to the conclusion that they wouldn't fit, at about the same time I got a PM from Jon to say same - and that he'd rather not sell me something he didn't think would work (good man!)

I looked at aftermarket carbon kits, these weighed in at about £120. To keep it OEM I looked at the circuit diagram for the option of wiring into the BMW switches (which I had bought). Mmy findings in case anyone else want to have a try...
Sourced from the following... http://spaghetticoder.org/bmw/wds/e85/
The circuit is relatively simple:
Image

Positive and negative power and a signal from a third cable. It was this section of the diagram that I wasn't sure about.
Image
Thankfully I had some help - Z4-Beemer identified it as a rheostat while ga41 has the symbol pegged as a lower case Theta (although I wasn't able to find any more from that).

Unfortunately I couldn't get diagrams of any of the aftermarket kits. I think the power to the pads would be fine, using the BMW switch, but I was concerned about the compatibility to the rheostat. The aftermarket kits all list temperature sensors, not shown on the BMW diagram. I wasn't sure how they would play with the rheostat - what signal it would send / recieve.

If I'd been able to get a carbon kit for about £50 I would have given it a go, but £120 is a little too much. The key point was that I think I was fixating on adding aftermarket heating to the BMW switch more because it was something that hadn't been done, rather than actually wanting heated seats. While a bonus, and I am sure very good, I have never really been a fan - but then neither was A11y and he's now a good advocate.
2003 2.5i. Info: Winter Tyres | PDF Manuals, Retrofit Instructions and Links | Modifications | YouTube | #Project924

Hey, wet-pants! This isn't the Womens Auxiliary Balloon Corps.

User avatar
elliot_holder
Member
Member
Posts: 310
Joined: Sat Mar 15, 2008 10:38 am

Re: Seats: occupancy sensor transplant and leather repair

Post by elliot_holder » Sun Dec 19, 2010 2:15 pm

Phenominal work! Seats look almost new now...

And, a great write up.. :D
3.0i z4 - Prof Sat Nav,TV, //M suspension. 19'' Alpina Dynamics, Red //M sport seats, soon to be fitted Alpina front spolier.

User avatar
Z4 Beemer
Senior Member
Senior Member
Posts: 1804
Joined: Thu Sep 24, 2009 9:02 pm
Location: Glasgow

Re: Seats: occupancy sensor transplant and leather repair

Post by Z4 Beemer » Sun Dec 19, 2010 2:18 pm

That is a truly amazing transformation and amount of work! :thumbsup:

I also hadn't heard of using a heat gun to get rid of the saggy bits. Look forward to seeing them in the car, or did you buy them for your house? :P
Current: 2016 Audi S3 :: Navarra Blue
Gone: 2009 Z4 sDrive 23i :: Deep Sea Blue
Gone: 2004 Z4 2.2i SE :: Maldives Blue


Post Reply