Headlight Overhaul E85
Posted: Fri Oct 30, 2015 2:25 pm
I have written this article to assist anyone intent on overhauling the general exterior and internals of the headlight as there seems to be no subject on how the whole thing can be broken into component parts for cleaning, inspection and repair. It may also be a help should you wish to remove the OEM running light and put in an Angel Eye upgrade or update to HID if you are running the candle light option.
The headlight is quite easy to work on. Just very labour intensive getting it off the car. However it is a rewarding project to undertake as I have annotated the photographs with skitch to help identify certain parts to aid the overhaul. I hope you don’t find it too irksome.
I had a real niggling problem of the driver side headlight shaking about a little when driving and decided to overhaul the interior to see what the actual cause of the fault is and whether it can be rectified.
The best way to overhaul the part is to get it off the car, then it can be worked on a lot easier and should the plexiglass need refurbishing (which I am also doing), it can be done without harm to the surrounding paintwork.
There is another how to on this forum to remove the front bumper to access the headlights. I won’t go into that as someone else has taken the time and effort to put that “how to” together.
Because the headlight is being taken out of the car and the car was not being moved at all. I was lucky enough to have the space to mark the location of where the headlight beams fire onto a wall. noting the exact location with masking tape of where the intensity of the beam fires. this will aid on final reassembly and minor adjustment of beam patterns when fully refurbished.
I had taken a photograph of the beam pattern so I can cross reference it later on on re-assembly.
---------------------------------------------------------------------------------------------------------------------------------------------------------
TOOLS REQUIRED
Needle nose pliers & curved pair if you have them
extra long 7mm & 9mm socket, ratched and accessories
T15 Torx bit and driver
Vacuum Cleaner
(Air Compressor)
Good Quality wax
Metal Polish
Very Soft Polishing Cloths
Silicone Grease
Penetrating Lubricant
TIME
Allow a day for the job. This does not want to be rushed.
---------------------------------------------------------------------------------------------------------------------------------------------------------
Once the bumper and lights have been removed, I cleaned the outside of the whole unit carefully as it was filthy from years of being in situ, and since the internals were going to be worked on it was good practice to not cross contaminate the internal parts.
Removal of the back plate reveals the birds nest of the HID kit I fitted in a previous post as this is a standard headlight set, not the Xenon upgrade, however I suspect the internals are pretty much the same and the process of removal and refurbishment will be the same.
---------------------------------------------------------------------------------------------------------------------------------------------------------
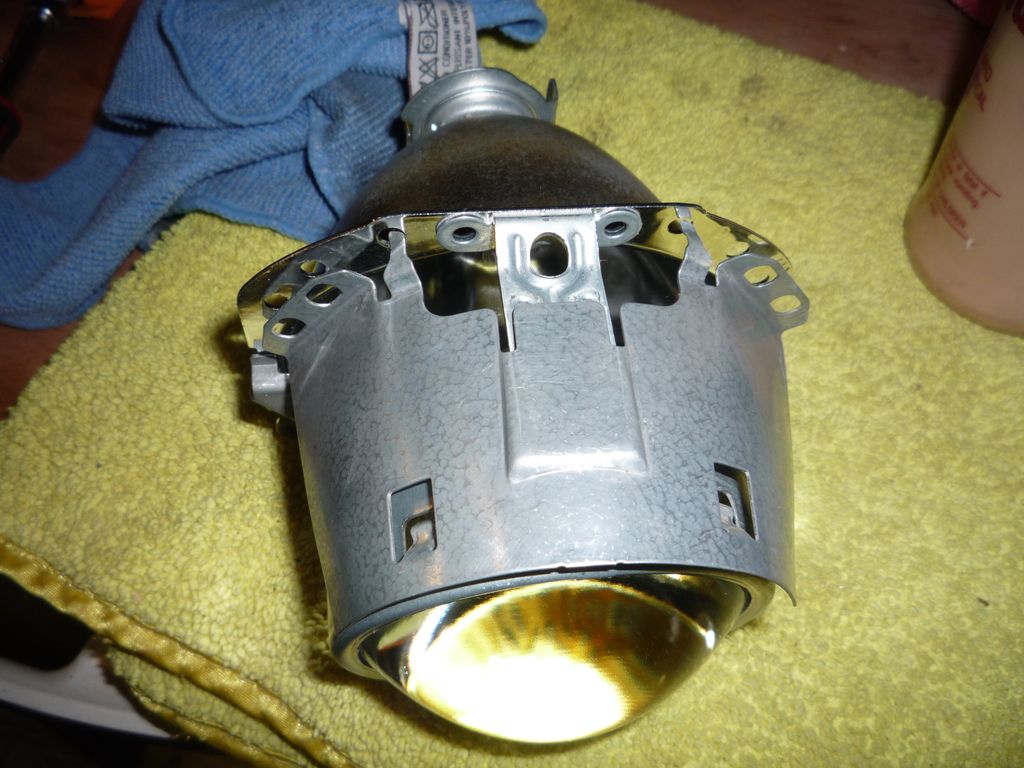
REMOVAL OF DIPPED BEAM LENS CARRIER
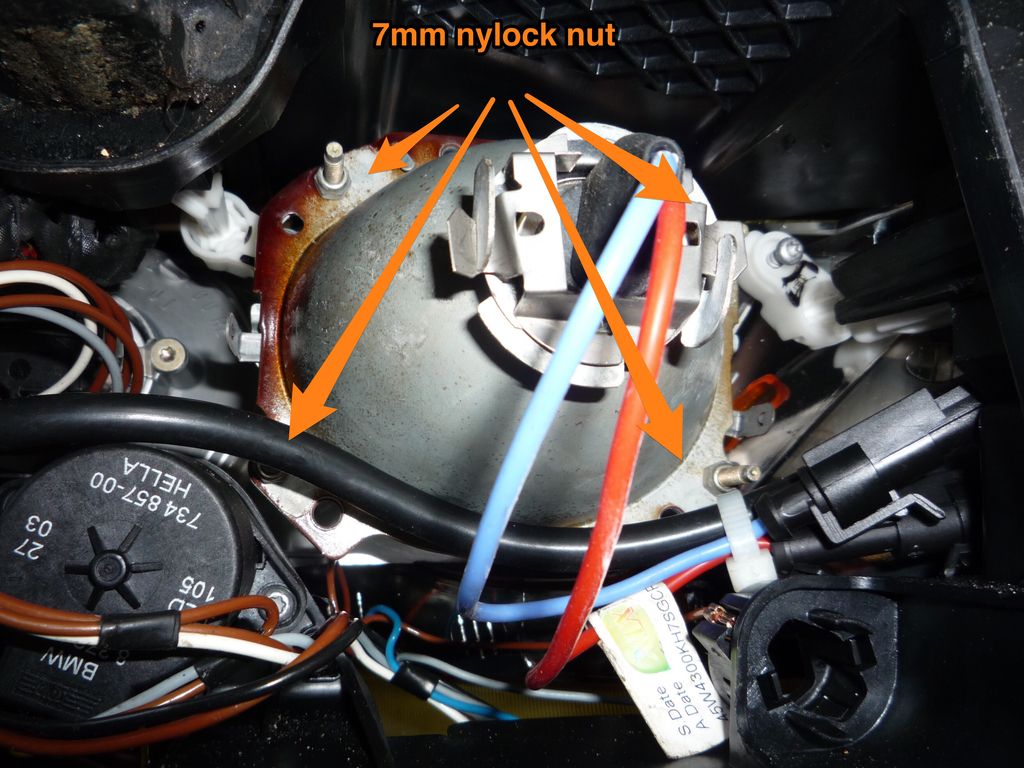
Removal of all the bulbs and the HID unit frees up space to access the 4 7mm nylock nuts that holds the dipped beam lens carrier. (Mark an arrow one side to aid orientation on re-assembly). I found on one occasion the 7mm nut undid the whole bar which screws into the main assembly (which need to be removed later on).
Now the lens is free, it can be disassembled a bit more to allow cleaning. The top cowl has 2 lugs that bend straight and slide off to get access to the reflector,the small metal beam compensation tab underneath and inside of the lens itself. The lens is held in place by an expasion spring that runs around the perimeter of the interior of the carrier. Mine was slightly loose, so I gently pushed it home and secured it with a dab of epoxy.

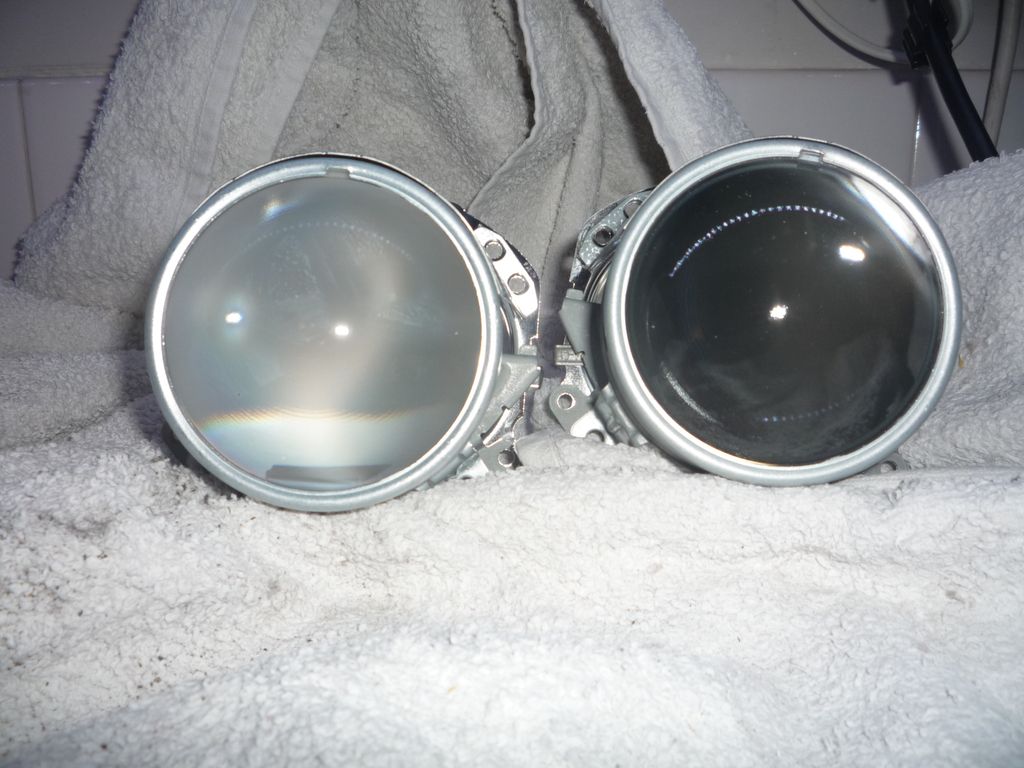
The lens was exceptionally opaque from years of heat and condensation (this headlight suffered from a bad access seal before replacement).
I polished all the interior parts and the lens with some collonite 915 wax polish to prevent clouding again in the future. Metal polish would be far too abrasive and damage the finish.
You can see the difference in the photo below.
The cowl was polished with metal polish as it had tarnished limiting the reflective quality to assist the bulb.
Reassembly of the cowl is the reverse of removal, ensuring the lip is pushed firm against the main assembly when the tabs are folded back down.
Once the lens carrier is fully assembled check to make sure the beam adjuster lever is in the correct position and place it aside for assembly later……
---------------------------------------------------------------------------------------------------------------------------------------------------------
REMOVAL OF MAIN BEAM CARRIER
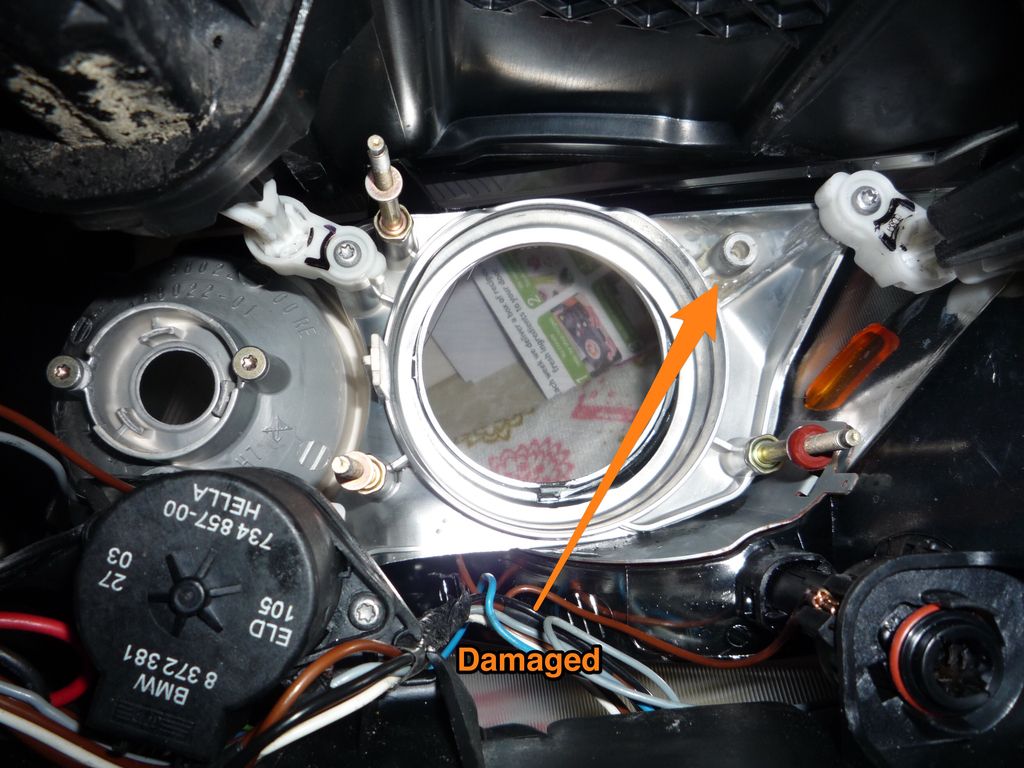
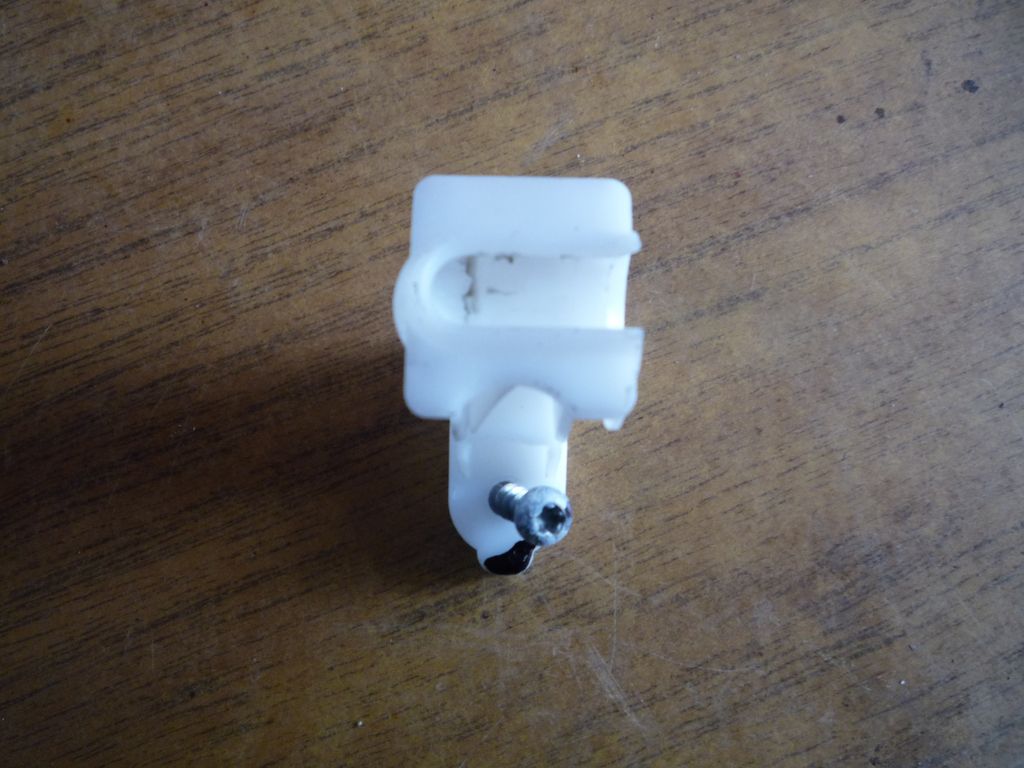
As seen from the photograph, one of the plastic lugs has broken completely. The plastic is quite brittle as it seems that it had been broken some time. I suspect this may be the source of the wobble as the bolts holding the whole assembly together were loose.
Removal is starting with a 9mm spanner, but you should be able to remove by hand as they are very loose. be sure to retain the little rubber washers as they have a habit of hiding up in the assembly.
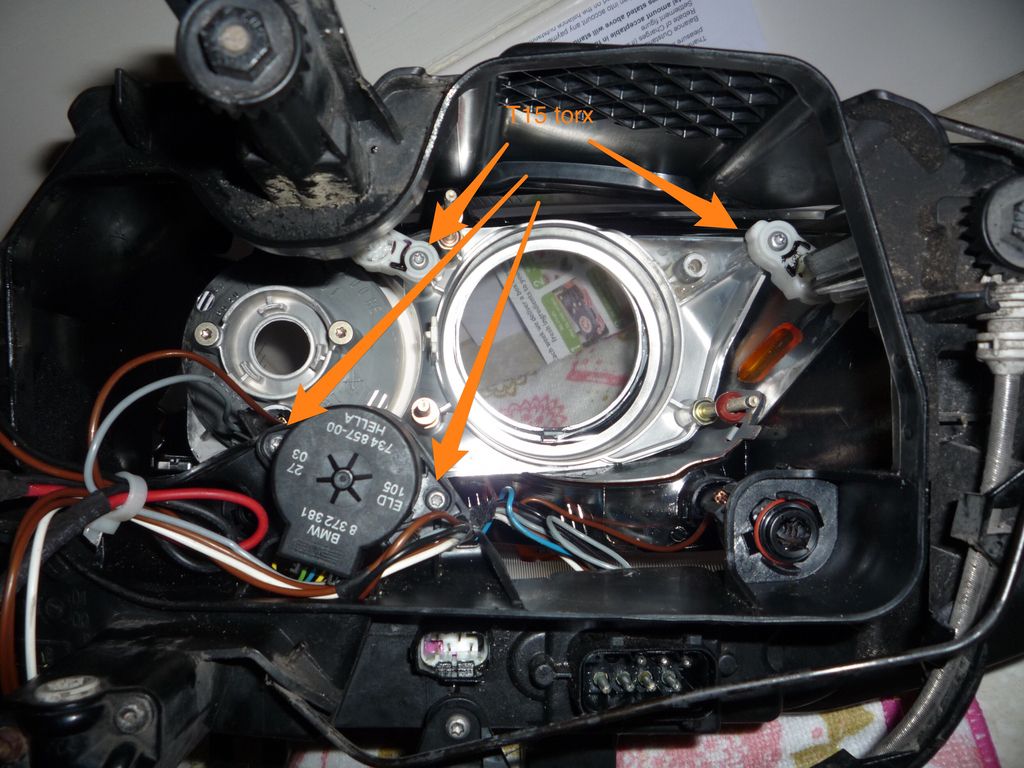
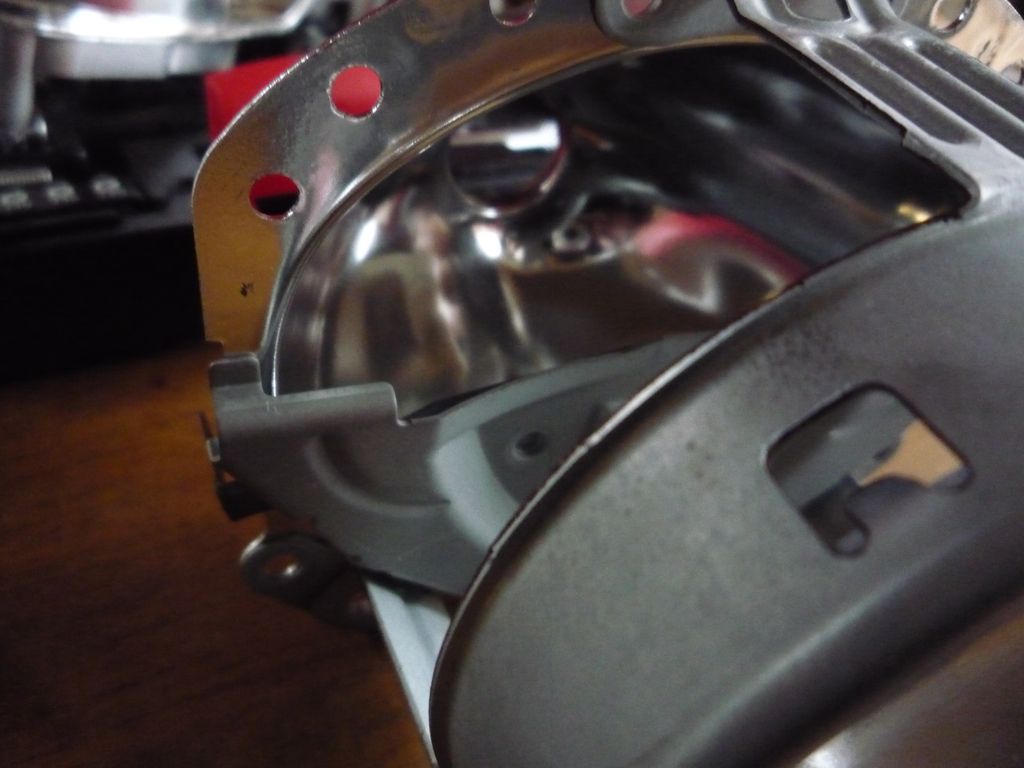
Remove the servo motor next by the 2 T15 torx screws at the front, then slide the motor sideways before withdrawing it. I left the wires connected to the main assembly and secured the motor with some tape.
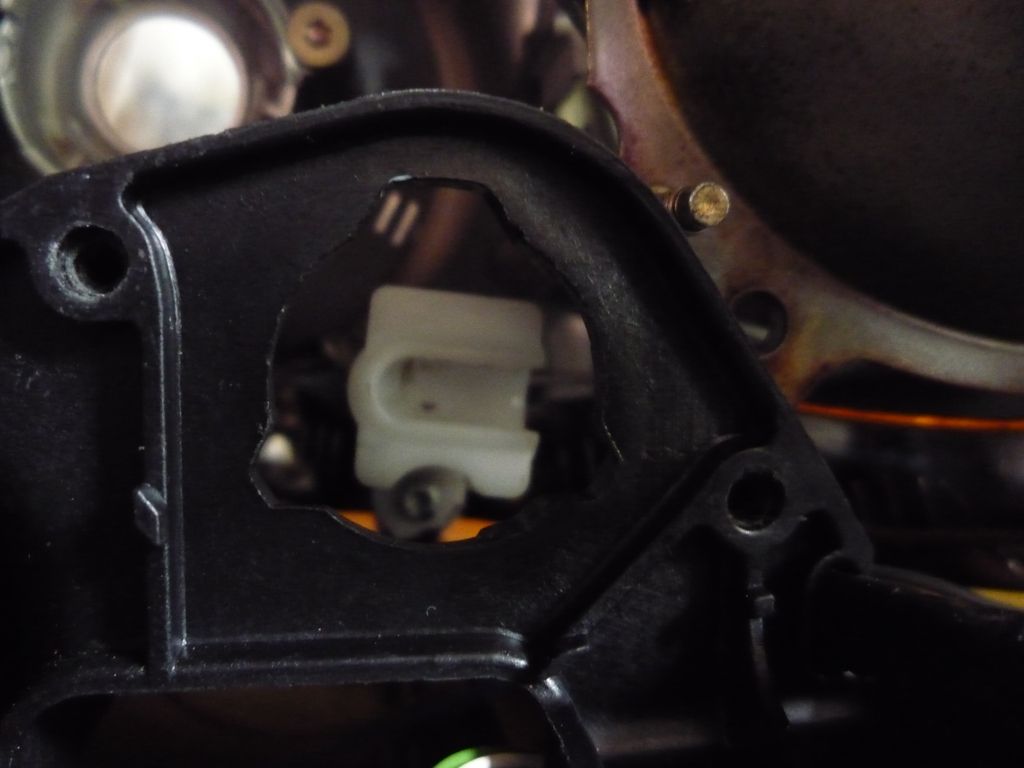
The picture above shows the joint the servo sits in. remove the joint as well with a T15 torx.
The 2 main brackets can now be undone with T15 torx and moved aside. The minor adjustment mechanism does not need to be touched which is handy as the light pattern should be exactly the same when finished.
Underneath in the headlight unit is the indicator bulbs which can be inspected and removed if necessary whilst you have the bonus of extra space.
The whole part can now be gently removed. I was extremely careful removing this part as the plastic is only chromed lightly as may scratch or come off easily.
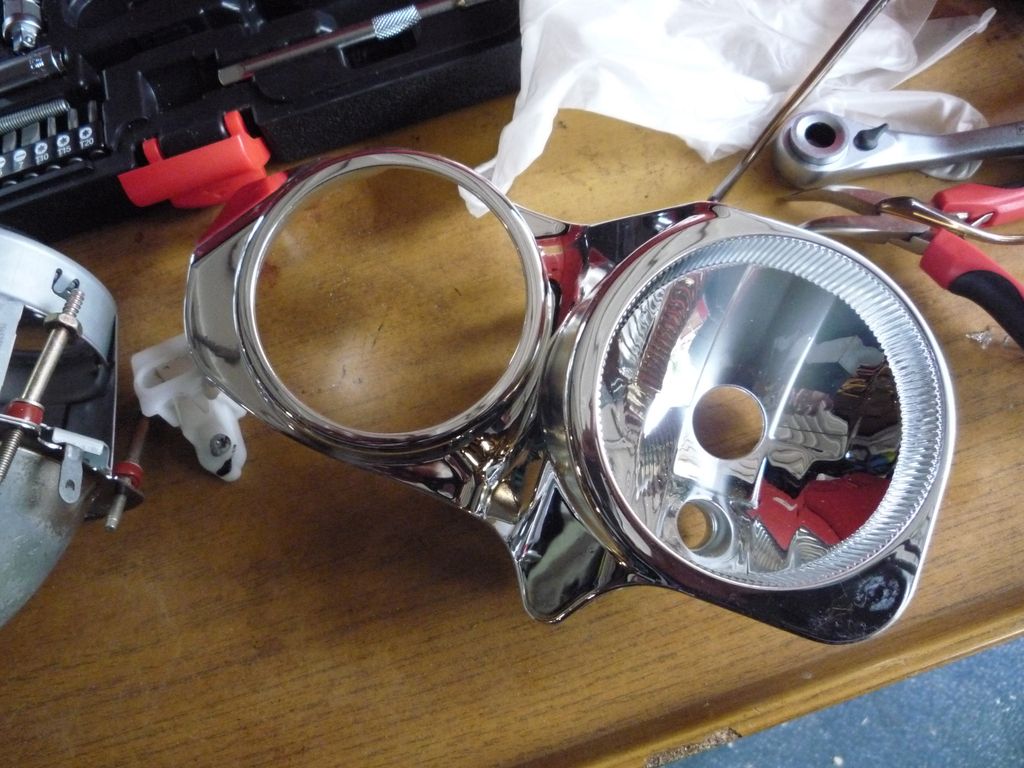
The assembly can now be gently polished and cleaned. Like I said before, it is very delicate and a rough cloth or dirt will cause scratches or lift the chrome. I used the Collinite 915 again to buff up and shine with the softest cloth I could find.
Check the mounting lugs to ensure they are not damaged. I put epoxy resin round all of mine to ensure they were sturdy for re-assembly.
This is as much of the light that can be removed without breaking the waterproof seal and pulling the plastic front off. There is a way it can be done by baking the light to free up the sealant, but I found the process far to invasive and risky to ruin the plexiglass when you can reach inside and clean the interior by hand even though this can be awkward.
I cleaned the inside of the light by a good squirt of low pressure compressed air to expell as much filth and then proceeded to clean and wax with the same cloth used for the main beam carrier. Surprisingly, it was rather dusty and a little opaque film had coated the inside. I used a long bendy pencil wrapped in masking tape to ensure no sharp edges with the cloth over the end to access and clean the interior.
This part took the longest to do as it is rather tough to get access to the edges, however the results outweigh the awkwardness and it s a job well worth doing when the whole assembly is put back together.
Reassembly is the exact reverse of the above process, so by going backwards through the writeup, you should be able to get the interior back together in 25 mins. I lubricated all the internal moving parts with silicone grease as the old grease was solid and the contact points non existent. it is good practice when reassembling to ensure it will work smoothly with the servo motor. Just be mindful that you are screwing into plastic mounts so great care must be taken not to thread or break off parts.
---------------------------------------------------------------------------------------------------------------------------------------------------------
EXTERIOR OVERLOOK AND PRE PREVENTATIVE MAINTAINANCE
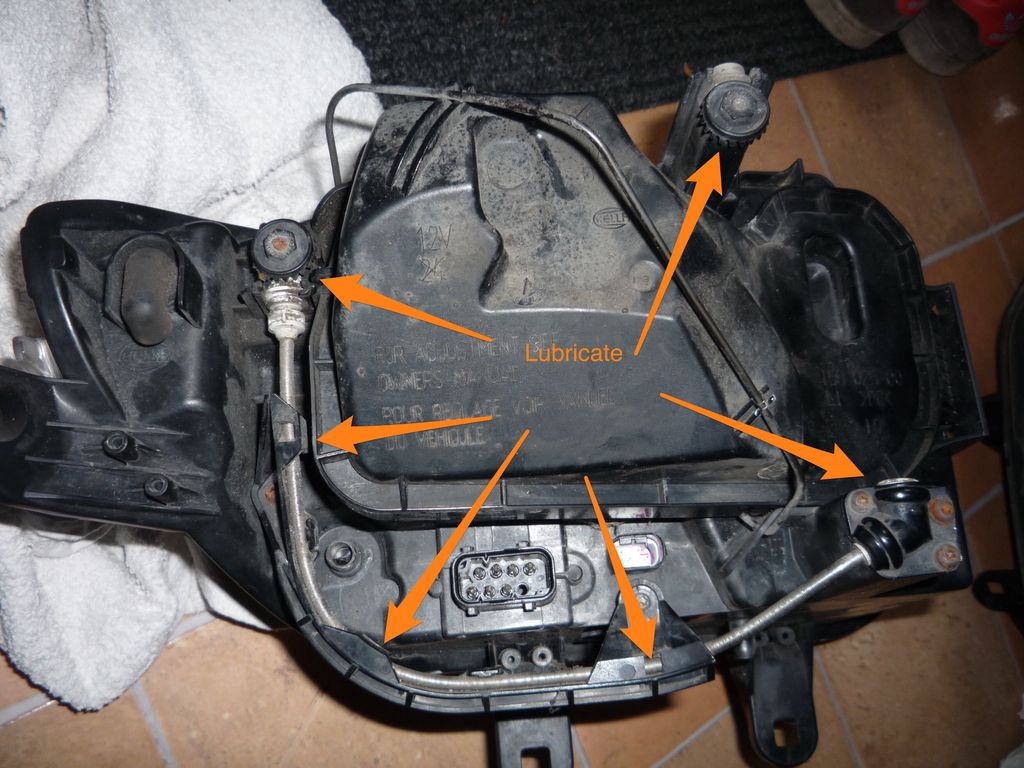
On inspection of the exterior, I noticed that the adjustment controls were filthy, had seized and needed a good clean up and lubrication. A good scrub with a toothbrush dowsed in penetrating lubricant gets to work on the parts and allowing a bit of time for it to get into the mechanism is well advised as the parts are quite flimsy and could easily be damaged if forced when adjusting the beam deflection with the allen keys as this operation is done seldom. Once serviced the parts move nice and free.
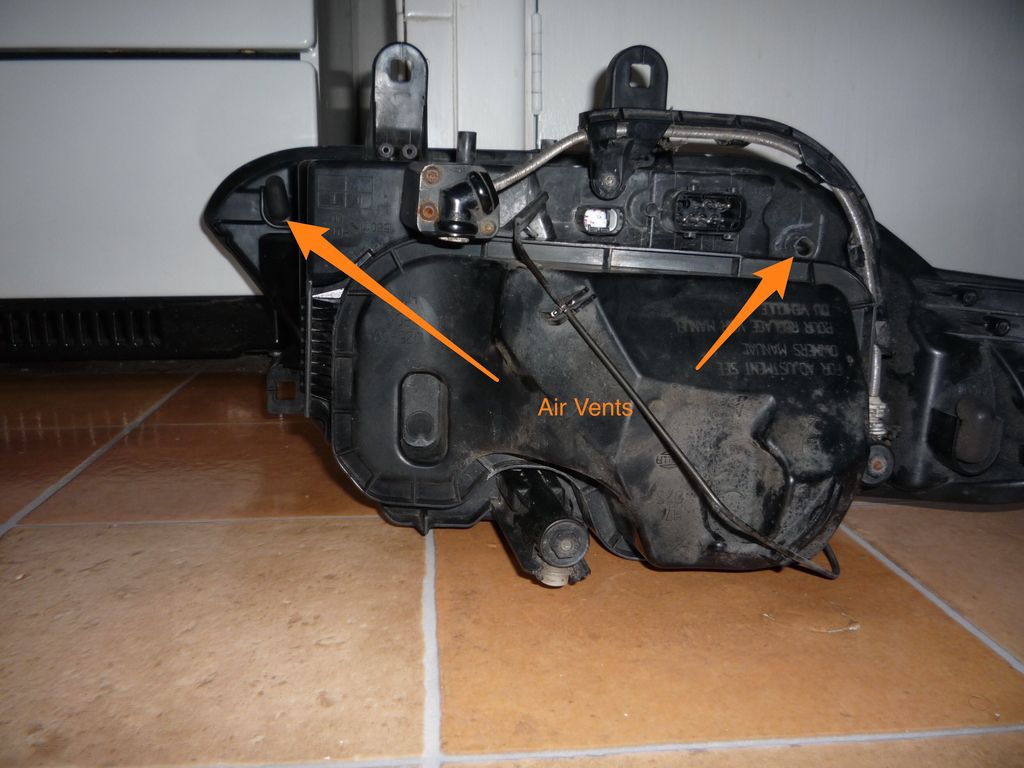
(The Light is Upside Down)
Also underneath the light itself there are two ventilation shafts which drain and allow condensation to expel. One is covered by a rubber boot, but the other is open. One of mine was blocked completely which I suspect caused the light to fill with water when combined with the bad seal on the back. Once vacuumed out there was a bit of damp on inspection, so I left the whole light in a warm place overnight to ensure it was completely dry.
The back cover which has a rubber seal in the lip which I removed and put it in quite warm water for 20 minutes to de stress and try to get some shape back into it. Once dried, I lubricated inside where the seal sits with a liberal smear of silicone grease before lubricating the seal itself with the same stuff and gently reseated it in the same position as before. Hopefully this will give a good water tight seal on the whole housing.
The whole assembly can now be re-installed back into the car and aligned with the bodywork.
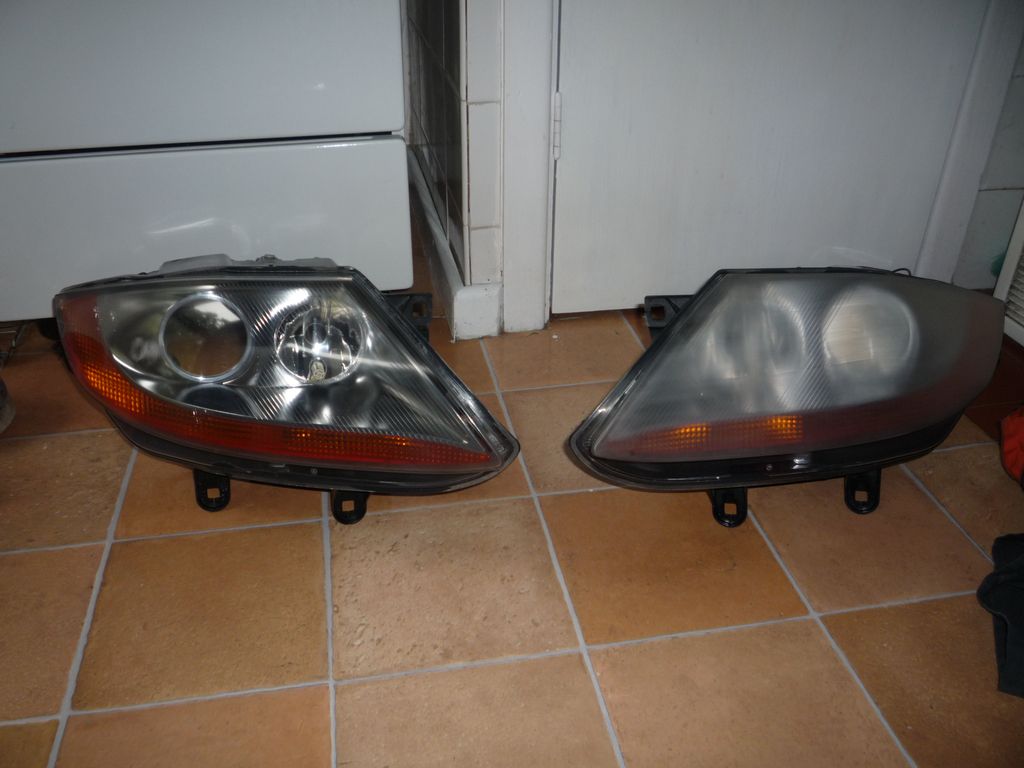
I sanded and polished the plexiglass as they had yellowed and began to get the crazed effect. Here is one final picture of the sanded light with one light after 800, 1200 grit and the other light halfway through polish with a DA machine using Eucryl smokers toothpaste (powder mixed into the correct consistency) which acts like 4000 grit before a thorough polish with a good quality car polish. It just needs sealing with a good wax.
---------------------------------------------------------------------------------------------------------------------------------------------------------
CONCLUSION
I think I have covered everything and hope this helps a lot of people out there that had headlight niggles and the photos can be used as an aid when doing the odd job as its such a tight location to work on. If anything has been missed out, feel free to add.
The headlight is quite easy to work on. Just very labour intensive getting it off the car. However it is a rewarding project to undertake as I have annotated the photographs with skitch to help identify certain parts to aid the overhaul. I hope you don’t find it too irksome.
I had a real niggling problem of the driver side headlight shaking about a little when driving and decided to overhaul the interior to see what the actual cause of the fault is and whether it can be rectified.
The best way to overhaul the part is to get it off the car, then it can be worked on a lot easier and should the plexiglass need refurbishing (which I am also doing), it can be done without harm to the surrounding paintwork.
There is another how to on this forum to remove the front bumper to access the headlights. I won’t go into that as someone else has taken the time and effort to put that “how to” together.
Because the headlight is being taken out of the car and the car was not being moved at all. I was lucky enough to have the space to mark the location of where the headlight beams fire onto a wall. noting the exact location with masking tape of where the intensity of the beam fires. this will aid on final reassembly and minor adjustment of beam patterns when fully refurbished.
I had taken a photograph of the beam pattern so I can cross reference it later on on re-assembly.
---------------------------------------------------------------------------------------------------------------------------------------------------------
TOOLS REQUIRED
Needle nose pliers & curved pair if you have them
extra long 7mm & 9mm socket, ratched and accessories
T15 Torx bit and driver
Vacuum Cleaner
(Air Compressor)
Good Quality wax
Metal Polish
Very Soft Polishing Cloths
Silicone Grease
Penetrating Lubricant
TIME
Allow a day for the job. This does not want to be rushed.
---------------------------------------------------------------------------------------------------------------------------------------------------------
Once the bumper and lights have been removed, I cleaned the outside of the whole unit carefully as it was filthy from years of being in situ, and since the internals were going to be worked on it was good practice to not cross contaminate the internal parts.
Removal of the back plate reveals the birds nest of the HID kit I fitted in a previous post as this is a standard headlight set, not the Xenon upgrade, however I suspect the internals are pretty much the same and the process of removal and refurbishment will be the same.
---------------------------------------------------------------------------------------------------------------------------------------------------------
REMOVAL OF DIPPED BEAM LENS CARRIER
Removal of all the bulbs and the HID unit frees up space to access the 4 7mm nylock nuts that holds the dipped beam lens carrier. (Mark an arrow one side to aid orientation on re-assembly). I found on one occasion the 7mm nut undid the whole bar which screws into the main assembly (which need to be removed later on).
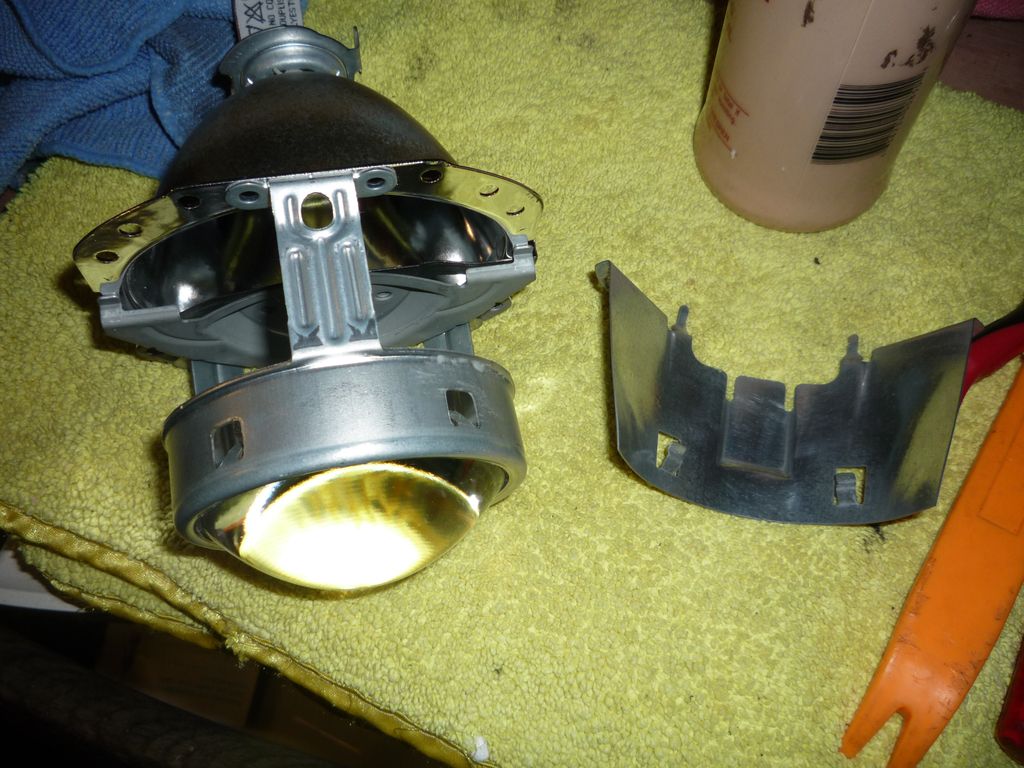
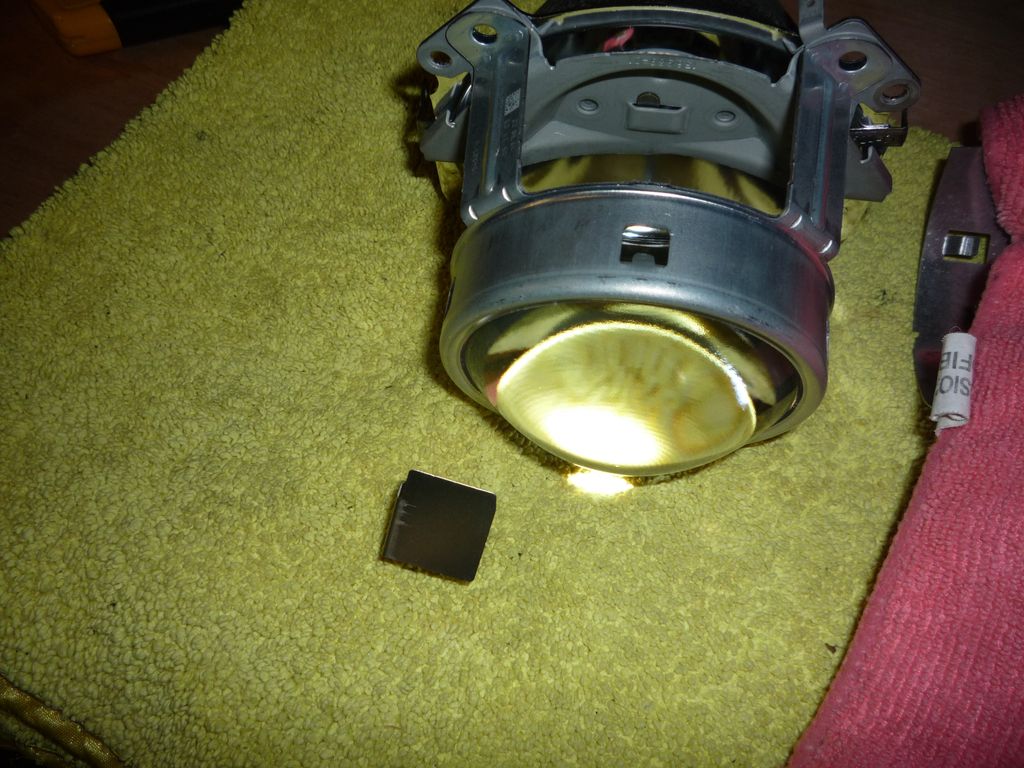
Now the lens is free, it can be disassembled a bit more to allow cleaning. The top cowl has 2 lugs that bend straight and slide off to get access to the reflector,the small metal beam compensation tab underneath and inside of the lens itself. The lens is held in place by an expasion spring that runs around the perimeter of the interior of the carrier. Mine was slightly loose, so I gently pushed it home and secured it with a dab of epoxy.
The lens was exceptionally opaque from years of heat and condensation (this headlight suffered from a bad access seal before replacement).
I polished all the interior parts and the lens with some collonite 915 wax polish to prevent clouding again in the future. Metal polish would be far too abrasive and damage the finish.
You can see the difference in the photo below.
The cowl was polished with metal polish as it had tarnished limiting the reflective quality to assist the bulb.
Reassembly of the cowl is the reverse of removal, ensuring the lip is pushed firm against the main assembly when the tabs are folded back down.
Once the lens carrier is fully assembled check to make sure the beam adjuster lever is in the correct position and place it aside for assembly later……
---------------------------------------------------------------------------------------------------------------------------------------------------------
REMOVAL OF MAIN BEAM CARRIER
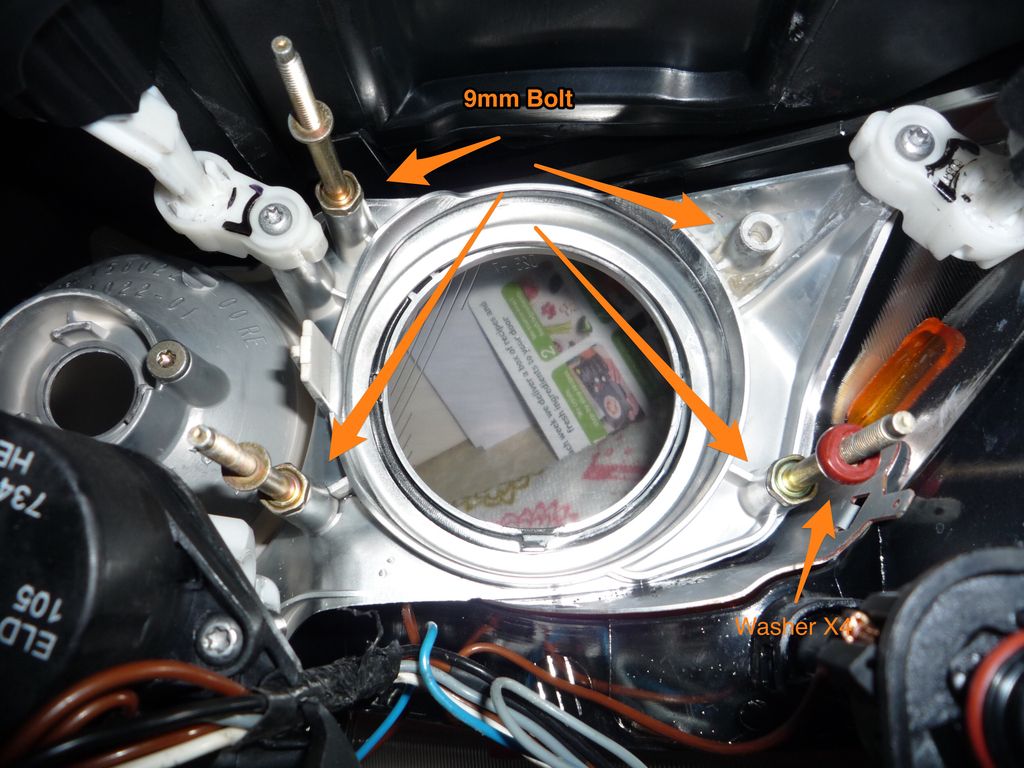
As seen from the photograph, one of the plastic lugs has broken completely. The plastic is quite brittle as it seems that it had been broken some time. I suspect this may be the source of the wobble as the bolts holding the whole assembly together were loose.
Removal is starting with a 9mm spanner, but you should be able to remove by hand as they are very loose. be sure to retain the little rubber washers as they have a habit of hiding up in the assembly.
Remove the servo motor next by the 2 T15 torx screws at the front, then slide the motor sideways before withdrawing it. I left the wires connected to the main assembly and secured the motor with some tape.
The picture above shows the joint the servo sits in. remove the joint as well with a T15 torx.
The 2 main brackets can now be undone with T15 torx and moved aside. The minor adjustment mechanism does not need to be touched which is handy as the light pattern should be exactly the same when finished.
Underneath in the headlight unit is the indicator bulbs which can be inspected and removed if necessary whilst you have the bonus of extra space.
The whole part can now be gently removed. I was extremely careful removing this part as the plastic is only chromed lightly as may scratch or come off easily.
The assembly can now be gently polished and cleaned. Like I said before, it is very delicate and a rough cloth or dirt will cause scratches or lift the chrome. I used the Collinite 915 again to buff up and shine with the softest cloth I could find.
Check the mounting lugs to ensure they are not damaged. I put epoxy resin round all of mine to ensure they were sturdy for re-assembly.
This is as much of the light that can be removed without breaking the waterproof seal and pulling the plastic front off. There is a way it can be done by baking the light to free up the sealant, but I found the process far to invasive and risky to ruin the plexiglass when you can reach inside and clean the interior by hand even though this can be awkward.
I cleaned the inside of the light by a good squirt of low pressure compressed air to expell as much filth and then proceeded to clean and wax with the same cloth used for the main beam carrier. Surprisingly, it was rather dusty and a little opaque film had coated the inside. I used a long bendy pencil wrapped in masking tape to ensure no sharp edges with the cloth over the end to access and clean the interior.
This part took the longest to do as it is rather tough to get access to the edges, however the results outweigh the awkwardness and it s a job well worth doing when the whole assembly is put back together.
Reassembly is the exact reverse of the above process, so by going backwards through the writeup, you should be able to get the interior back together in 25 mins. I lubricated all the internal moving parts with silicone grease as the old grease was solid and the contact points non existent. it is good practice when reassembling to ensure it will work smoothly with the servo motor. Just be mindful that you are screwing into plastic mounts so great care must be taken not to thread or break off parts.
---------------------------------------------------------------------------------------------------------------------------------------------------------
EXTERIOR OVERLOOK AND PRE PREVENTATIVE MAINTAINANCE
On inspection of the exterior, I noticed that the adjustment controls were filthy, had seized and needed a good clean up and lubrication. A good scrub with a toothbrush dowsed in penetrating lubricant gets to work on the parts and allowing a bit of time for it to get into the mechanism is well advised as the parts are quite flimsy and could easily be damaged if forced when adjusting the beam deflection with the allen keys as this operation is done seldom. Once serviced the parts move nice and free.
(The Light is Upside Down)
Also underneath the light itself there are two ventilation shafts which drain and allow condensation to expel. One is covered by a rubber boot, but the other is open. One of mine was blocked completely which I suspect caused the light to fill with water when combined with the bad seal on the back. Once vacuumed out there was a bit of damp on inspection, so I left the whole light in a warm place overnight to ensure it was completely dry.
The back cover which has a rubber seal in the lip which I removed and put it in quite warm water for 20 minutes to de stress and try to get some shape back into it. Once dried, I lubricated inside where the seal sits with a liberal smear of silicone grease before lubricating the seal itself with the same stuff and gently reseated it in the same position as before. Hopefully this will give a good water tight seal on the whole housing.
The whole assembly can now be re-installed back into the car and aligned with the bodywork.
I sanded and polished the plexiglass as they had yellowed and began to get the crazed effect. Here is one final picture of the sanded light with one light after 800, 1200 grit and the other light halfway through polish with a DA machine using Eucryl smokers toothpaste (powder mixed into the correct consistency) which acts like 4000 grit before a thorough polish with a good quality car polish. It just needs sealing with a good wax.
---------------------------------------------------------------------------------------------------------------------------------------------------------
CONCLUSION
I think I have covered everything and hope this helps a lot of people out there that had headlight niggles and the photos can be used as an aid when doing the odd job as its such a tight location to work on. If anything has been missed out, feel free to add.

