>

MMI wiring connection - the newer AUX version (not MOST)

fantomass

Member
Hi! Instead of asking @AnubisZed privately, creating this thread in the hope of helping others and that also others who've faced these issues may chime in...

So I have the newer generation of the AUX version (and having read the forum posts it feels like it’s the worst middle option - it's not documented well-enough as the original version for which Dave's videos are also available, yet not the newest version with MOST fiber optic) - anyway, here’s my attempt to get it working…
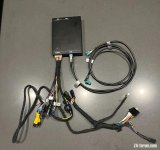
IMG_9405.jpeg

I connected the wiring for a test boot up but apparently there’s was a fault somewhere, because the car’s electronics would not turn on at all (after inserting and pressing the key, and/or pressing the engine start button with the foot off the break pedal - no reaction).

Diagnosis:

10pin connector unused?
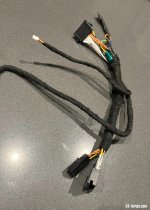
IMG_9408.jpeg

Can you confirm that the 10pin connectors (male & female) are not to be used and only the 4pin should be used to connect in between the iDrive cable & controller?

(With no instructions to follow, in my installation attempt I connected both - the 4pin to the iDrive and the 10pin to the parking break - seemed obvious at the time - only later I began thinking this may have been a (the?) mistake.)

LVDS cable

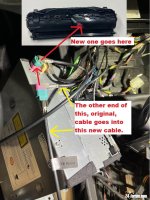
Rewatching this section of your original video https://youtu.be/jY-pSPUz0IU?t=633 - can you confirm that the top pink socket on the head unit is for GPS (and the original cable should remain connected), and I should only connect the MMI’s LVDS cables in between the 2nd-from-top yellow socket (and the yellow cable that was originally plugged into that socket)?

(As shown in photo below, for some reason I was connecting the MMI to the top pink connection and puzzled why the green angled connector was turned 90degrees and interfering with the yellow - and why the labels “To OEM Monitor” and “To OEM Radio” seemed switched - I guess this was my 2nd mistake?)
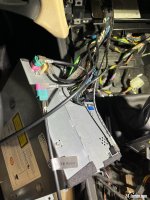
IMG_9401.jpeg

So before I tear the car open again in my friend’s garage, could you please confirm those two mistakes I think I made?

And some additional questions:

In the packaging there was this little thingy which looks like a jumper with some electronic component (a resistor?) that fits this 2wire connector - should that be on or not?
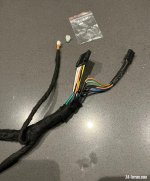
IMG_9410.jpeg
IMG_9411.jpeg

I have two 3,5mm female jacks labeled MIC:

One in the cable bundle with the AUX jack and the camera wires (and the 4- & 10-pin connectors discussed above):
IMG_9412.jpeg

and a second one on the USB loom:
IMG_9413.jpeg

Any idea why - and which one I should connect the microphone to?

And yes, the microphone cable is exactly as described here https://z4-forum.com/forum/viewtopic.php?p=1869483#p1869483 so I’ll be needing to get that Y-loom.

Your instructions suggest using the OEM microphone on the steering column and ditching the one supplied with the MMI - is that because the MMI one is inferior? Would it also be an option to use both - two mics?

Why are there two USB ports? Is it just for convenience - choice of shorter or longer cable - or is there something more to it?

And finally, this is what the jumper setting was when I opened the box: only #5 ON, all the rest OFF. Is that the correct setting?
IMG_9407.jpeg

Oh, one more: I have Comfort Access and have kept the key out of the dash during the first installation attempt, then inserted in for the test. Any special considerations when doing the wiring? Cause I did hear what sounded like various power-related sounds during the deed, so trying not to harm the car :)

Very grateful for all the help!
 
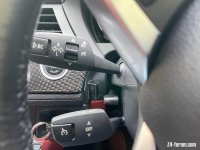
I can’t answer most of those questions as I have the older / original Aux MMI box but I am sure AnusbisZed can help with that. However with respect to the Mic supplied with the kit, I used this instead of connecting the OEM mic in the steering column for a) simpler install and b) wishing to take apart less trim of the car as possible and not messing around with the original wiring loom. In terms of function I mounted the Mic in a discreet location next to the ignition key slot and it works just fine, no issues with sound. It works as well as the OEM Mic.
 
fantomass said:
Can you confirm that the 10pin connectors (male & female) are not to be used and only the 4pin should be used to connect in between the iDrive cable & controller?
Yes that is correct, do not use the 10 pin.

fantomass said:
LVDS cable

Rewatching this section of your original video https://youtu.be/jY-pSPUz0IU?t=633 - can you confirm that the top pink socket on the head unit is for GPS (and the original cable should remain connected), and I should only connect the MMI’s LVDS cables in between the 2nd-from-top yellow socket (and the yellow cable that was originally plugged into that socket)?
Connect like this....
Leave original (pink) LVDS cable plugged in back of headunit.
The other end of the original LVDS cable is then unplugged from the tail of the screen, this then plugs into the new female aqua blue plug.
The new aqua blue male plug now plugs into the tail from the headunit.
All as per photo attached....


IMG_9401.jpeg

fantomass said:
And some additional questions:

In the packaging there was this little thingy which looks like a jumper with some electronic component (a resistor?) that fits this 2wire connector - should that be on or not?
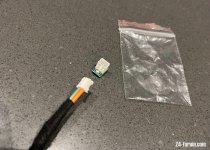
Trial and error, unfortunately. I've come across this once with a customer and can't for the life of me remember whether I used it in the end or not, I'm thinking not!!

fantomass said:
I have two 3,5mm female jacks labeled MIC:

One in the cable bundle with the AUX jack and the camera wires (and the 4- & 10-pin connectors discussed above):
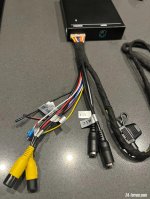
and a second one on the USB loom:
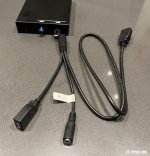
Any idea why - and which one I should connect the microphone to?
No, try the one on the main loom first

fantomass said:
And yes, the microphone cable is exactly as described here https://z4-forum.com/forum/viewtopic.php?p=1869483#p1869483 so I’ll be needing to get that Y-loom.

Your instructions suggest using the OEM microphone on the steering column and ditching the one supplied with the MMI - is that because the MMI one is inferior? Would it also be an option to use both - two mics?
My reasoning was purely for aesthetics, I didn't want some aftermarket microphone in the way, but not only that the Y loom came with my original MMI box, so I just used it.

fantomass said:
Why are there two USB ports? Is it just for convenience - choice of shorter or longer cable - or is there something more to it?
Just for extra use, not sure why they are different lengths though.

fantomass said:
And finally, this is what the jumper setting was when I opened the box: only #5 ON, all the rest OFF. Is that the correct setting?
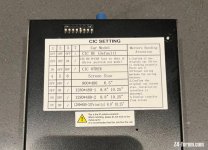
Looks correct to me, maybe switch 3 to on if you still have problems with the controller.

fantomass said:
Oh, one more: I have Comfort Access and have kept the key out of the dash during the first installation attempt, then inserted in for the test. Any special considerations when doing the wiring? Cause I did hear what sounded like various power-related sounds during the deed, so trying not to harm the car :)

Very grateful for all the help!
As long as you don't turn anything on then you should be fine, but if you're worried then disconnect the battery negative terminal.

Hope that helps,
Dave
 
Very clear explanation - thanks!

1. OK, so I'll need to unscrew the screen to get to its LVDS connector - or is there another/easier/better way of reaching it through the back once the head unit is removed? Just to confirm the steps (& for other readers): first remove the long trim with A/C knobs to expose the screws holding the air vents, then remove the air vents to expose the screws holding the display. And, as you mention in one of your videos, being careful when lifting the display up by hand not to go all the way.

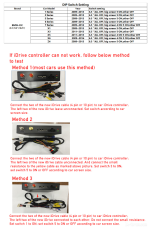
2. Now that I've done a better forum search (only relied on the great YouTube videos and 'master thread' before), I've found these instructions https://z4-forum.com/forum/viewtopic.php?p=1856207#p1856207 (which I never received :( ) that seem to provide useful info regarding the various switch options and that little resistor (also, that in case of 'Method 3' the two unused 10-pin male-female iDrive plugs should be connected to each other). My unit is a little different from that one but probably closer than the older original, so I will be trying those options, in case the default doesn't work.

3. Regarding the mic: OK, so since Silverstar confirmed no issues with the MMI mic, and also after hearing about the possible issues with the Y-loom during Bluetooth calls (https://youtu.be/EY4XAzUYiXk?t=1401) I'll go with the supplied mic. I'll try to mount it invisibly under the top steering column trim, taping it next to the OEM mic, read this https://z4-forum.com/forum/viewtopic.php?p=1856593#p1856593 I guess it should be doable.

4. The switch label in those other instructions is slightly different from the one on mine and it mentions that switch #8 is for "OEM MIC" vs "Add-on MIC". This got me curious: what could it be for - have you experimented with that at all? (But perhaps the fact that switch #8 isn't not mentioned on my label at all says something about leaving it in the default off position.)

5. MMI box positioning: so I've seen the multiple options - and I'm considering the position behind the A/C knobs (https://youtu.be/EY4XAzUYiXk?t=1470), since I'll be removing that trim to get to the display anyway. I guess for the purposes of firmware updates, it's a bit easier to get to than having to unscrew and lower the glove box. In fact, with this position, I might not even have to lower the glovebox for the installation, would I? Perhaps only for the USB cable, unless I discover another way/position to feed it though - but I reckon I won't be needing the USB ports anyway (planning to connect my phone wirelessly only and also not planning to feed music/video files off of USB sticks), so I might keep them tucked away to save myself the trouble of lowering and reassembling the glove box. (And I can do that any time in the future, if I do decide I want/need them.) Any thoughts / suggestions? Have you encountered any issues since you started using this position?

6. USB ports' purpose - I presume that for this box version, the USB ports are no longer used for firmware updates as with the original version which didn't have the microSD slot, but they're done through a microSD card only? So the USBs here are only for connecting USB stick or a phone?

7. Wired Apple CarPlay - on the older box, you said the wired option was for Android Auto, but now that I'm looking at this manual https://z4-forum.com/forum/viewtopic.php?p=1856207#p1856207 it looks like they added the missing wired functionality? (If they did, it's probably a good reason to make the USB port accessible, in case wireless CarPlay is finicky.)

8. Updates - should I expect to be updating this unit? (I've ordered it almost a year ago, and only got to installing it now)


Hoping that my 2nd installation attempt / dashboard dismantling will be successful :)
 
fantomass said:
3. Regarding the mic: OK, so since Silverstar confirmed no issues with the MMI mic, and also after hearing about the possible issues with the Y-loom during Bluetooth calls (https://youtu.be/EY4XAzUYiXk?t=1401) I'll go with the supplied mic. I'll try to mount it invisibly under the top steering column trim, taping it next to the OEM mic, read this viewtopic.php?p=1856593#p1856593 I guess it should be doable.

If it helps, you can see in the photo below where I placed the mic, its very discreet and hardly visible yet works fine.

IMG_0223.jpeg
 
Should add in terms of MMi box positioning, I placed it behind the panel that houses the footwell light (just behind the glovebox. No need to remove the glovebox, just a matter of undoing three screws and you can pull that panel out.

From there if you need the USB cable you could probably thread it through into the glovebox or leave it hanging just out of the trim panel so if you need the cable its there ready to use and no need to undo any trim at all. Personally I never bothered connecting the cable as I use wireless apple CarPlay and I have not bothered to update the firmware / software etc. since everything works just fine and its been in there over two years now.
 
Thanks, that mic position looks good indeed and I might end up doing it that way. Regarding the option of hiding it inside the steering cowling , I was disappointed when I read "Microphone is a vw and does not fit in the steering cowel as too big", then clicked on page 2 of that thread to see that it can be done :D https://z4-forum.com/forum/viewtopic.php?p=1856593#p1856593 If by chance birdy_z4 sees this, I'd be interested in knowing if there aren't any issues with that position.

Re: the box positioning, that sounds like another good option - that's the panel you need to remove to get to the pollen filter, right? As opposed to the driver's footwell that Wolter used (https://z4-forum.com/forum/viewtopic.php?p=1927851#p1927851)
 
Now that I'm thinking about it, that may actually be a good use of the two USB cables that I have for some unexplained reason: one inside the glovebox for the option of plugging in (driver's) phone & tucking it away and the other hanging outside the panel for plugging in a phone that the passenger can hold in hand and use, while also feeding wired CarPlay.
 
fantomass said:
Re: the box positioning, that sounds like another good option - that's the panel you need to remove to get to the pollen filter, right? As opposed to the driver's footwell that Wolter used (viewtopic.php?p=1927851#p1927851)

Yes correct, on the passenger side that you remove to access the pollen filter.
 
fantomass said:
Very clear explanation - thanks!

1. OK, so I'll need to unscrew the screen to get to its LVDS connector - or is there another/easier/better way of reaching it through the back once the head unit is removed? Just to confirm the steps (& for other readers): first remove the long trim with A/C knobs to expose the screws holding the air vents, then remove the air vents to expose the screws holding the display. And, as you mention in one of your videos, being careful when lifting the display up by hand not to go all the way.
Video point here at 12:00.... https://www.youtube.com/watch?v=wYQgNDj4Fac=720
You don't need to actually remove the screen as once the vents are removed you'll have access to the LVDS tail.


fantomass said:
2. Now that I've done a better forum search (only relied on the great YouTube videos and 'master thread' before), I've found these instructions https://z4-forum.com/forum/viewtopic.php?p=1856207#p1856207 (which I never received :( ) that seem to provide useful info regarding the various switch options and that little resistor (also, that in case of 'Method 3' the two unused 10-pin male-female iDrive plugs should be connected to each other). My unit is a little different from that one but probably closer than the older original, so I will be trying those options, in case the default doesn't work.
DO NOT plug the two 10 pin plugs together!! Nah, I'm just messing with you :rofl: it'll serve no purpose whats so ever. There are only four wires that the MMI box needs, 12v + & - plus the 2 CanBus, and these are jumpered from the 10 pin and 4 pin plugs, so it doesn't matter for the rest of the 10 pin wires as the box doesn't need them.

fantomass said:
3. Regarding the mic: OK, so since Silverstar confirmed no issues with the MMI mic, and also after hearing about the possible issues with the Y-loom during Bluetooth calls (https://youtu.be/EY4XAzUYiXk?t=1401) I'll go with the supplied mic. I'll try to mount it invisibly under the top steering column trim, taping it next to the OEM mic, read this https://z4-forum.com/forum/viewtopic.php?p=1856593#p1856593 I guess it should be doable.
Ignore that video, it is specific to the Mr12volt box ONLY. There are NO issues with the Y loom for the microphone on any of these types of units that I'm aware of.

fantomass said:
4. The switch label in those other instructions is slightly different from the one on mine and it mentions that switch #8 is for "OEM MIC" vs "Add-on MIC". This got me curious: what could it be for - have you experimented with that at all? (But perhaps the fact that switch #8 isn't not mentioned on my label at all says something about leaving it in the default off position.)
Leave as default

fantomass said:
5. MMI box positioning: so I've seen the multiple options - and I'm considering the position behind the A/C knobs (https://youtu.be/EY4XAzUYiXk?t=1470), since I'll be removing that trim to get to the display anyway. I guess for the purposes of firmware updates, it's a bit easier to get to than having to unscrew and lower the glove box. In fact, with this position, I might not even have to lower the glovebox for the installation, would I? Perhaps only for the USB cable, unless I discover another way/position to feed it though - but I reckon I won't be needing the USB ports anyway (planning to connect my phone wirelessly only and also not planning to feed music/video files off of USB sticks), so I might keep them tucked away to save myself the trouble of lowering and reassembling the glove box. (And I can do that any time in the future, if I do decide I want/need them.) Any thoughts / suggestions? Have you encountered any issues since you started using this position?
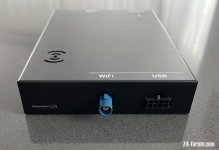
On the older boxes any updates were done through the USB, so unless there is a memory card slot on the box (can't see one in your photos) then this will be the same. So for that purpose then you'll only need access to the USB plug.

fantomass said:
6. USB ports' purpose - I presume that for this box version, the USB ports are no longer used for firmware updates as with the original version which didn't have the microSD slot, but they're done through a microSD card only? So the USBs here are only for connecting USB stick or a phone?
As above, is there a slot on the box?

fantomass said:
7. Wired Apple CarPlay - on the older box, you said the wired option was for Android Auto, but now that I'm looking at this manual https://z4-forum.com/forum/viewtopic.php?p=1856207#p1856207 it looks like they added the missing wired functionality? (If they did, it's probably a good reason to make the USB port accessible, in case wireless CarPlay is finicky.)
Yes both wired and wirless for both now

fantomass said:
8. Updates - should I expect to be updating this unit? (I've ordered it almost a year ago, and only got to installing it now)
If one is available then update it, always best.
 
AnubisZed said:
As above, is there a slot on the box?
Yep.
IMG_9415.jpeg
Anyhow, since CarPlay is also wired now, I'll expose the USB port(s) too.

AnubisZed said:
If one is available then update it, always best.

I'll see what SW version is on it once I get it running, and then hopefully can get the udpate from the dealer.
 
Sadly, I have to report that my second attempt to install this was also unsuccessful :(

After connecting everything, the iDrive controller would not respond at all. A green light inside the MMI box would be slowly blinking, indicating it's receiving power. The iDrive controller would intermittently light up but no response when turning it or on any of the buttons. One possibility would be a bad harness or connection, or the box itself (or both). I have tested each of the pins on the harness with an ohmmeter and it seemed alright.

I have tried the various switch settings according to the instructions I received from the seller, as well as using/not using the little resistor, as well as connecting/not connecting together the unused male/female 10-pin iDrive plugs:

Screenshot 2023-02-22 at 18.50.10.png

One observation, in case it matters:
AnubisZed said:
DO NOT plug the two 10 pin plugs together!! Nah, I'm just messing with you it'll serve no purpose whats so ever.
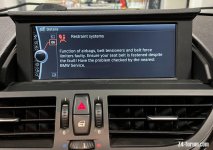
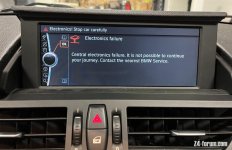
It appears that plugging the 10-pins together does make a difference - as also suggested in "Method 3": When trying Method 1 or 2 (and any permutations of switches and resistor), after powering up iDrive, the controller would simply not work but no error would be shown. When I connect the 10-pin male-female together, though, the system gives more dramatic warnings:

D4BE3674-65CB-408D-86E0-9C8BF073B6E1_1_102_o.jpeg
AF5FFDBE-6520-49FE-8BA2-B4430966277F_1_102_o.jpeg

So there is a difference in behaviour depending on whether they're plugged together or not.

Quite frustrated, the only positive from today is that at least I didn't blow a fuse this time.

@AnubisZed (or anyone else), any suggestions?
 
The various doom messages from the CIC screen look bad…have you unplugged / cross plugged some connectors to cause that?

On the CIC connector on my MOST box the pertinent issue is the amount of force required to mate the new CIC connector with the controller..

I had similar errors and found that it took extraordinary/ disproportionate force to get the new connector to sit in the CIC controller correctly..there was an audible click when it sat correctly…it’s handed so it wil only go in one way..

I assume all the pins are correctly aligned and not bent from previous mishandling?
 
I just checked again and made sure that the CIC connectors are inserted all the way. No difference.

Here's a video of what it looks like: https://youtu.be/dCWMODdqX-M

The controller is lit up, so it's receiving power. But no response. In today's test I did not connect the LVDS cable, I just wanted to see if I'd be able to control the original iDrive system with the MMI box connected. I can't :(

The video shows what's referred to in the instructions as the default "Method 1" - all switches off, except #5 on, and without connecting the tiny resistor. No error shows up, only the controller doesn't work. Those pop up only with the other "Methods" (switch #3 ON, or switch #1 ON, and using the resistor).
 
So you've now got tge following....

Original 4 pin male controller plug into 4 pin female of mmi loom.
New 4 pin male of mmi loom into iDrive controller.
10 pin male and 10 pin female just hanging not connected to anything.
Dipswitch 5 on, all others off.
Resistor not connected.

Is that all correct?
 
Correct. That's the default "Method 1". (And I've also tried the other combinations, also without success, and for some of them, got those warning messages.)
 
Following previous conversations on this very same box, this is why I've never fitted one, and won't.
I've seen this same issue on the E9x community boards, and I've not found/seen a solution. This hasn't come up for a couple of years now so I thought it may have been resolved, but obviously not.
 
Similar experience when fitting my 2nd box, after a trouble free experience fitting the first - which was the original design and worked flawlessly.

Did get the 2nd working, but it kept cutting out and eventually throwing a load of random canbus errors which got me scared so I gave up and reverted to stock idrive. It remains unused in john-e89's 35is to this day :)

Very frustrating experience.
 
Back
Top Bottom