When I was fitting me new M Sport seats the other week I put the passenger base in to test the occupancy sensor. fiddling around with the seat - setting to maximum height, I managed to break the height adjustment. Grrr. To get by I set the seat to a mid height a got on with the seat refurb.
Later I had the car in for its MOT and asked them to look at the seat. The garage told me it was probably the gearing and wasn't worth the time / money for them to investigate. I decided to take a look myself and discovered one of the gears had been damage.
I did some research on the web and found this was not uncommon with E36s, E46s and other BMWs. The problem I had, BMW don't sell the gears and no-one else makes them - I found someone in the US for E36s and older cars. So, was left with two options, 1, leave the seat at a fixed height or 2, make a new gear.
This is the process for making a new gear
(there is a quick video summary at the bottom with evidence of the fix!)
Done for height adjustment. Sorry about the pics - taken with my digital video camera (it was to hand).
Remove the seat from the car. Next for ease of access remove the two bolts (Torx T50) from the seat belt and one above it.

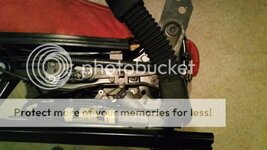
Remove the 3 bolts holding the gearbox in place:

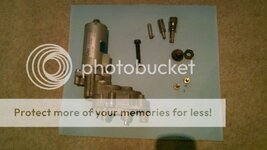
Disconnect the cable(s) and remove the motor. Below is the gearbox with motor attached:

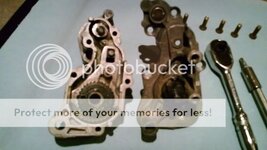
Gearbox with the cover removed:

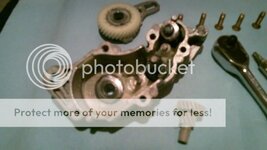
Gearbox stopped down and offending gear found:

I decided to take the working gear from the driver's seat as the master for the mould. Below is a picture of the damaged gear alongside the working one:

Create the mould
On the advice of the Tiranti (mould supplier) I set decided to make the mould casing out of Lego - easy to make to size. I started by putting the gear on Blu Tack to stop the mould from filling up from the bottom. I then inserted two needles done the centre of the gear - this is to help hold the rubber upright once the gear is removed.

Build the Lego box up around the gear - plenty of space of over the top, when turned upside down this will form the base:

Fill the box with Mould material:

I used an RTV Silicone Mould Rubber - supplied as the rubber and catalyst, mix and then pour in. Pour slowly to try and avoid air bubbles getting into the mould.
I left this for about 24 hours before removing - stripped down the Lego walls and removed worked the rubber mould to remove the gear:

Casting the new gear
Then fill the mould with the plastic - I used a two part epoxy glasscoat, again having talked it through with the chap at Tiranti this was seen as best - as it would dry harder and be stronger at the tips, downside it is potentially more brittle. You can't really see them in the picture, but I used needles, pinned on either side of the mould, to hold the centre in place - ensure the hole is down the middle of the gear.

I left for 24 hours before removing the gear from the mould. At this time the cast plastic held its shape must moved slightly under pressure. I left for another 24 hours to cure.
Working gear, new gear and damaged gear:


I checked the new gear and it was a little tight fitting so I used my little Dremel type tool to hollow out until it moved freely. Finally re-grease the gearbox (thought I'd give it a clean while in there) - used a general purpose lithium grease and reassemble. Job done.
Very quick video summary and working seat
It's a cyclical world these days, so here's a quick summary and clip of the working seat:
[youtube]Sy1pc_Gqt-g[/youtube]
A couple final points
This was my first attempt and there were small indents on the new gear, I suspect cause by air bubbles. While the new gear appears to work fine I have taken a new mould of the working gear in case I need to cast another, saves having to strip down the driver' seat gearbox again. Also, the centre section of the gear mould didn't work brilliantly, so this time I used a rolled up piece of thick paper, protected with Seleotape. Seems to have worked better. Gear won't be cast for another 48 hours.
Without a working gear to take a mould from, the other option is slightly longer winded. Take a mould of the broken gear and make two casts. Then cut and shut to make a complete master - this will be weak from the cut and she, so take mould from this and cast a single piece working gear.
Am very happy with the results on this one - always nice when something new works The gear has just gone in so durability remains to be seen, but should work with other gears. Am delighted to have picked up this new technique, could have uses elsewhere.
Later I had the car in for its MOT and asked them to look at the seat. The garage told me it was probably the gearing and wasn't worth the time / money for them to investigate. I decided to take a look myself and discovered one of the gears had been damage.
I did some research on the web and found this was not uncommon with E36s, E46s and other BMWs. The problem I had, BMW don't sell the gears and no-one else makes them - I found someone in the US for E36s and older cars. So, was left with two options, 1, leave the seat at a fixed height or 2, make a new gear.
This is the process for making a new gear
(there is a quick video summary at the bottom with evidence of the fix!)
Done for height adjustment. Sorry about the pics - taken with my digital video camera (it was to hand).
Remove the seat from the car. Next for ease of access remove the two bolts (Torx T50) from the seat belt and one above it.

Remove the 3 bolts holding the gearbox in place:

Disconnect the cable(s) and remove the motor. Below is the gearbox with motor attached:

Gearbox with the cover removed:

Gearbox stopped down and offending gear found:

I decided to take the working gear from the driver's seat as the master for the mould. Below is a picture of the damaged gear alongside the working one:

Create the mould
On the advice of the Tiranti (mould supplier) I set decided to make the mould casing out of Lego - easy to make to size. I started by putting the gear on Blu Tack to stop the mould from filling up from the bottom. I then inserted two needles done the centre of the gear - this is to help hold the rubber upright once the gear is removed.

Build the Lego box up around the gear - plenty of space of over the top, when turned upside down this will form the base:

Fill the box with Mould material:

I used an RTV Silicone Mould Rubber - supplied as the rubber and catalyst, mix and then pour in. Pour slowly to try and avoid air bubbles getting into the mould.
I left this for about 24 hours before removing - stripped down the Lego walls and removed worked the rubber mould to remove the gear:

Casting the new gear
Then fill the mould with the plastic - I used a two part epoxy glasscoat, again having talked it through with the chap at Tiranti this was seen as best - as it would dry harder and be stronger at the tips, downside it is potentially more brittle. You can't really see them in the picture, but I used needles, pinned on either side of the mould, to hold the centre in place - ensure the hole is down the middle of the gear.

I left for 24 hours before removing the gear from the mould. At this time the cast plastic held its shape must moved slightly under pressure. I left for another 24 hours to cure.
Working gear, new gear and damaged gear:


I checked the new gear and it was a little tight fitting so I used my little Dremel type tool to hollow out until it moved freely. Finally re-grease the gearbox (thought I'd give it a clean while in there) - used a general purpose lithium grease and reassemble. Job done.
Very quick video summary and working seat
It's a cyclical world these days, so here's a quick summary and clip of the working seat:
[youtube]Sy1pc_Gqt-g[/youtube]
A couple final points
This was my first attempt and there were small indents on the new gear, I suspect cause by air bubbles. While the new gear appears to work fine I have taken a new mould of the working gear in case I need to cast another, saves having to strip down the driver' seat gearbox again. Also, the centre section of the gear mould didn't work brilliantly, so this time I used a rolled up piece of thick paper, protected with Seleotape. Seems to have worked better. Gear won't be cast for another 48 hours.
Without a working gear to take a mould from, the other option is slightly longer winded. Take a mould of the broken gear and make two casts. Then cut and shut to make a complete master - this will be weak from the cut and she, so take mould from this and cast a single piece working gear.
Am very happy with the results on this one - always nice when something new works