DISA Removal and Maintenance - N52 Engine (Pic Heavy)
Posted: Sat Apr 07, 2012 7:03 pm
Casting around this forum you find a lot of stuff that you think will be a good idea – an example of this that I found was Shipkiller’s excellent guide to DISA maintenance (http://www.z4-forum.com/forum/viewtopic ... 30&t=12150). Seemed a relatively simple job with potential upside in terms of prevention of a problem / increase in performance – and an excuse to have a proper poke round my engine bay.
I have a 2006 3.0Si though, and this has the N52 engine which is quite different to the M54 (pre-facelift engine) to which Shipkiller’s thread relates. There’s only one guide from someone in his thread doing it on the N52 engine, and whilst it helped me it's a little light on detail and I reckoned a thread with some photos would be in order. I am not an engineer, so this is a bit mickey mouse and I make no apologies for any terminology I get wrong – anyone who knows their way around their engine won’t need this anyway…
It is worth noting before you even start that I do not think this is necessary as preventative maintenance on the N52 engine because of changes that BMW have obviously made to the system based on experience of the M54 issues. However, should you have an issue that you think may be DISA-related, then hopefully this will help you.
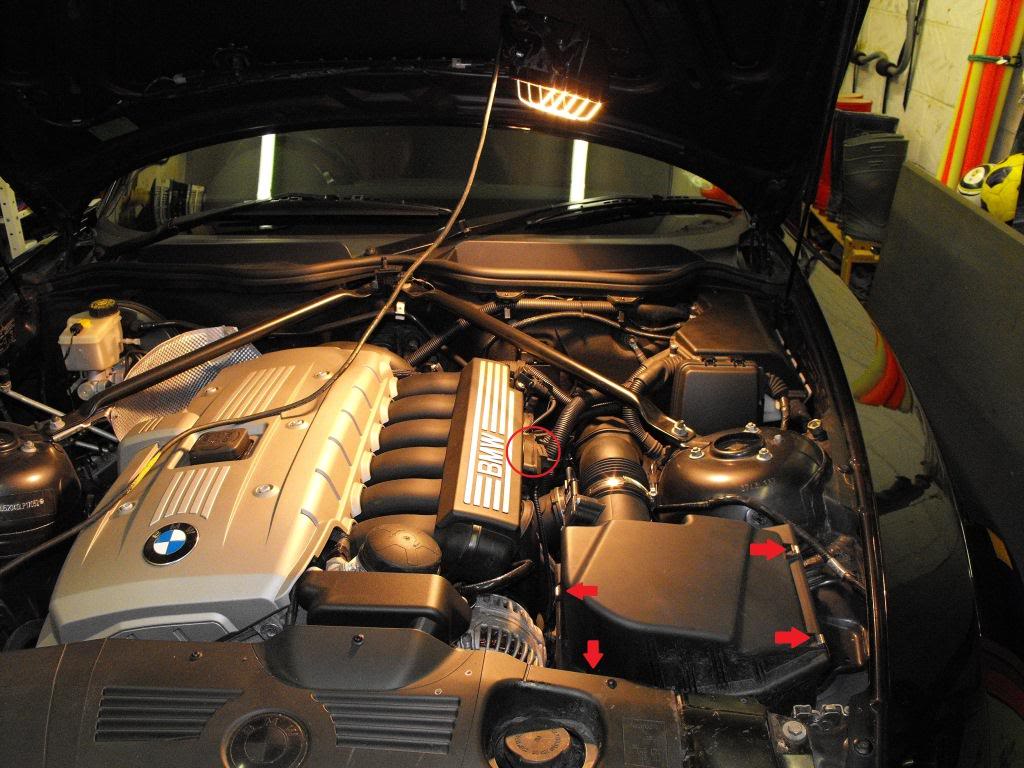
So, here’s the start picture – you’re after getting the bad boy circled in red out to examine and clean. First things first, get the air filter box out the way, with a flat head screw driver under the metal clips shown by red arrows. Don’t worry, they won’t fall down into the engine bay as they remain attached to the lower part of the air filter system :

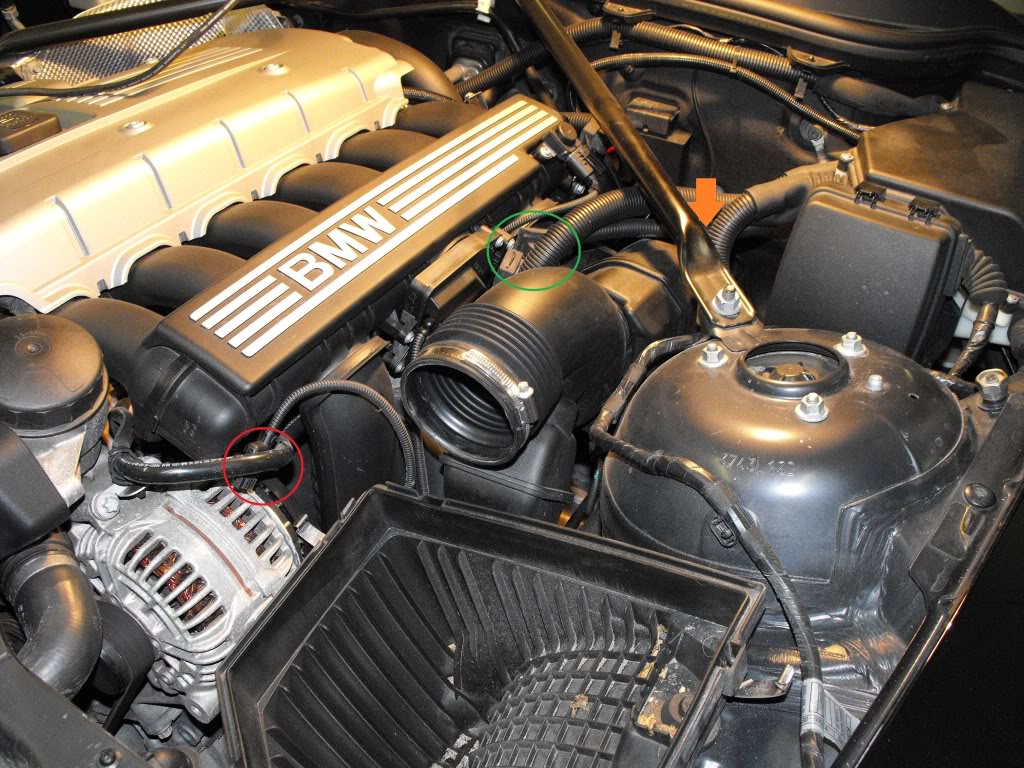
You then need to loosen the jubilee clip circled in orange below, and undo the connection to the MAF (circled in red) by getting a small flat head screw driver under the clip circled in green and pulling gently off :

Once you’ve done this you should be able to take the top of the air filter off. Tuck the MAF connector out of the way as in the red circle below, then move to the tubing at the rear of the sound generator assembly, circled in green :

You need to pull off the rubber connectors circled in green below, and also disconnect the MAF input to the DISA, circled in orange, by getting a flat head screw driver under the clip and pulling gently. Tuck it out of the way with the other one, and tuck the larger plastic felxi hoses back under the strut brace.

Next, remove the bracket that the rubber connectors were attached to, circled in red – you will need a socket set ratchet with an adaptor to fit a torx screw driver head into as there’s not a lot of space :

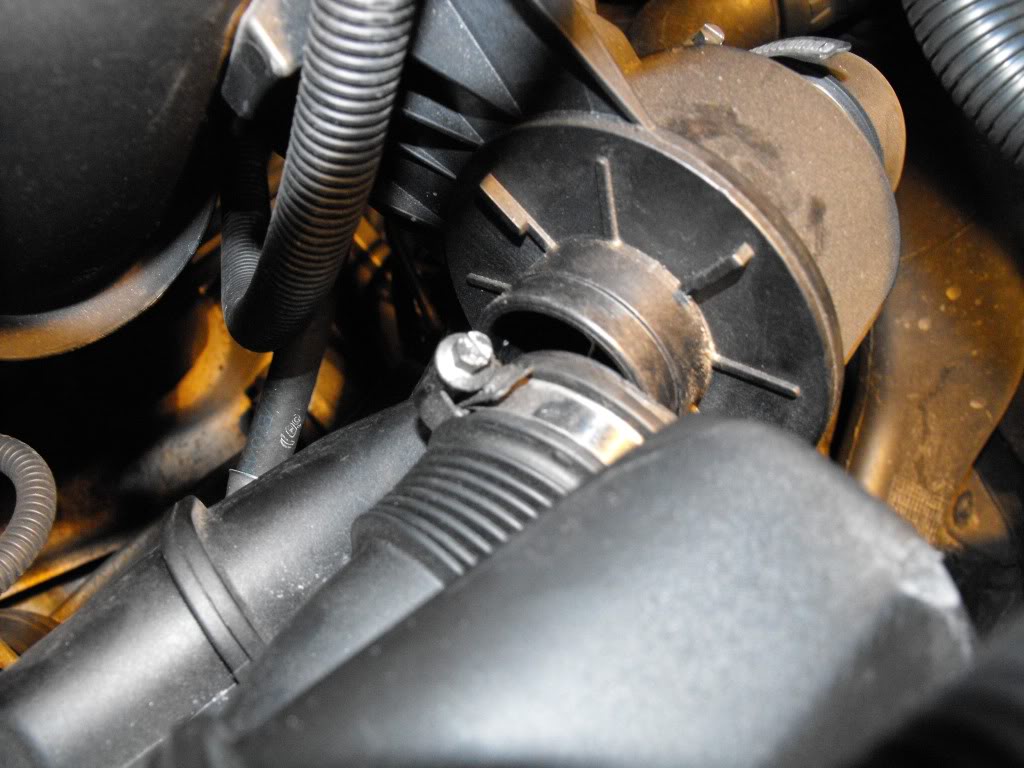
At this point I made my first error of judgement, though I didn’t realise it until I went to put everything back together. I undid the jubilee clip on the back of the sound generator connected to a bracket attached to the engine. With hindsight I should have just removed the single torx screw on the bracket and taken the whole sound generator out. So, don’t do what you see in the next pic :

The next pic shows my second error. I carefully undid the 4 torx screws holding the DISA in, but when I removed the sound generator I had left a connecting piece on, and couldn’t get the DISA out :

I loosened the jubilee clip on this part, then pulled and twisted, and pulled and twisted some more, but the little bugger wouldn’t come out… in the end I re-attached the main part of the sound generator and then used the leverage from that to pull it off. So, I should have just undone that one in the first place, leaving me with it looking like this :

Out with the DISA, a wee peek inside – looks nice and clean, no deposits, just a bit oily hence the rag. You can see where the DISA fits in and the ‘pin’ on the end sits :

And here’s the wee beasty itself. Note that the rubber seals are green, not orange as in the M54 version, and it is all a bit different in shape. First thing I noticed is that the flap cannot be turned by hand – this version must be motorised and electronically controlled by the MAF / ECU. It was also open in this position when I removed it (hopefully that’s normal…) :

It also doesn’t have a pin on the end like the M54 version – it has a plastic coupling that is very secure :

Finally, and I guess most disappointingly, it is very, very clean, with little in the way of deposits. Bear in mind that my car is an ’06 which has just clicked over 68k miles, so I was expecting at least a little gunk – as it’s not got any, I wonder if it has been replaced before ?

I didn’t want to feel I had done nothing, so I cleaned it anyway using some of this nasty stuff :

I then started on putting it all back together – this is just a shot to show all the bits, I was quite amazed that the sound generator (sat on top of the engine) is so large, given that it’s only purpose is to… well, generate sound :

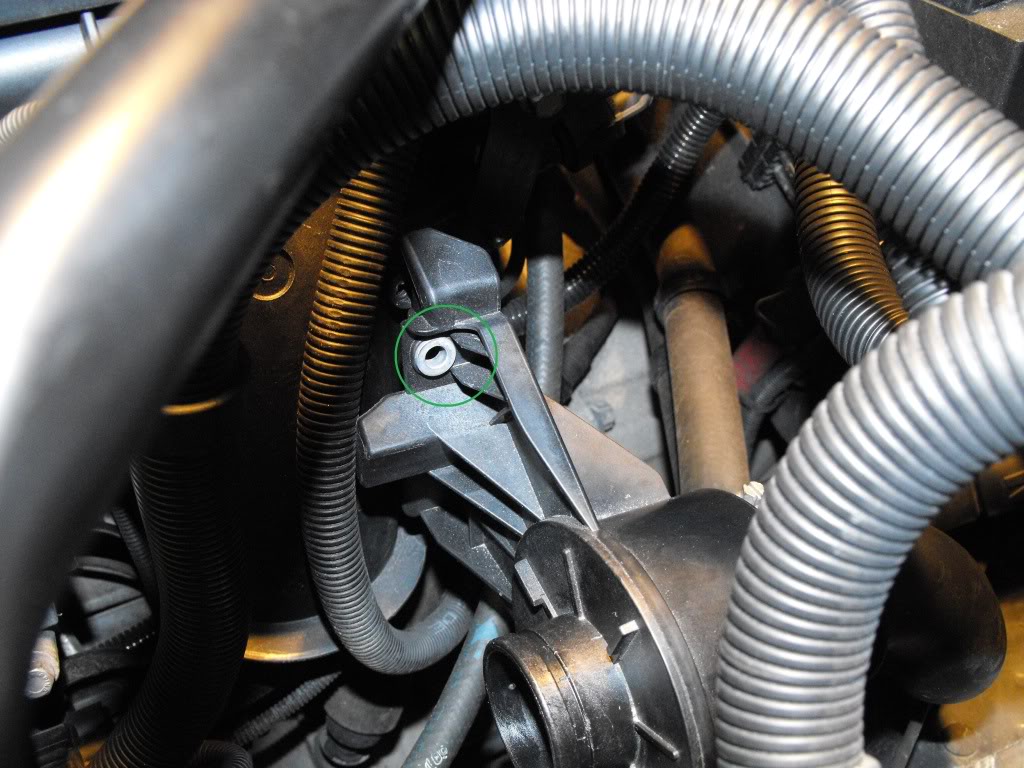
Putting it back together is simply the reverse of what you’ve done. However at this point I realised that I had made an error because I simply couldn’t get the small end of the sound generator re-attached, no matter how hard I tried – there was just too little space to get any leverage. So, if you do this then undo the torx bolt that sits in the hole circled in green in the photo below :

Then just unclip the bulkhead end of the whole assembly from the firewall and pull the whole lot out, or you could undo the jubilee clip indicated by the green arrow in the following photo. The former is simpler, and would have saved me at least 30mins of swearing and scraped knuckles :

So there you have it – a fully documented N52 DISA removal guide, complete with errors for future generations to avoid… It was pretty much a waste of a couple of hours though, as BMW seem to have learned their lesson and toughened up the part in the newer engine. That said, I am sure it can go wrong, and perhaps can get gunked up, so if it does I hope this has helped you !
UPDATED 19/03/19 - 7 years later and it would appear issues can arise with perishing of the green rubber, so don’t be lulled into a false sense of security !
Thread here from today : viewtopic.php?f=3&t=113175&p=1632354#p1632354
Thanks to propaintballa for posting up the new pics
I have a 2006 3.0Si though, and this has the N52 engine which is quite different to the M54 (pre-facelift engine) to which Shipkiller’s thread relates. There’s only one guide from someone in his thread doing it on the N52 engine, and whilst it helped me it's a little light on detail and I reckoned a thread with some photos would be in order. I am not an engineer, so this is a bit mickey mouse and I make no apologies for any terminology I get wrong – anyone who knows their way around their engine won’t need this anyway…
It is worth noting before you even start that I do not think this is necessary as preventative maintenance on the N52 engine because of changes that BMW have obviously made to the system based on experience of the M54 issues. However, should you have an issue that you think may be DISA-related, then hopefully this will help you.
So, here’s the start picture – you’re after getting the bad boy circled in red out to examine and clean. First things first, get the air filter box out the way, with a flat head screw driver under the metal clips shown by red arrows. Don’t worry, they won’t fall down into the engine bay as they remain attached to the lower part of the air filter system :

You then need to loosen the jubilee clip circled in orange below, and undo the connection to the MAF (circled in red) by getting a small flat head screw driver under the clip circled in green and pulling gently off :

Once you’ve done this you should be able to take the top of the air filter off. Tuck the MAF connector out of the way as in the red circle below, then move to the tubing at the rear of the sound generator assembly, circled in green :

You need to pull off the rubber connectors circled in green below, and also disconnect the MAF input to the DISA, circled in orange, by getting a flat head screw driver under the clip and pulling gently. Tuck it out of the way with the other one, and tuck the larger plastic felxi hoses back under the strut brace.

Next, remove the bracket that the rubber connectors were attached to, circled in red – you will need a socket set ratchet with an adaptor to fit a torx screw driver head into as there’s not a lot of space :

At this point I made my first error of judgement, though I didn’t realise it until I went to put everything back together. I undid the jubilee clip on the back of the sound generator connected to a bracket attached to the engine. With hindsight I should have just removed the single torx screw on the bracket and taken the whole sound generator out. So, don’t do what you see in the next pic :

The next pic shows my second error. I carefully undid the 4 torx screws holding the DISA in, but when I removed the sound generator I had left a connecting piece on, and couldn’t get the DISA out :

I loosened the jubilee clip on this part, then pulled and twisted, and pulled and twisted some more, but the little bugger wouldn’t come out… in the end I re-attached the main part of the sound generator and then used the leverage from that to pull it off. So, I should have just undone that one in the first place, leaving me with it looking like this :

Out with the DISA, a wee peek inside – looks nice and clean, no deposits, just a bit oily hence the rag. You can see where the DISA fits in and the ‘pin’ on the end sits :

And here’s the wee beasty itself. Note that the rubber seals are green, not orange as in the M54 version, and it is all a bit different in shape. First thing I noticed is that the flap cannot be turned by hand – this version must be motorised and electronically controlled by the MAF / ECU. It was also open in this position when I removed it (hopefully that’s normal…) :

It also doesn’t have a pin on the end like the M54 version – it has a plastic coupling that is very secure :

Finally, and I guess most disappointingly, it is very, very clean, with little in the way of deposits. Bear in mind that my car is an ’06 which has just clicked over 68k miles, so I was expecting at least a little gunk – as it’s not got any, I wonder if it has been replaced before ?

I didn’t want to feel I had done nothing, so I cleaned it anyway using some of this nasty stuff :

I then started on putting it all back together – this is just a shot to show all the bits, I was quite amazed that the sound generator (sat on top of the engine) is so large, given that it’s only purpose is to… well, generate sound :

Putting it back together is simply the reverse of what you’ve done. However at this point I realised that I had made an error because I simply couldn’t get the small end of the sound generator re-attached, no matter how hard I tried – there was just too little space to get any leverage. So, if you do this then undo the torx bolt that sits in the hole circled in green in the photo below :

Then just unclip the bulkhead end of the whole assembly from the firewall and pull the whole lot out, or you could undo the jubilee clip indicated by the green arrow in the following photo. The former is simpler, and would have saved me at least 30mins of swearing and scraped knuckles :

So there you have it – a fully documented N52 DISA removal guide, complete with errors for future generations to avoid… It was pretty much a waste of a couple of hours though, as BMW seem to have learned their lesson and toughened up the part in the newer engine. That said, I am sure it can go wrong, and perhaps can get gunked up, so if it does I hope this has helped you !
UPDATED 19/03/19 - 7 years later and it would appear issues can arise with perishing of the green rubber, so don’t be lulled into a false sense of security !
Thread here from today : viewtopic.php?f=3&t=113175&p=1632354#p1632354
Thanks to propaintballa for posting up the new pics
