Not joined yet? Register for free and enjoy features such as alerts, private messaging and viewing latest posts and topics.

DISA Removal and Maintenance - N52 Engine (Pic Heavy)

User avatar
Bing
Legend
Legend
Posts: 26514
Joined: Sun Oct 02, 2011 7:19 pm
Location: Exiled Scot in Maidstone

DISA Removal and Maintenance - N52 Engine (Pic Heavy)

Post by Bing » Sat Apr 07, 2012 7:03 pm

Casting around this forum you find a lot of stuff that you think will be a good idea – an example of this that I found was Shipkiller’s excellent guide to DISA maintenance (http://www.z4-forum.com/forum/viewtopic ... 30&t=12150). Seemed a relatively simple job with potential upside in terms of prevention of a problem / increase in performance – and an excuse to have a proper poke round my engine bay.

I have a 2006 3.0Si though, and this has the N52 engine which is quite different to the M54 (pre-facelift engine) to which Shipkiller’s thread relates. There’s only one guide from someone in his thread doing it on the N52 engine, and whilst it helped me it's a little light on detail and I reckoned a thread with some photos would be in order. I am not an engineer, so this is a bit mickey mouse and I make no apologies for any terminology I get wrong – anyone who knows their way around their engine won’t need this anyway…

It is worth noting before you even start that I do not think this is necessary as preventative maintenance on the N52 engine because of changes that BMW have obviously made to the system based on experience of the M54 issues. However, should you have an issue that you think may be DISA-related, then hopefully this will help you.

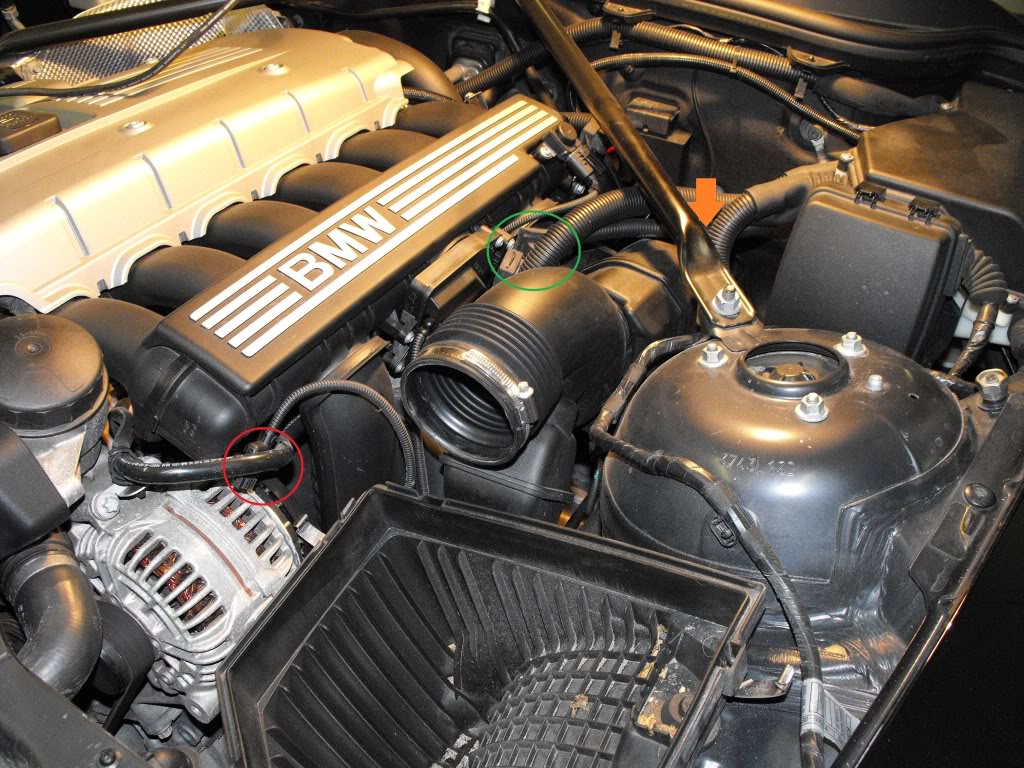
So, here’s the start picture – you’re after getting the bad boy circled in red out to examine and clean. First things first, get the air filter box out the way, with a flat head screw driver under the metal clips shown by red arrows. Don’t worry, they won’t fall down into the engine bay as they remain attached to the lower part of the air filter system :

Image

You then need to loosen the jubilee clip circled in orange below, and undo the connection to the MAF (circled in red) by getting a small flat head screw driver under the clip circled in green and pulling gently off :

Image

Once you’ve done this you should be able to take the top of the air filter off. Tuck the MAF connector out of the way as in the red circle below, then move to the tubing at the rear of the sound generator assembly, circled in green :

Image

You need to pull off the rubber connectors circled in green below, and also disconnect the MAF input to the DISA, circled in orange, by getting a flat head screw driver under the clip and pulling gently. Tuck it out of the way with the other one, and tuck the larger plastic felxi hoses back under the strut brace.

Image

Next, remove the bracket that the rubber connectors were attached to, circled in red – you will need a socket set ratchet with an adaptor to fit a torx screw driver head into as there’s not a lot of space :

Image

At this point I made my first error of judgement, though I didn’t realise it until I went to put everything back together. I undid the jubilee clip on the back of the sound generator connected to a bracket attached to the engine. With hindsight I should have just removed the single torx screw on the bracket and taken the whole sound generator out. So, don’t do what you see in the next pic :

Image

The next pic shows my second error. I carefully undid the 4 torx screws holding the DISA in, but when I removed the sound generator I had left a connecting piece on, and couldn’t get the DISA out :

Image

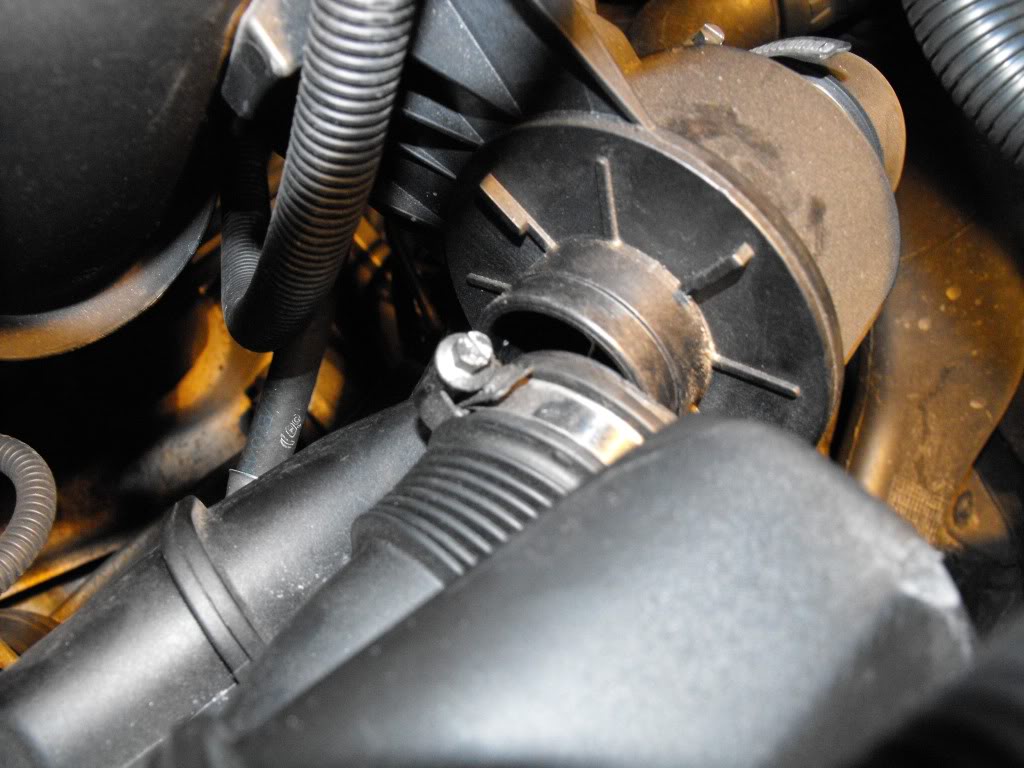
I loosened the jubilee clip on this part, then pulled and twisted, and pulled and twisted some more, but the little bugger wouldn’t come out… in the end I re-attached the main part of the sound generator and then used the leverage from that to pull it off. So, I should have just undone that one in the first place, leaving me with it looking like this :

Image

Out with the DISA, a wee peek inside – looks nice and clean, no deposits, just a bit oily hence the rag. You can see where the DISA fits in and the ‘pin’ on the end sits :

Image

And here’s the wee beasty itself. Note that the rubber seals are green, not orange as in the M54 version, and it is all a bit different in shape. First thing I noticed is that the flap cannot be turned by hand – this version must be motorised and electronically controlled by the MAF / ECU. It was also open in this position when I removed it (hopefully that’s normal…) :

Image

It also doesn’t have a pin on the end like the M54 version – it has a plastic coupling that is very secure :

Image

Finally, and I guess most disappointingly, it is very, very clean, with little in the way of deposits. Bear in mind that my car is an ’06 which has just clicked over 68k miles, so I was expecting at least a little gunk – as it’s not got any, I wonder if it has been replaced before ?

Image

I didn’t want to feel I had done nothing, so I cleaned it anyway using some of this nasty stuff :

Image

I then started on putting it all back together – this is just a shot to show all the bits, I was quite amazed that the sound generator (sat on top of the engine) is so large, given that it’s only purpose is to… well, generate sound :

Image

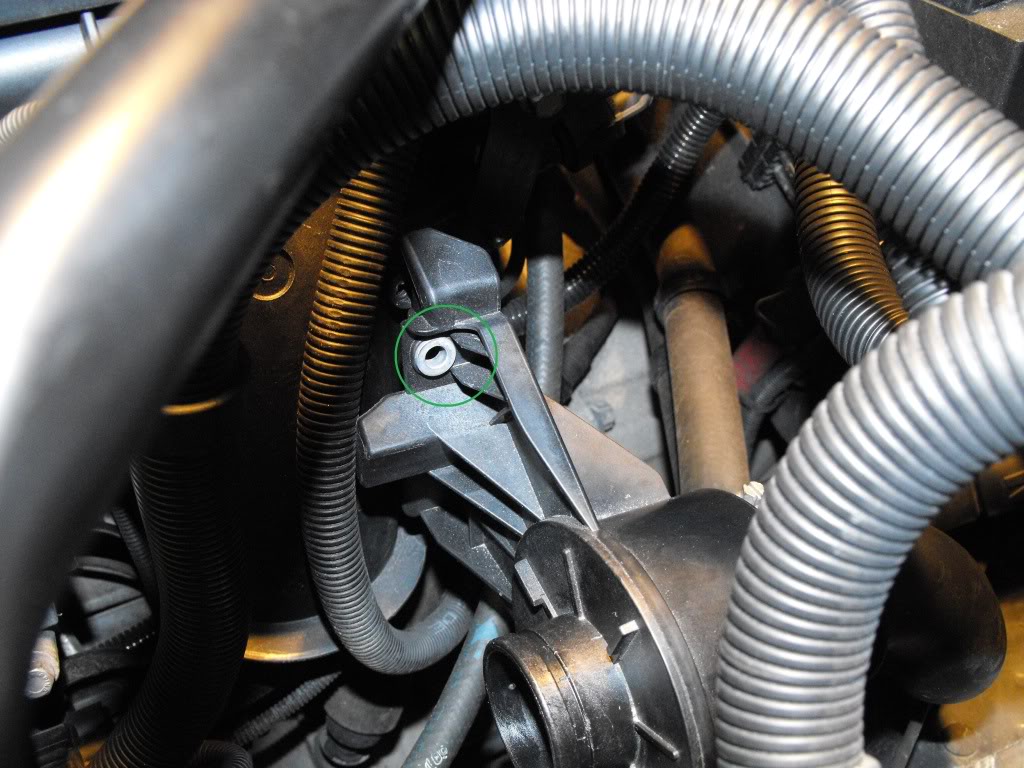
Putting it back together is simply the reverse of what you’ve done. However at this point I realised that I had made an error because I simply couldn’t get the small end of the sound generator re-attached, no matter how hard I tried – there was just too little space to get any leverage. So, if you do this then undo the torx bolt that sits in the hole circled in green in the photo below :

Image

Then just unclip the bulkhead end of the whole assembly from the firewall and pull the whole lot out, or you could undo the jubilee clip indicated by the green arrow in the following photo. The former is simpler, and would have saved me at least 30mins of swearing and scraped knuckles :

Image

So there you have it – a fully documented N52 DISA removal guide, complete with errors for future generations to avoid… It was pretty much a waste of a couple of hours though, as BMW seem to have learned their lesson and toughened up the part in the newer engine. That said, I am sure it can go wrong, and perhaps can get gunked up, so if it does I hope this has helped you !

UPDATED 19/03/19 - 7 years later and it would appear issues can arise with perishing of the green rubber, so don’t be lulled into a false sense of security !

Thread here from today : viewtopic.php?f=3&t=113175&p=1632354#p1632354

Thanks to propaintballa for posting up the new pics :thumbsup:
Last edited by Bing on Tue Mar 19, 2019 9:44 pm, edited 1 time in total.
Current... Silver Grey ///M Roadster, non-flimper spec, Imola Red nappa, permanent ear-to-ear grin 8)

Previous... 3.0Si Sport Roadster, Black Sapphire, Dream Red leather with lots of toys and lots of mods...

User avatar
Stuart Truman
Lifer
Lifer
Posts: 13039
Joined: Wed Jul 27, 2011 10:59 pm
Location: The Cotswolds

DISA Removal and Maintenance - N52 Engine (Pic Heavy)

Post by Stuart Truman » Sat Apr 07, 2012 8:35 pm

Nice write up, and it's always good to document the "gotchas" :thumbsup:


Tapatalking...
Add yourself to the Z4 Map HERE! Instructions HERE!
Z4M Roadster, Imola Red, with Stubby and Intravee II. Low Miles per Gallon, High Smiles per Gallon
Previously Alpina Roadster S #69 Alpina Blue

User avatar
Bing
Legend
Legend
Posts: 26514
Joined: Sun Oct 02, 2011 7:19 pm
Location: Exiled Scot in Maidstone

Re: DISA Removal and Maintenance - N52 Engine (Pic Heavy)

Post by Bing » Sat Apr 07, 2012 9:01 pm

Thanks Stuart, just doing my bit - someone might need it sometime. Was good to have a decent look at where a Gruppe M intake might sit one day too :evil:
Current... Silver Grey ///M Roadster, non-flimper spec, Imola Red nappa, permanent ear-to-ear grin 8)

Previous... 3.0Si Sport Roadster, Black Sapphire, Dream Red leather with lots of toys and lots of mods...

User avatar
Three_thirty_I
Newbie
Newbie
Posts: 9
Joined: Fri Nov 09, 2012 12:42 pm

Re: DISA Removal and Maintenance - N52 Engine (Pic Heavy)

Post by Three_thirty_I » Fri Nov 09, 2012 1:25 pm

This thread is what brought me to the is forum! Great write-up and info!!

Reason for my search is that I have been battling with a rattling noise from the engine when under load at lower revs. Car is an E90 330i manual, but same engine as above! At first I thought it was dual mass flywheel chatter, then pinging, but have since ruled this both out. Just to clarify, it's not the metallic ticking noise from the hydraulic lifters, mine is luckily not affected by this. The car has been to the agents and no codes come up. Took it to a specialist tuner and they reported that the DISA flaps are making noise - they are making constant adjustments and/or fluttering. They also ruled out pinging and verified that the knock sensors were functioning properly. Other issues are that the thermostat is not allowing the engine to get up to proper operating temperatures when cold, and the valvetronic motor is apparently out of spec by 10%.

They recommend replacing both DISA flaps and the theromostat - the valvetronic motor can be recalibrated with software (not sure). Agents had the car for this issue while it was still under motorplan but could not find these faults and fix, so with the specialist tuner's report I went back to the agents - waste of time because they insist on running their own diagnostics which is all static and shows everything it fine. DISA motors are working, but noisy, thermostat is working and of course the weather was warm when they had the car. Then they want to continue playing the "pinging is normal for these engines with our 95 unleaded fuel, and even worse with the automatics) - anyone smell that, smells like poo?!?

So considering replacing these items myself starting with DISA motor 1 which is the one shown above, so this write-up is very very helpful!
BMW E90 330i (M) '05 (His) | (Hers) BMW E46 320i f/l (M) '03

Image
Image

User avatar
Bing
Legend
Legend
Posts: 26514
Joined: Sun Oct 02, 2011 7:19 pm
Location: Exiled Scot in Maidstone

Re: DISA Removal and Maintenance - N52 Engine (Pic Heavy)

Post by Bing » Fri Nov 09, 2012 2:33 pm

I really hoped someone would find this useful - so delighted to have been able to help :thumbsup:

Now, go buy a Z :evil:

Hope it all works out for you.
Current... Silver Grey ///M Roadster, non-flimper spec, Imola Red nappa, permanent ear-to-ear grin 8)

Previous... 3.0Si Sport Roadster, Black Sapphire, Dream Red leather with lots of toys and lots of mods...

User avatar
Three_thirty_I
Newbie
Newbie
Posts: 9
Joined: Fri Nov 09, 2012 12:42 pm

Re: DISA Removal and Maintenance - N52 Engine (Pic Heavy)

Post by Three_thirty_I » Fri Nov 09, 2012 5:27 pm

Thanks again!

Yep, would love to get a Z4 M some day!!! 8)
BMW E90 330i (M) '05 (His) | (Hers) BMW E46 320i f/l (M) '03

Image
Image

User avatar
aquazi
Lifer
Lifer
Posts: 8167
Joined: Fri Oct 02, 2009 9:20 pm
Location: Derby + N. London

Re: DISA Removal and Maintenance - N52 Engine (Pic Heavy)

Post by aquazi » Fri Nov 09, 2012 6:00 pm

Wow very detailed... Good work :thumbsup:

I could barely get my airbox lid off though... So doubt i'd try this :roll:

User avatar
Bing
Legend
Legend
Posts: 26514
Joined: Sun Oct 02, 2011 7:19 pm
Location: Exiled Scot in Maidstone

Re: DISA Removal and Maintenance - N52 Engine (Pic Heavy)

Post by Bing » Fri Nov 09, 2012 10:26 pm

aquazi wrote:Wow very detailed... Good work :thumbsup:

I could barely get my airbox lid off though... So doubt i'd try this :roll:
Just as well you don't need to, but come on - my lack of skills is clearly evidenced on my many posts, so if I can do it a well trained lemur probably could :D
Current... Silver Grey ///M Roadster, non-flimper spec, Imola Red nappa, permanent ear-to-ear grin 8)

Previous... 3.0Si Sport Roadster, Black Sapphire, Dream Red leather with lots of toys and lots of mods...

User avatar
Mark-Z4
Senior Member
Senior Member
Posts: 1097
Joined: Wed Apr 03, 2013 10:23 pm
Location: South West

Re: DISA Removal and Maintenance - N52 Engine (Pic Heavy)

Post by Mark-Z4 » Tue Aug 13, 2013 9:35 pm

Checked mine today, all good, feels stable and the pin mechanism feels much more solid than the older version. The flap was found open and was solid in position.


Thanks for the write up Bing 8)
E86 - Space Grey | Grey Oregon Pearl Leather | Sport Interior | ///M Bumper | Aero Skirts | Piano Black Trim | ///M Wheel | Eibach Pro | CSL | HID | LED | ZHP | MM Tips | Stubby SOLD

User avatar
Bing
Legend
Legend
Posts: 26514
Joined: Sun Oct 02, 2011 7:19 pm
Location: Exiled Scot in Maidstone

Re: DISA Removal and Maintenance - N52 Engine (Pic Heavy)

Post by Bing » Tue Aug 13, 2013 9:36 pm

All part of the service :thumbsup: :D
Current... Silver Grey ///M Roadster, non-flimper spec, Imola Red nappa, permanent ear-to-ear grin 8)

Previous... 3.0Si Sport Roadster, Black Sapphire, Dream Red leather with lots of toys and lots of mods...

Incompatible
Member
Member
Posts: 580
Joined: Fri Oct 05, 2007 8:42 pm
Location: San Diego

Re: DISA Removal and Maintenance - N52 Engine (Pic Heavy)

Post by Incompatible » Wed Aug 14, 2013 5:12 pm

Great write up! Thanks for posting.
If you can't take the time to teach a kid something good, someone will take the time to teach them something bad.
2007 AW Z4 3.0Si Coupe

Big_Toe_Knee
Newbie
Newbie
Posts: 21
Joined: Thu Mar 29, 2012 10:27 pm
Location: Peterborough

Re: DISA Removal and Maintenance - N52 Engine (Pic Heavy)

Post by Big_Toe_Knee » Tue Oct 08, 2013 8:25 pm

Hi guys, before I purchase a new DISA can someone confirm that the actuator should be in its open position when removed? Mine is half way between open and closed, it also has a little play, should it be entirely rigid?

I've added a link to a photo of my DISA removed, hope it works.

https://www.dropbox.com/s/ros1zn7rv0ju8 ... 7%2027.jpg

BTW, great write up :thumbsup:

User avatar
Bing
Legend
Legend
Posts: 26514
Joined: Sun Oct 02, 2011 7:19 pm
Location: Exiled Scot in Maidstone

Re: DISA Removal and Maintenance - N52 Engine (Pic Heavy)

Post by Bing » Tue Oct 08, 2013 8:34 pm

Mine was fully open and didn't move by hand - if I recall correctly I felt that if I forced it I'd break it. So on the basis of my experience only, I'd say it should be fully open and shouldn't move... Not sure if someone else can confirm ?

And you're welcome - but if you get a chance you owe us some pics and an intro in the newbies section :D
Current... Silver Grey ///M Roadster, non-flimper spec, Imola Red nappa, permanent ear-to-ear grin 8)

Previous... 3.0Si Sport Roadster, Black Sapphire, Dream Red leather with lots of toys and lots of mods...

Big_Toe_Knee
Newbie
Newbie
Posts: 21
Joined: Thu Mar 29, 2012 10:27 pm
Location: Peterborough

Re: DISA Removal and Maintenance - N52 Engine (Pic Heavy)

Post by Big_Toe_Knee » Tue Oct 08, 2013 9:29 pm

Thanks Bing, I have intro'd in the newbies section. I've added a pic too of my Z. I'll add a few more now I know how :)

Thanks for replying, I will try and get a video of the movement in the DISA it'll be easier to show rather than explain, I just want to be sure before I spent the £220 on a replacement. It's odd because it's position is not closed nor open but I between.

Also suspect my CCV is iffy, quite a lot of oil sat in the intake.
Image
56 Z4 Roadster | 2.5i Sport | Titanium Silver Metallic | Black Leather

Big_Toe_Knee
Newbie
Newbie
Posts: 21
Joined: Thu Mar 29, 2012 10:27 pm
Location: Peterborough

Re: DISA Removal and Maintenance - N52 Engine (Pic Heavy)

Post by Big_Toe_Knee » Tue Oct 08, 2013 9:47 pm

Just in case the link don't work.....

Image
Image
56 Z4 Roadster | 2.5i Sport | Titanium Silver Metallic | Black Leather

Post Reply