
Hi All,
I am now the proud owner of a mint condition wind deflector and full fitting kit (brackets for both the roll over hoops and boot lid) courtesy of handy_andy_100 who is sadly breaking his car. I thought fitting this would be a simple process, but having read up on the subject, there appears to be three approaches:
1. Buy new roll over hoop covers (with the holes cut out), fit these and simply screw the brackets into place.
2. Drill the existing roll over hoop covers to expose the screw threads, then screw the brackets into place
3. Drill very small holes into the roll over hoop covers, then use short self tapping screws to secure the brackets in place
If I understand things correctly, option 1 is the best method, but will add another £120 or so to the cost which I want to avoid. Option 2 sounds like the most risky, but if careful will deliver the integrity of option 1. Option 3 is the most cost effective and others have done this successfully.
I would like to pursue option 2 or 3, but am a little reluctant to start drilling without clear instructions. Thus does anyone have the exact dimensions regarding where holes should be drilled (photos would help enormously), the size of the holes, the size of screws (option 3) etc.
Many thanks, James
Not joined yet? Register for free and enjoy features such as alerts, private messaging and viewing latest posts and topics.
Fitting wind deflector - solved 'how to'.
-
jnwright71
- Member

- Posts: 158
- Joined: Tue Mar 18, 2014 8:28 pm
Fitting wind deflector - solved 'how to'.
Last edited by jnwright71 on Sat Aug 15, 2015 11:14 pm, edited 1 time in total.
2006 Z4 2.5si roadster - Silvergrey, oregon peal grey leather, cruise, BT
-
samZ4M
- Member

- Posts: 648
- Joined: Tue Apr 23, 2013 10:20 am
- Location: Oxford
Re: Fitting wind deflector
double sided sticky tape the bracket to the hoop?
-
AndrewP
- Member
- Posts: 263
- Joined: Wed Jan 11, 2012 12:22 am
- Location: Livingston
Re: Fitting wind deflector
I did option 2, you can lever the roll hoop covers off carefully (just the front IIRC), mark where the threaded holes are and drill - there's a reasonable amount of leeway as the bracket is quite wide in comparison.
-
jnwright71
- Member
- Posts: 158
- Joined: Tue Mar 18, 2014 8:28 pm
Re: Fitting wind deflector
Cheers both. I don't want to risk double sided tape as i am not sure this would be strong enough !
Andrew P, do you have any photos and / or the dimensions ?
Can anyone else help ?
Ta. James
Andrew P, do you have any photos and / or the dimensions ?
Can anyone else help ?
Ta. James
2006 Z4 2.5si roadster - Silvergrey, oregon peal grey leather, cruise, BT
-
srhutch

- Moderator

- Posts: 26959
- Joined: Tue Jun 19, 2007 1:22 pm
- Location: East Sussex, UK
- Contact:
Re: Fitting wind deflector
Double sided tape 
I would go for option two. I'm sure someone will have the dimensions of sheer to drill the holes. The brackets will cover any slight variance in position.
I would go for option two. I'm sure someone will have the dimensions of sheer to drill the holes. The brackets will cover any slight variance in position.

-
85genius
- Senior Member

- Posts: 1857
- Joined: Wed Jun 24, 2015 2:20 pm
Re: Fitting wind deflector
The brackets are big so surely you don't have to be that accurate with the drilling as they will cover the holes. I reckon you can just clip the deflector into the bracket and hold in place in-between the hoops to get the position . Then draw round the bracket on the hoops with something you can rub off (pencil or dry wipe marker maybe) once you have your bracket position mark out the hole position and drill through, if it's slightly too high or low it doesn't matter just make the hole bigger up or down it is going to be covered by the bracket for the rest of eternity do no one will ever see it
Mine came with the deflector BTW so I never had to do it but if I did I would have done it like that
Mine came with the deflector BTW so I never had to do it but if I did I would have done it like that
Audi quattro driver
NOW SOLD - Ruby Black 3.0 SI Roadster

Previous - E85 2.5 Ti Silver - See avatar photo - R.I.P Destroyed by a Tranny
NOW SOLD - Ruby Black 3.0 SI Roadster
Previous - E85 2.5 Ti Silver - See avatar photo - R.I.P Destroyed by a Tranny
-
OnlineScooba_Steve
- Lifer

- Posts: 5284
- Joined: Wed Feb 19, 2014 3:01 pm
- Location: NW London
Re: Fitting wind deflector - solved 'how to'.
Could you take some pics and measurements? That would help the retrofitters with positioning 
3.0si Sport: F10 Illuminated ZHP, Retrofit Cruise, OE Stubby, Gaptech RCH+, Kenwood BT73DAB + Handsfree, HIDs, LED Sidelights, OE LED Number Plate Lights, Custom LED strip bootlight.
-
Russ59
- Senior Member
- Posts: 1670
- Joined: Mon Nov 30, 2009 4:49 pm
- Location: Mansfield Woodhouse
Re: Fitting wind deflector - solved 'how to'.
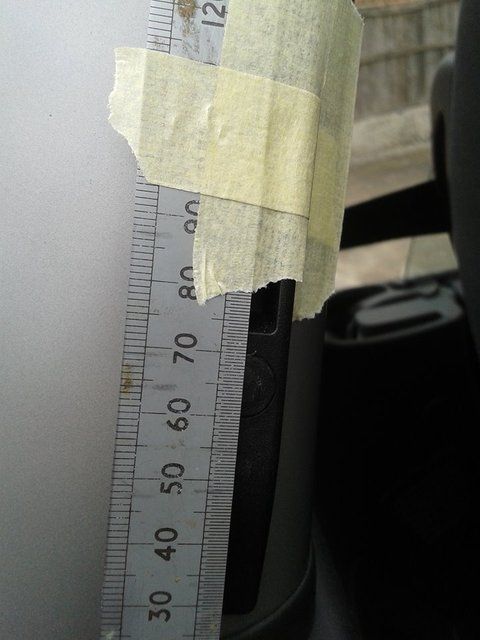
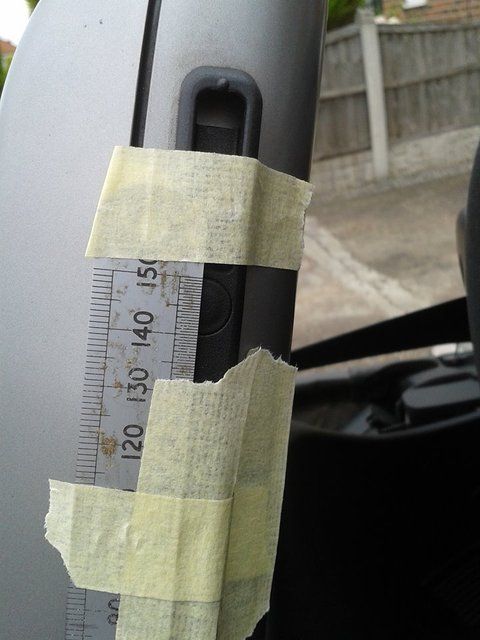
Someone asked me if I'd fitted my own at the Shepshed meet yesterday. I didn't but here are a few pics and measurements I have just done for anyone else wanting to fit there own.
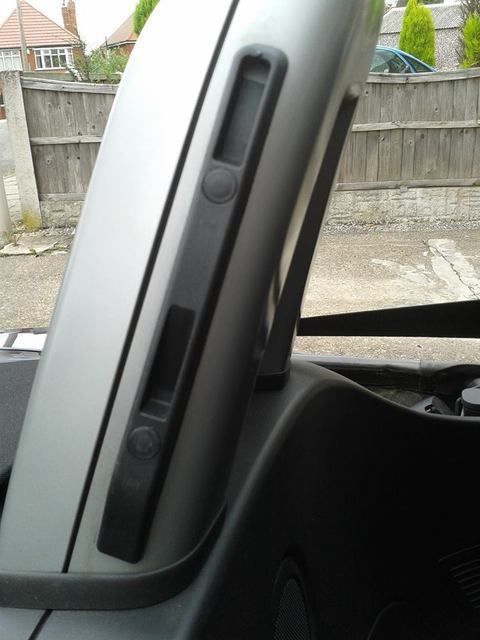
Bottom of bracket 10mm up from trim around hoop covers.
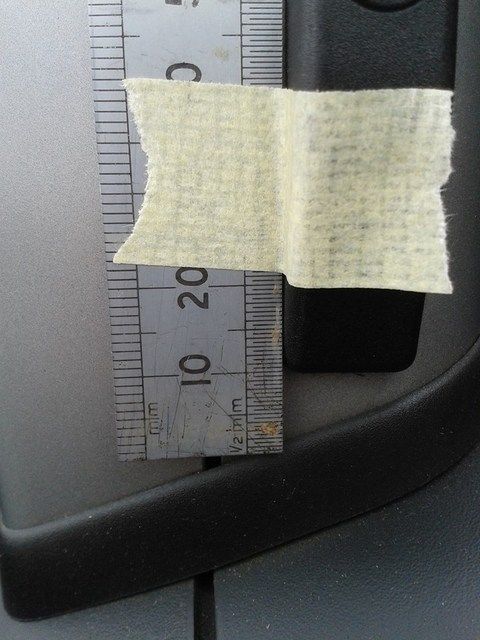
Edge of bracket 7mm away from back of front hoop cover
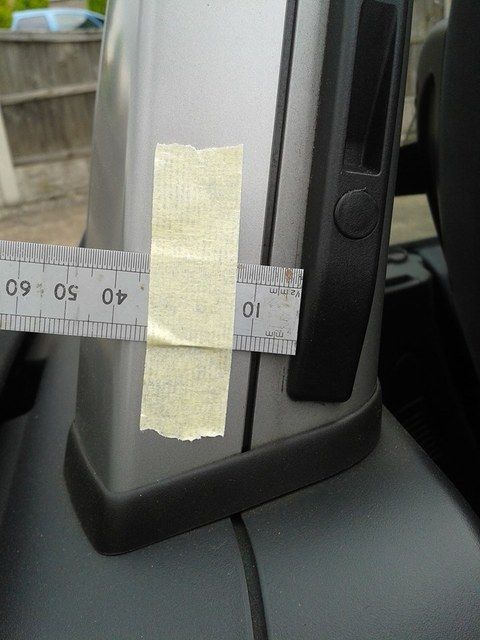
First hole 65mm up from bottom of trim around hoop covers and second hole 145mm up from bottom of trim around hoop covers

Bottom of bracket 10mm up from trim around hoop covers.

Edge of bracket 7mm away from back of front hoop cover

First hole 65mm up from bottom of trim around hoop covers and second hole 145mm up from bottom of trim around hoop covers


2005, 3.0l Toledo Blue, sports seats, sports suspension, ZHP, MFSW,4 clear spot rear lights, clear side repeaters and third brake light , 19" AXE EX14 wheels, DIY carbon badges, interior parts gloss black wrapped, rear spoiler
-
jnwright71
- Member
- Posts: 158
- Joined: Tue Mar 18, 2014 8:28 pm
Re: Fitting wind deflector - solved 'how to'.
Thanks Russ59.
I actually completed my install on Saturday having visited a dealer to get just those measurements.
All, here is how I did it:
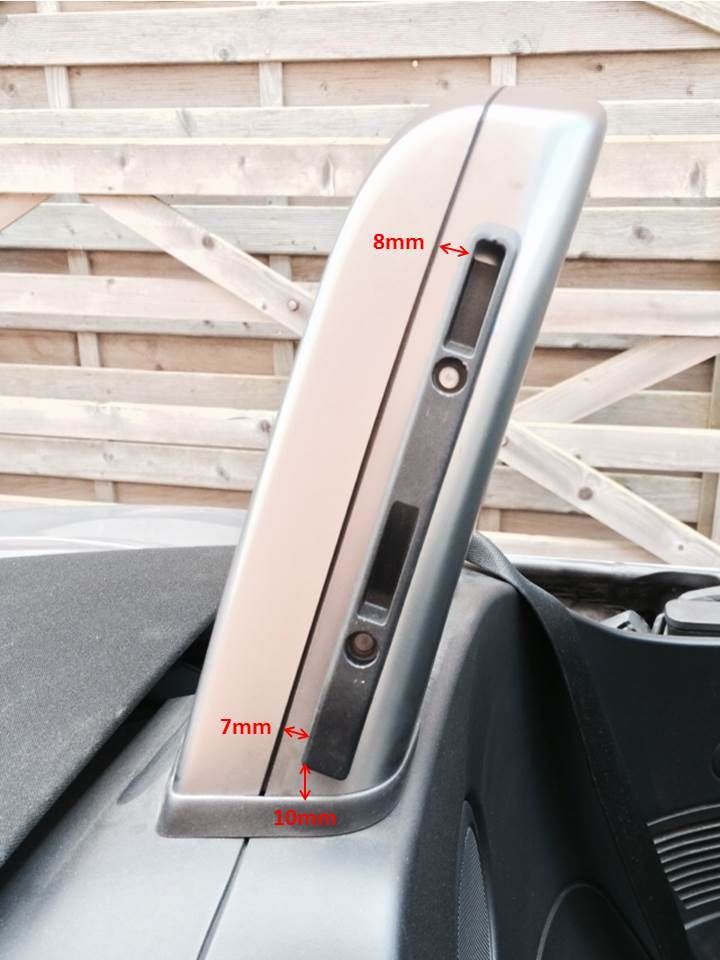
- Made up a couple of paper templates to make this easy. I first cut a strip the length of the bracket, with it being 7mm wide and one end and 8mm wide at the other. I then cut a 2mm wide x 10mm long piece.
- Having placed 2 small balls of blu-tac on the reverse of each bracket, I roughly positioned them and then fine tuned the location using the paper templates.
- Once happy with the final location, I marked the centre of each screw hole with a pencil, then removed the brackets
- Using an 8mm sharp drill bit (the type for wood with a nice point), I slowly drilled through the plastic covers to reveal the threads in the roll over hoops
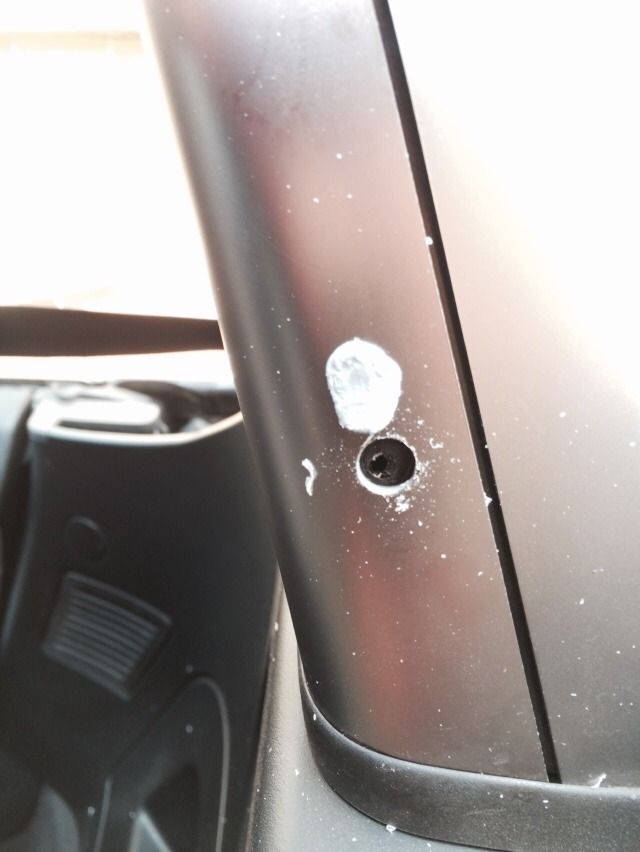
- I then vacuumed up the swarf before attaching the brackets using the hex head screws supplied.
Very easy, but just one word of caution. Please, please do not over tighten the screws as one of mine sheared off (that is a whole other story) !!
Also for info, the boot brackets need 4 x small plastic speed nuts to secure the screws. These are not listed on realoem.com or anywhere else that is easy to find. However, I can confirm they are a standard BMW part, no. 63171367868 and cost a very reasonable £0.23 + VAT each.
Hope this helps,
James
I actually completed my install on Saturday having visited a dealer to get just those measurements.
All, here is how I did it:
- Made up a couple of paper templates to make this easy. I first cut a strip the length of the bracket, with it being 7mm wide and one end and 8mm wide at the other. I then cut a 2mm wide x 10mm long piece.
- Having placed 2 small balls of blu-tac on the reverse of each bracket, I roughly positioned them and then fine tuned the location using the paper templates.

- Once happy with the final location, I marked the centre of each screw hole with a pencil, then removed the brackets
- Using an 8mm sharp drill bit (the type for wood with a nice point), I slowly drilled through the plastic covers to reveal the threads in the roll over hoops

- I then vacuumed up the swarf before attaching the brackets using the hex head screws supplied.
Very easy, but just one word of caution. Please, please do not over tighten the screws as one of mine sheared off (that is a whole other story) !!
Also for info, the boot brackets need 4 x small plastic speed nuts to secure the screws. These are not listed on realoem.com or anywhere else that is easy to find. However, I can confirm they are a standard BMW part, no. 63171367868 and cost a very reasonable £0.23 + VAT each.
Hope this helps,
James
2006 Z4 2.5si roadster - Silvergrey, oregon peal grey leather, cruise, BT
-
OnlineScooba_Steve
- Lifer
- Posts: 5284
- Joined: Wed Feb 19, 2014 3:01 pm
- Location: NW London
Re: Fitting wind deflector - solved 'how to'.
Thanks James and Russ
3.0si Sport: F10 Illuminated ZHP, Retrofit Cruise, OE Stubby, Gaptech RCH+, Kenwood BT73DAB + Handsfree, HIDs, LED Sidelights, OE LED Number Plate Lights, Custom LED strip bootlight.
-
srhutch
- Moderator
- Posts: 26959
- Joined: Tue Jun 19, 2007 1:22 pm
- Location: East Sussex, UK
- Contact:
Re: Fitting wind deflector - solved 'how to'.
Just one thing, those brackets are upside down. The chamfer is meant to be at the top.
-
Russ59
- Senior Member
- Posts: 1670
- Joined: Mon Nov 30, 2009 4:49 pm
- Location: Mansfield Woodhouse
Re: Fitting wind deflector - solved 'how to'.
Can't see how!!srhutch wrote:Just one thing, those brackets are upside down. The chamfer is meant to be at the top.
If the ones in our pics were turned upside down the slots would be too low down to accept the wind deflector.
2005, 3.0l Toledo Blue, sports seats, sports suspension, ZHP, MFSW,4 clear spot rear lights, clear side repeaters and third brake light , 19" AXE EX14 wheels, DIY carbon badges, interior parts gloss black wrapped, rear spoiler
-
Russ59
- Senior Member
- Posts: 1670
- Joined: Mon Nov 30, 2009 4:49 pm
- Location: Mansfield Woodhouse
Re: Fitting wind deflector - solved 'how to'.
Here you go. No 4 down the PDF.srhutch wrote:Just one thing, those brackets are upside down. The chamfer is meant to be at the top.
http://www.roadstersolutions.com/media/ ... PcMesh.pdf
2005, 3.0l Toledo Blue, sports seats, sports suspension, ZHP, MFSW,4 clear spot rear lights, clear side repeaters and third brake light , 19" AXE EX14 wheels, DIY carbon badges, interior parts gloss black wrapped, rear spoiler
-
Geezah
- Senior Member
- Posts: 1347
- Joined: Tue Nov 19, 2013 7:33 pm
- Location: Monifieth
Re: Fitting wind deflector - solved 'how to'.
Excellent! Thank you very much guys, given me the confidence to have a go this weekend!
2008 Z4 2.0i SE E85, Space Grey, 18" 241 staggered rims, 255/35/18, 225/40/18, 2 tone anthracite/silverstone leather Msport heated seats, M sport MFC Steering wheel, Bluetooth, Comfort pack, Tracker, Automatic climate control, Gaptech, Blah, blah.
-
srhutch
- Moderator
- Posts: 26959
- Joined: Tue Jun 19, 2007 1:22 pm
- Location: East Sussex, UK
- Contact:
Re: Fitting wind deflector - solved 'how to'.
I stand corrected. From an engineering point of view though it's arse about face but there you go.Russ59 wrote:Here you go. No 4 down the PDF.srhutch wrote:Just one thing, those brackets are upside down. The chamfer is meant to be at the top.
http://www.roadstersolutions.com/media/ ... PcMesh.pdf