


My 2004 BMW Z4 E85's differential clunks on acceleration, specifically in 1st 2nd, and 3rd gear, at low speeds. The clunk only happens when engaging or disengaging the accelerator. I lift my foot off the petal and *clunk* it disengages, and I put my foot back on *clunk* it engages.
The sound seems to come from the back of the car and is really starting to annoy me because it is audible from outside the car, and can be felt on the inside.
For more information on how this repair was researched & which options were considered please view this thread: viewtopic.php?t=145990
Hypothesis
Greasing the differential input flange can silence the clank on acceleration and deceleration. I was skeptical, it seemed too simple, but my results are undeniable.
Results
After greasing the flange, and putting the vehicle back together, the clank is gone. I slipped the car into reverse and did not hear the customary clanking, quiet and smooth driving. (I will provide updates over time to test the longevity of this solution)
QUIETER & SMOOTHER
Special Thanks to:
Patriot66 - Constant technical support throughout the project.
AndyMitton - Original Procedure - viewtopic.php?t=55471
Purpose of this Post
This post is intended to mainly provide more clarity on the amount of grease and torque specifications. I do not intend to take away any from any of AndyMitton's work and only to help future enthusiasts.
Bill of Materials
1. High Temp Grease (Moly) I used LiquiMoly Long Life Grease $11.50 https://www.amazon.com/gp/product/B01BS ... UTF8&psc=1
2. Ribbed Torx Screws x4 $6.00 each (driveshaft to differential 26117571956)
https://www.fcpeuro.com/products/bmw-to ... 56#fitment
3. Exhaust Pipe Manifold Gasket x2 $9.49 each (18107502346)
https://www.fcpeuro.com/products/bmw-ex ... 8107502346
4. Differential Input Flange Nut Lock Plate x1 $4.95 (23211490120)
https://www.pelicanparts.com/More_Info/ ... yPassCat=Y
Tools Required
1. Metric Socket Set 8mm-30mm
2. Torx Screw Socket E12 (for ribbed torx screws driveshaft to differential) $9.99 (set)
https://www.amazon.com/gp/product/B0773 ... UTF8&psc=1
3. 30mm thin-walled socket (You can grind down the wall of a cheap one if you do not have a thin-walled one) $7.98
https://www.amazon.com/gp/product/B07QJ ... UTF8&psc=1
Exectutive Descisions
I did not purchase any replacement screws or nuts. The Torx screws are technically single-use. However, the torx screws only need 63 ft-lbs of torque, meaning that their structure is not compromised. I reused them, but do this at your own discretion. (I had purchased them but they were taking forever to arrive and I wanted to put the car back together)
Furthermore, I did not use a new differential nut lock plate. Once again, I did not feel the need to do so, and if something serious happens as a result I will update you all.
I also did not replace the gaskets on my exhaust to the manifold. I did not feel the need and instead sanded the existing ones and put a thin layer of sealant on them before reattaching the exhaust.
Torque Specs
Torx Screws (Size E12 Driveshaft to Differential) 63 Ft-Lbs
Exhast to manifold 22 Ft-Lbs
Differential Input Flange securing nut - 60 Ft-Lbs (After returning it to the original position I did 60 ft-lbs I could not find any clear torque specs online)
Project Length
5-10 hours depending on experience. This was my first time ever working on a vehicle so it took me multiple days and many tool purchases. If I were to do it again I could have it done in one day or 5 hours.
PROCEDURE
If the images are not showing up as in-line attachments, I have the Google Drive links to each image underneath each image as well
1. Jack up the vehicle, and set it on blocks, I had around 1.5 feet of clearance to work with.
https://drive.google.com/uc?id=157HxvqX ... CTsBo6SUFN
2. Remove this splash tray:
https://drive.google.com/uc?id=1GPHAV06 ... X1G4oOxhEI
3. Remove this black metal exhaust support tray:
https://drive.google.com/uc?id=1EJsGb9E ... Cr43qVokbH
4. Remove these 2 support beams that cross over the bottom of the vehicle (Black):
https://drive.google.com/uc?id=1XqH2lm4 ... J6P_Jj5TI6
5. Remove the Exhaust - There are four stud bolts that secure the exhaust to the manifold, these can become corroded and break for many people. They did not break on my vehicle, but I did take the precaution of soaking them in WD-40 for 10 minutes prior to trying to lose them.
https://drive.google.com/uc?id=1qGTI3Dj ... njpzIqx0yD
The muffler on the exhaust (Back of the car) is supported by hanging brackets secured by four nuts one of these locations is shown in this photo:
https://drive.google.com/uc?id=1ZYIaswP ... kQc1RcNVCg
(While removing the muffler on the back be sure to support its weight, do NOT let it drop because the weight could bend and damage the exhaust manifolds at the front of the vehicle) I used a jack to hold up the muffler box while taking it down.
6. Remove the splash covering to gain access to the drive shaft area:
https://drive.google.com/uc?id=1BkvpqDj ... NYGrbCUqZf
7. Remove the aluminum bracing that is blocking access to the differential:
https://drive.google.com/uc?id=1hQEFXPd ... UNycc6AeMU
8. MARK THE POSITION OF THE DRIVE SHAFT BEFORE MOVING FORWARDS
9. Remove the x4 torx screws (Torx E12 Torque 63 Ft-Lbs) securing the driveshaft to the differential:
https://drive.google.com/uc?id=1SPOfo6M ... O2HL7319rW
10. Push the drive shaft back (Towards the front of the car) to allow it to be brought down. DO NOT LET IT DROP. I supported the drive shaft end with a jack.
11. You will now use a 30mm socket to take off this large securing nut (image taken from Andy Mitton's write-up) MARK THE POSITION OF THIS NUT:
11.1 EXTREEMLY IMPORTANT When taking off this nut count the number of turns required to remove it, for me this was exactly eight full turns. When re-installing this nut make sure that it is at the location where you marked it before taking it off.
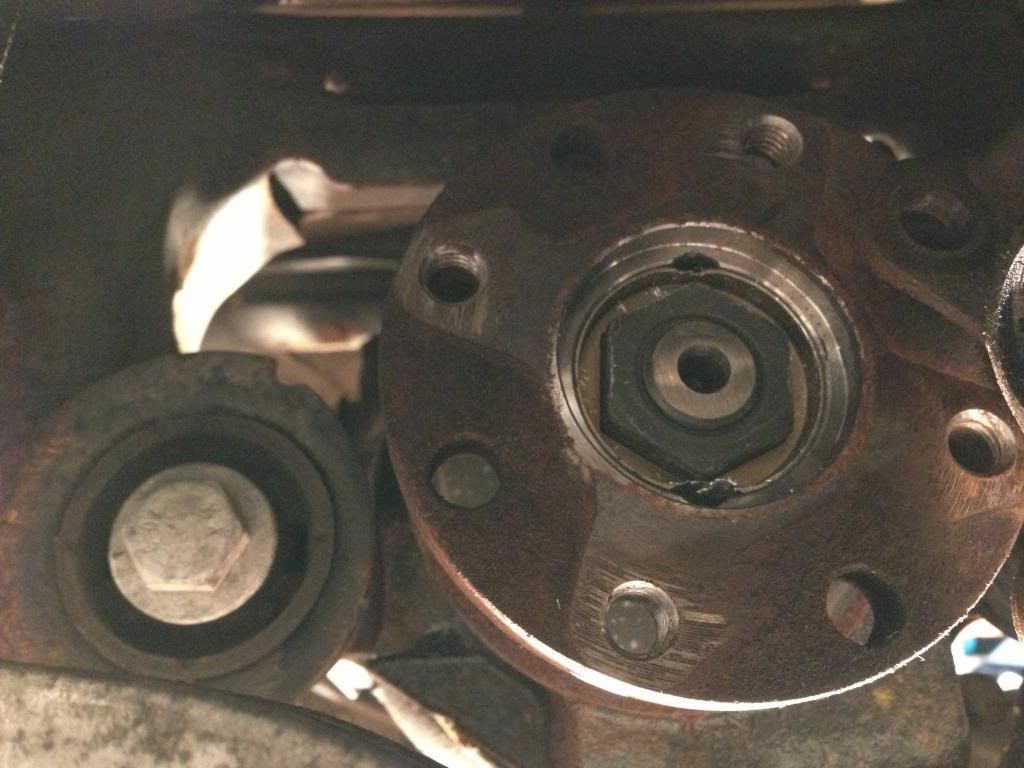
12. Remove the Input Flange!
https://drive.google.com/uc?id=1Tm2_6qw ... 5dh7ZY0vUD
13. Grease the Flange! (I used a large amount, I don't want to have to do this job again any time soon, I put some on the back tray and on the splines.)
https://drive.google.com/uc?id=1risC2h- ... ADqfzgHK3X
More greasing detail (Grease all smeared on the plate and splines:
https://drive.google.com/uc?id=1f36HOBN ... zcBgE4L_tv
More Greasing on the male splines on the differential:
https://drive.google.com/uc?id=1Rn0NEoB ... OSIXXMYAXV
14. Put the flange back on:
Assembled Flange with Greasing
https://drive.google.com/uc?id=1CbKb0fT ... 6pnkxGtyC8
15. Re-attach the securing nut and securing plate. I apologize for the lack of clarity on this important part of the procedure. For more clarification please refer to Andy Mitton's procedure. viewtopic.php?t=55471
Tighten the securing nut to the position you marked when disassembling, then torque it to around 60 Ft-Lbs
16. Re-attach the drive shaft, and slide it forward into the flange connection. Secure with x4 torx screws (E12) 63 Ft-Lbs
17. Re-attach the splash tray (Large covers the drive shaft)
18. Re-attach exhaust (Use a jack to support the muffler and slide the manifold side onto the stud bolts first)
19. Re-attach supports (Black and form a V shape on the bottom of the vehicle)
20. Re-attach the black splash tray (smaller)
20. Re-attach the silver splash tray. (Larger but thinner)
After doing all these steps, there should be no clanking from the differential. One should have a much quieter, and smoother driving experience. I am not entirely sure why this part is not greased in the first place, or if over 20 years if eventually all just washed away.
I will provide further information on the longevity of this procedure over time.
If you have any further questions about this procedure please feel free to ask.
Best regards
- Jordan

