Not joined yet? Register for free and enjoy features such as alerts, private messaging and viewing latest posts and topics.

Accessing E89 rear strut top mounts…

Specific discussion about the E89 2009 Z4 (sDrive35is, sDrive35i, sDrive30i, sDrive23i)
Post Reply
True-Blue
Lifer
Lifer
Posts: 3247
Joined: Sun Feb 10, 2019 2:10 pm
Location: Bristol/Bath

Accessing E89 rear strut top mounts…

Post by True-Blue » Mon Apr 22, 2024 1:09 pm

A quick run through with pics as requested by @Big Andra

In some ways replacing E89 rear struts is more straightforward than on the E85… after a bit of trial and error, once you know how to get to the top mounts…

The plastic push- fit rivets are reusable if treated with a bit of care.

First of all there are two that need to be removed which are hidden behind the bulkhead trim panel as follows:
IMG_3654.jpeg
IMG_3654.jpeg (194.88 KiB) Viewed 273 times
IMG_3655.jpeg
IMG_3655.jpeg (186.14 KiB) Viewed 273 times
Removing the two bulk rivets indicated makes this considerably easier:
IMG_3656.jpeg
IMG_3656.jpeg (137.46 KiB) Viewed 273 times
More in next post.
Last edited by True-Blue on Fri May 03, 2024 3:32 pm, edited 5 times in total.
Alpina Roadster S Lux no. 204 (1 of 15 uk cars in Alpina Blue)

Previous Z4’s :E89 30i, E89 20i, E85 3.0Si (X4) E85 3.0i, E86 3.0 Si, E85 2.5si, E85 2.5i

True-Blue
Lifer
Lifer
Posts: 3247
Joined: Sun Feb 10, 2019 2:10 pm
Location: Bristol/Bath

Accessing rear strut top mounts…

Post by True-Blue » Mon Apr 22, 2024 1:11 pm

Then it’s a case of removing the rivets that hold down the ‘top mount trim pieces’, which are next to the roof mechanism on both sides as follows;
IMG_3657.jpeg
IMG_3657.jpeg (136.61 KiB) Viewed 269 times
IMG_3660.jpeg
IMG_3660.jpeg (112.51 KiB) Viewed 269 times
Alpina Roadster S Lux no. 204 (1 of 15 uk cars in Alpina Blue)

Previous Z4’s :E89 30i, E89 20i, E85 3.0Si (X4) E85 3.0i, E86 3.0 Si, E85 2.5si, E85 2.5i

True-Blue
Lifer
Lifer
Posts: 3247
Joined: Sun Feb 10, 2019 2:10 pm
Location: Bristol/Bath

Accessing rear strut top mounts…

Post by True-Blue » Mon Apr 22, 2024 1:17 pm

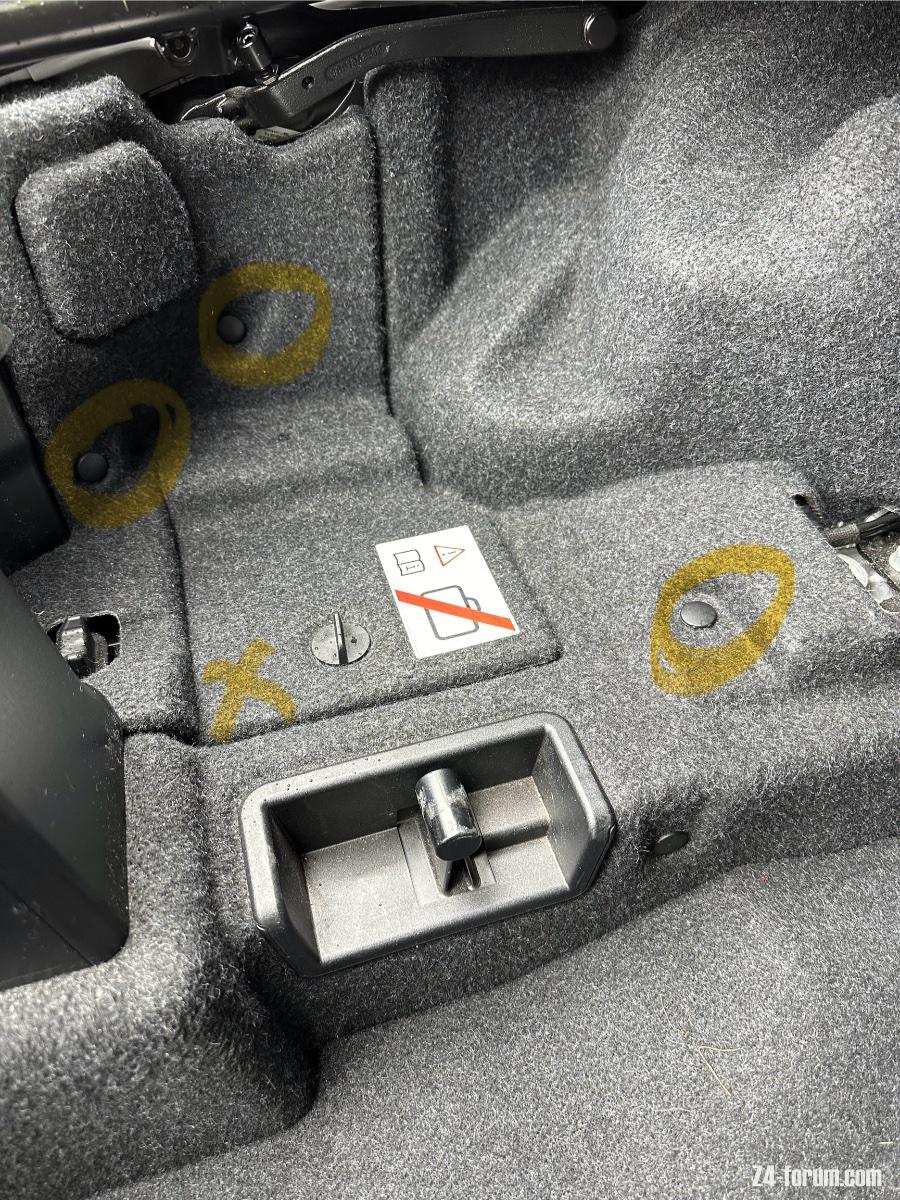
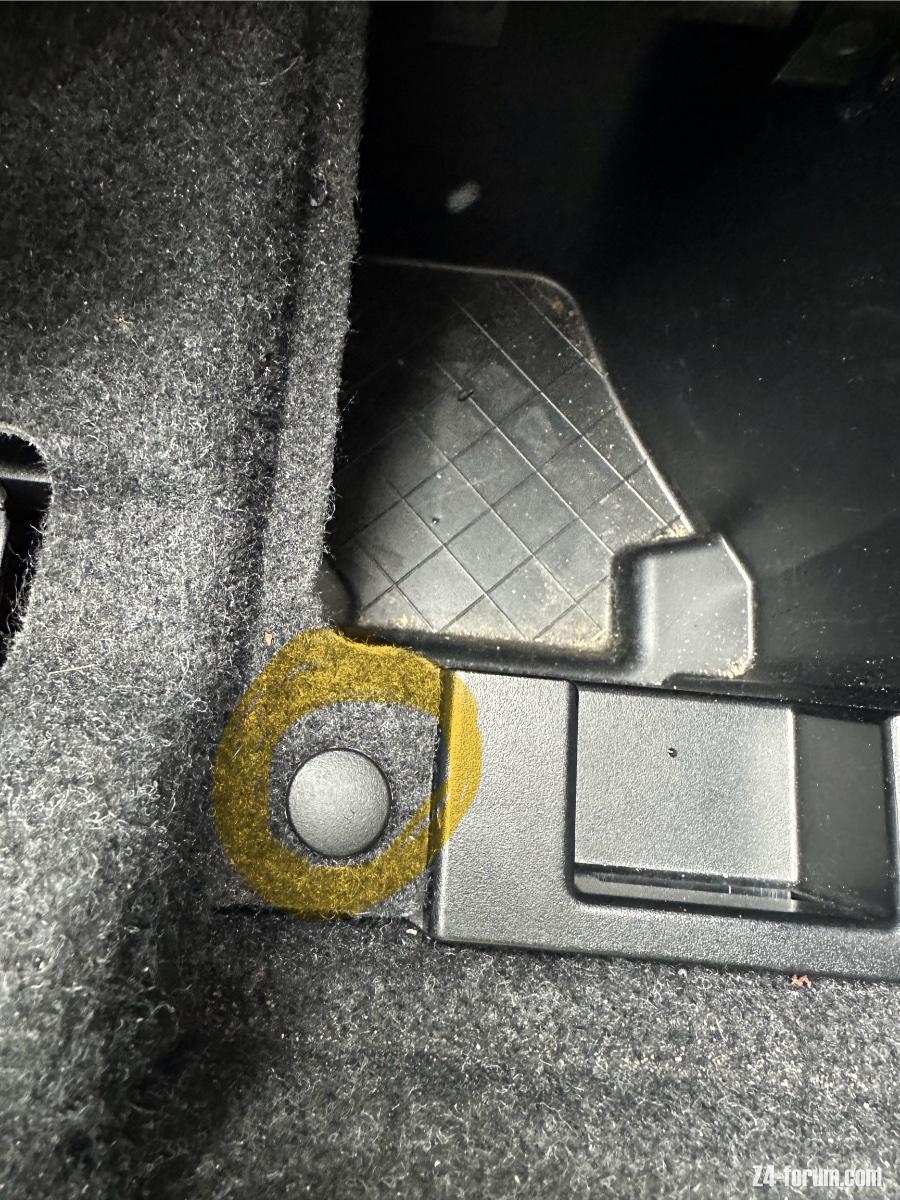
Then you need to remove the small storage box on the passenger side, this releases with a bit of wiggling once the two rivets to the left of the photo have been removed, and the hidden rivet beneath the lid have been removed (location marked with an X);
IMG_3668.jpeg
IMG_3668.jpeg (327.52 KiB) Viewed 266 times
IMG_3664.jpeg
IMG_3664.jpeg (231.83 KiB) Viewed 266 times
To remove any doubt, the corner trim and storage box come out as one piece.

Also, removing the fourth rivet on the boot floor in the first photo releases tension on the trim panel holding in the part to be moved /removed.

At this point, with a bit of force and possibly some swearing, you should be able to pull the trim piece out from behind the bulkhead and roof mechanism and either remove it completely or just move it so you have sufficient access to the top strut mount. On the passenger side.

If you can gain sufficient access without removing it completely, this makes it easier to reassemble. The other pieces of trim hold this piece in at the ‘boot end’, so it’s a bit awkward to get it back in if completely removed :thumbsup:

This is definitely the case on the drivers side as you don’t need to remove the corner boot trim.
Last edited by True-Blue on Tue Apr 23, 2024 12:30 pm, edited 6 times in total.
Alpina Roadster S Lux no. 204 (1 of 15 uk cars in Alpina Blue)

Previous Z4’s :E89 30i, E89 20i, E85 3.0Si (X4) E85 3.0i, E86 3.0 Si, E85 2.5si, E85 2.5i

True-Blue
Lifer
Lifer
Posts: 3247
Joined: Sun Feb 10, 2019 2:10 pm
Location: Bristol/Bath

Accessing rear strut top mounts…

Post by True-Blue » Mon Apr 22, 2024 1:27 pm

For the drivers side there’s a little less to do as there’s no storage box to be removed.
IMG_3667.jpeg
IMG_3667.jpeg (319.22 KiB) Viewed 263 times
I simply removed the rivets circled and this gave me enough wiggle room to manoeuvre this trim piece out of the way after pulling firmly to release it from behind the boot trim and roof mechanism.
Alpina Roadster S Lux no. 204 (1 of 15 uk cars in Alpina Blue)

Previous Z4’s :E89 30i, E89 20i, E85 3.0Si (X4) E85 3.0i, E86 3.0 Si, E85 2.5si, E85 2.5i

True-Blue
Lifer
Lifer
Posts: 3247
Joined: Sun Feb 10, 2019 2:10 pm
Location: Bristol/Bath

Accessing rear strut top mounts…

Post by True-Blue » Mon Apr 22, 2024 1:30 pm

To summarise, the trickiest bit really is manoeuvring the trim piece’s back into place, especially the storage box… it’s a case of trial and error really :thumbsup:

This is what the push fit rivets look like once separated;
IMG_3669.jpeg
IMG_3669.jpeg (51.92 KiB) Viewed 259 times
I separated them all and put them in a cup of freshly boiled water and left them in there for about half an hour. I then spread the prongs gently with blunt knife. Reinsert the pronged part first, you’ll have to apply very gentle pressure to the prongs, then push in the pin.

This worked much better for me than just poking them back in as they seemed to have lost their grip :thumbsup:
Alpina Roadster S Lux no. 204 (1 of 15 uk cars in Alpina Blue)

Previous Z4’s :E89 30i, E89 20i, E85 3.0Si (X4) E85 3.0i, E86 3.0 Si, E85 2.5si, E85 2.5i

Online
User avatar
B21
Lifer
Lifer
Posts: 5500
Joined: Tue Oct 05, 2021 7:15 pm
Location: In my Banana Yellow Space Shuttle...somewhere over Southern Caledonia

Accessing rear strut top mounts…

Post by B21 » Mon Apr 22, 2024 10:40 pm

True-Blue wrote: Mon Apr 22, 2024 1:30 pm To summarise, the trickiest bit really is manoeuvring the trim piece’s back into place, especially the storage box… it’s a case of trial and error really :thumbsup:

This is what the push fit rivets look like once separated;

IMG_3669.jpeg

I separated them all and put them in a cup of freshly boiled water and left them in there for about half an hour. I then spread the prongs gently with blunt knife. Reinsert the pronged part first, you’ll have to apply very gentle pressure to the prongs, then push in the pin.

This worked much better for me than just poking them back in as they seemed to have lost their grip :thumbsup:
Interesting technique..I’ll have to try it :thumbsup:
We choose to go to on with this endeavour at this time and do the other things, not because they are easy, but because they are hard…
A very modified Atacama Yellow 35is :thumbsup:

User avatar
Big Andra
Member
Member
Posts: 878
Joined: Tue Jul 17, 2018 1:45 pm
Location: Scotland

Accessing rear strut top mounts…

Post by Big Andra » Mon Apr 22, 2024 11:33 pm

Absolutely spot on :thumbsup:
2009 E89 2.5 Alpine white.

k755
Member
Member
Posts: 55
Joined: Mon Nov 02, 2020 3:44 pm

Accessing rear strut top mounts…

Post by k755 » Tue Apr 23, 2024 11:04 am

Agreed having just done the job the trim is the worst part to move the rest is easy as long as you can undo the bottom shock absorber bolt. i used a windy gun.

True-Blue
Lifer
Lifer
Posts: 3247
Joined: Sun Feb 10, 2019 2:10 pm
Location: Bristol/Bath

Accessing rear strut top mounts…

Post by True-Blue » Tue Apr 23, 2024 12:22 pm

k755 wrote: Tue Apr 23, 2024 11:04 am Agreed having just done the job the trim is the worst part to move the rest is easy as long as you can undo the bottom shock absorber bolt. i used a windy gun.
Yeah, I still haven’t bought a rattle-gun…

The bottom bolts are indeed an effort, but I found that a liberal application of WD40, waiting half an hour and then brute force with a breaker bar after jacking the hub up to get a bit more clearance was the solution. Be advised, this approach may lead to an unplanned release of bodily gas :rofl:
Alpina Roadster S Lux no. 204 (1 of 15 uk cars in Alpina Blue)

Previous Z4’s :E89 30i, E89 20i, E85 3.0Si (X4) E85 3.0i, E86 3.0 Si, E85 2.5si, E85 2.5i

True-Blue
Lifer
Lifer
Posts: 3247
Joined: Sun Feb 10, 2019 2:10 pm
Location: Bristol/Bath

Accessing rear strut top mounts…

Post by True-Blue » Tue Apr 23, 2024 12:40 pm

Another tip is to virtually undo the nut on top of the shock absorber itself whilst the shock is still in situ, rather than remove the shock first. This is a rear shock, so nothing is under tension.

I used a ratchet head ring spanner on the nut itself and a small adjustable wrench to hold the shaft and stop it spinning
IMG_3647.jpeg
IMG_3647.jpeg (208.24 KiB) Viewed 138 times
Didn’t take a photo whilst on the car, but this is one of the old ones with the nut close to the top of the thread :thumbsup:
Last edited by True-Blue on Tue Apr 23, 2024 3:10 pm, edited 2 times in total.
Alpina Roadster S Lux no. 204 (1 of 15 uk cars in Alpina Blue)

Previous Z4’s :E89 30i, E89 20i, E85 3.0Si (X4) E85 3.0i, E86 3.0 Si, E85 2.5si, E85 2.5i

Stash36
Member
Member
Posts: 160
Joined: Tue Sep 08, 2020 7:43 pm

Accessing rear strut top mounts…

Post by Stash36 » Tue Apr 23, 2024 2:35 pm

Which shocks did you use and how much are we looking at for standard replacement rears chaps? Sensible to do the springs as well I would think?
I know this is very much needed on my 2009.

True-Blue
Lifer
Lifer
Posts: 3247
Joined: Sun Feb 10, 2019 2:10 pm
Location: Bristol/Bath

Accessing rear strut top mounts…

Post by True-Blue » Tue Apr 23, 2024 3:06 pm

Stash36 wrote: Tue Apr 23, 2024 2:35 pm Which shocks did you use and how much are we looking at for standard replacement rears chaps? Sensible to do the springs as well I would think?
I know this is very much needed on my 2009.
I used Bilstein B4’s, which is O.E. Equivalent, fortunately the springs on the rear of this car were replaced recently.

Autodoc app is the way to go, but keep an eye on their price vs discount as it varies daily. Delivery times vary, this order took about 10 days, but I was in no rush.

£117.98 for the rear pair, plus I never re-use top mounts. I paid £402 including delivery and ‘safe order’ for front and rear Bilstein B4’s and lemforder top mounts. I’d have preferred Sachs as they are actually O.E., but they didn’t have stock at the time.
Alpina Roadster S Lux no. 204 (1 of 15 uk cars in Alpina Blue)

Previous Z4’s :E89 30i, E89 20i, E85 3.0Si (X4) E85 3.0i, E86 3.0 Si, E85 2.5si, E85 2.5i

Stash36
Member
Member
Posts: 160
Joined: Tue Sep 08, 2020 7:43 pm

Accessing rear strut top mounts…

Post by Stash36 » Tue Apr 23, 2024 3:31 pm

Thanks TB, great write up as well.

Post Reply