

=============================================

First, remove this screw.
=============================================

Pushing up on the two tabs, the glove box will open further reveling the fuses.I
=============================================

Place the antenna on the dashboard and work the wire into the seam as shown.

=============================================

Place your Barnes and Nobles gift card (or equivalent) behind the rubber seal to help you get your fingers under it to help you push the wire under.

=============================================

Now begin to run the xm antenna wire through as shown.
=============================================

Run the black wire from the power cable around like the antenna wire and connect it to the metal as shown.
=============================================

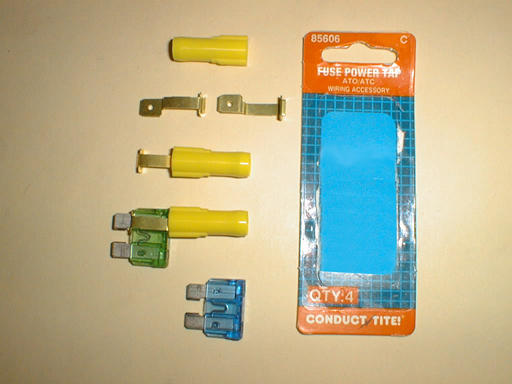
Remove this fuse.
=============================================

I then connected the red wire from the power cable to the fuse (I am going to clean this up- but it works for now).
=============================================

Plug the fuse back in to it's place. Now I have the dock in the glove box plugged up to the antenna, the power, and the ground loop isolator. Shut the glove box, and screw back in the screw that you removed in step 1.
=============================================

Next remove this screw.
=============================================

This image is showing how I ran the audio cable from the ground loop isolator.
=============================================

I plugged in the audio cable to the AUX input, and placed the xm unit it it's place. Run the wire to the unit in the seam that the arrow is pointing to.
=============================================

Here is the wire from the unit going into the glove box. If you look closely you can see the wire from the ground loop isolator right next to the unit wire.
=============================================

This is what it now looks like with the glove box open.

=============================================
And here it is finished.