>

Aftermarket audio upgrade PLAN 1

Yesterday I have picked up my 30i. After driving 150km, I can only say one thing; this is a great car. In the sport+ mode with the adaptive suspension, the 30i feel more communicative then my previous E85. In my opinion of course.

Now about my audio update plan. The radio frame fits, that a good start! Removing the standard radio is easy. Just pull of the cover plate below the radio unit and remove 2 screws of the radio unit; ready.

108%5b1%5d.jpg


I also removed one of the rear speakers to measure its dimension. Also very easy, click of the front plate and the speaker can be removed after removing 3 screws.

Now some more good news. The standard audio system sounds much better than the standard E85 system. The front footwell speakers are great to fill up the frequency range between my future build subwoofer and new mid-high range front rear speakers.

So next I will order a Pioneer DEH-P5100UB radio unit and route the RCA audio cable for the subwoofer amplifier to the truck. I have still to make a decision which mid-high speaker I want to buy.

That’s it for now…
 
I have some pictures of removing the standard radio.
First the cover plate below the radio. A click system is used on all 4 edges.

100_4946.jpg


Only 2 screws below the radio mounts the unit to the dashboard.

100_4947.jpg


And yes, the radio frame fits, now it's time to buy a decent radio! Another thing about removing the standard radio is that your car warning sounds won’t be hearable anymore. The E89 sends these warning sound via the CAN bus system, so the radio system can generate the ‘beep’ sound. I guess this is one of the down sides of changing to a non BMW radio. There are car radio brands that sell also CAN bus interfaces, so the volume, channel and playback navigation can still be controlled by the steering wheel buttons.

100_4948.jpg


Yesterday I have spent some time designing a 'small' subwoofer to add in the trunk. I estimate a box size of 60cm (W) x 28cm (H) x 35cm (D). Focus is not to design a >500watt earth quake machine but a woofer that has enough power to reproduce low frequencies starting at ~25hz up to 125hz to reproduce decent sound level for open driving of cource.

That’s it for today, more to come.

EdP
 
Hi,

I picked up my Z yesterday … wow what an amazing car.

To be honest I am satisfied with the sound of the professional audio system, so no upgrade for me at this moment. The dealer told me that there is a shorter version of the antenna available; I will order this coming week.
 
EdP said:
Yesterday I have picked up my 30i.
Arnold said:
I picked up my Z yesterday … wow what an amazing car.
:worthless:

Back on topic, it will be interesting to see the final install. I think the pro hifi would be enough for me too, I'm not into hifi enough to get anything else.
 
gannet said:
That looks a lot better than an aftermarket install in the e85 car :thumbsup:

I agree, but to loose MFSW functions and so on is a real no no IMO

Guessing you dont have NAv in this car then EDP
 
Guessing you dont have NAv in this car then EDP

No, why spent more than 3700 euro on a navigation system that is outdate within 3 years (navigation features, not the maps). I seldom need one and if I do, I own a portable navigation system to be used in all of my cars. And than you need to spend again more money to get rid of the standard speaker.
 
I agree, but to loose MFSW functions and so on is a real no no IMO

I you have a problem losing the steering wheel function, there are can bus interfaces (also for pioneer). These interfaces not only assign the basic buttons to the radio but can also be reconfigured and give these button even more functionality.
 
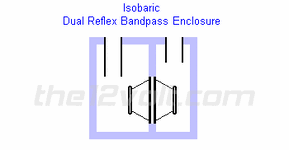
A small update. The subwoofer is ready and integrated into the trunk. It uses the maximum height and width and takes only 26cm of trunk space depth. Because of unused space left and right of the rear wall, I have saved up to 10cm. I guess the space is used by hifi and professional system to install the amplifier unit. So the subwoofer unit dimensions are 69cm x 27,2cm x 35cm.

isodualrefbpass.gif

One of the bass flex ports enters the cabin. This is required because the trunk muffles frequencies above ~70hz quite good. I have also made an 3th bass reflex port in the same chamber of the cabin bass reflex to improve the sound. This subwoofer reproduces frequencies between 29 - 125 hz. I'm quite satisfied with the sound, not only hearing it but also feeling it. Now I have to do some fine tuning and carpeting the sub woofer unit.
 
Some points of attention for people who want to replace the standard radio unit (NOT the business radio or navigation)


  • - Buttons on steering wheel won't function anymore, also the ventilation re-circulate button!

    - Can be fixed by integrating a CAN bus interface. I won't spend money on it. An non-BMW interface can create CAN bus conflicts.

    - The warning sound (lights still on, doors not closed, seatbelt, etc...) won't hearable anymore.

    - A radio frame that fits in the E81/E90 can be used (DIN radio opening is not centered, but shifted to the left).

    - A E81/E90 to DIN converter cable can be used.

    - A antenna converter plug BMW<->DIN plug.

    - You need to add an extra 12volt power supply cable from the battery (so not switched off). Don't forget to fuse this line near the battery!! (10-15amps) Use at least 2mm2 cable. You need to have a continue voltage otherwise your radio will lose all the programmed settings. The original 12volt line is switched off after 5-10 minutes when your car is parked. This line can be used on the radio's ACC power line. If you forget to switch off your radio, the car's on-board power management will switch off your radio.

    - According a BMW service station, they could not re-program the car's engine MCU because of the missing standard radio unit. I have no idea if this is the case.
 
I totally forget to write something about the installation of the Omnes BB3.01 to replace the standard rear speakers.

omnes-audio-bb301.jpg


I took the easy way to make a converter ring to fit the 3" Omnes into the 3 screw hole and 4" opening of the car.

100_4951.jpg


Here a picture of the standard speaker. Yes bad speakers have a 2nd live by modifing them so the Omnes fits into the 4"ring. I have glued the Omnes on the ring and installed the speakers into the car.

First I was afraid that the seats would mute some of the sound of the rear speakers, but that is not the case. I'm really impressed with the sound of this 3” speaker. It sounds very clean, has a low distortion and sounds very detailed. With this speaker a tweeter is completely obsolete. I have adjusted the High Pass Filter on 125Hz, so the Pioneer does not output low frequencies anymore on the front and rear speakers. This will result in cleaner sound at a high sound level. The sub will taken over all the frequencies below the 125Hz.

I have read some remarks about the audio sound level of the standard system when driving open. Today I drove top-down, all windows down @~140km/h. My upgraded audio system had no problem to produce a decent and clean sound level at this speed.

I'm still busy to finish things like electrical and esthetical work.

That's it.
EdP
 
thanks EdP
very nice and detailed work. would appreciate a summary when done, on all components used, cost etc so that everything is in one post...for us poor followers :wink:
 
Update:

I have changed the subwoofer setup. I was not pleased with the sound after all. The efficiency of the band pass subwoofer was not good. The amplifier had to work too hard to get it going. Also the bass sound was not punchy enough. So I decided to design a new cabinet and a speaker.


view_img.php


The new setup uses the JBL GTO804 woofer that can handle 200 watt RMS and peaks of 800 watt. It's mounted in the rear wall between the passenger’s seats. Just a small closed cabinet in the trunk of 10 liter is required.

The weakness of the old subwoofer is definitely fixed. It plays clean and punchy bass sound starting at frequency of 29Hz. Even at high levels, when the interior starts to rattle, the sound is still clean. I have still to do some cosmetically work. The JBL is not quite a beautify, so a nice grill would be nice. Also the rear wall behind the seats is not resonance proof, it needs to be stiffened...anyone an idea how?

So still some work to do. I will post some pictures when I'm finished.

EdP
 
I have started last weekend by lining the rear wall with black textile fabric for covering the subwoofer.

I didn't like the existing gray one, but also the plastic clips holding the storage net, this looks so messy, I had to remove it!

I have already taken some photos of the work in progress. I guess next week when I have finished the job, I will post new photos.

EdP
 
My audio upgrade is finished!

Looking back, the radio unit and rear speaker upgrade was in comparison with the sub woofer work an easy job. After changing to the JBL sub, I reworked the setup 3 times to get it resonance free and to implement the best cosmetically solution. The best setup is to start with a solid box/cabinet that takes only a small amount of trunk space. I wanted this time to avoid all kind of difficulties with bass reflex or open box systems and choose to go with a small volume and closed cabinet. The JBL GTO804 can sound great with a small closed setup of 10 liter. The box should fix in the tunnel between the trunk and cabin and should make it possible to open the roof :rofl: of course. That's why the box is not just a simple cube but has a staggered cube shape. Also the trunk floor is 10cm lower than tunnel entrance.

100_5109.jpg


If you build a sub like this, mount the speaker on the box. I tried to mount it on the cabin rear wall and screwed the box on the rear wall. You will get all kind of squeaks, rattles and resonance issues. Also you will get air leaks because the rear wall has some kind of profile to firm it up. Also avoid 'hard' material contact, so MDF on steel is a no go. I have used speaker textile to 'de-couple' all contact points.

100_5144.jpg


Yes, this is the one that gives me a lot of bass pleasure :evil: . Speaker, box and the 650 watt amplifier has a weight penalty of 10Kg,
I can live with that.

100_5142.jpg


Cutting a hole in the rear wall wasn't that difficult. The plastic is +/- 3 mm thick and can easily be cut with small saw. The outer ring of the JBL speaker should fit through the hole. The maximum hole size is limited by the dimensions of the trunk tunnel of 23 x 23 cm and gives us a maximum speaker size of 20cm/8 inch. The cables on the trunk picture are coming from the head unit, +12v continue power line used by the head unit, the audio line out signal and one power ON signal for the amplifier.

100_5146.jpg


The box is only screwed on the plastic rear wall and because it thigh fits in the tunnel this seems to be strong enough.

100_5147.jpg
100_5151.jpg


To finish the cabin work I have looked for several solutions. I could not find a good looking speaker grill that could fit on the rear wall with a 23 cm / 9 inch hole. Some were ugly, some were too tick (more than 18mm). So the cleanest solution is to cover it up with acoustic speaker textile.

The lining part was easier than I expected. I could pinch the most textile under plastic covers like the original textile. I only glued the textile in the corners were I couldn't pinch it. I think the textile needs to pull tight within some weeks when it is settled. As you see I have removed the plastic clips holding the storage net. Personally I think this look cleaner but also the color black fits in better. I still could finish the trunk rear wall. I didn't want to cut holes in the carpet of the original part. In case of getting back to an original setup when the car is sold in the future is a reason to leave it untouched. I think I leave the truck as it is now.

So the final cabin result, we have invisible bass!

100_5149.jpg


Now the audio part... I have used an audio signal generator to check frequency response of all speakers with my ears. After many years of hobby audio experiences I can quite good judge if there is a problem. Just to verify the sound reproduction is relatively flat and does not peak at some frequencies. I did not have to use any form of bass improving DSP stuff. I only amplified @ 12 KHz +2db and changed the cross over frequency of the sub woofer and full range speakers from 125Hz to 100Hz, that's all.


So, now the time has come to enjoy my Z even more than before with the sound of good music!

EdP
 
Very cool setup, EdP. Please help me with a couple of questions.

What formula did you use to calculate base cabinet volume required by your base speaker?

Concerning the hole in the rear wall, for some reason I thought all e89 Z4's have the storage pass-thru capability, even if the hole isn't there. Did you find marks for the dealer to install the option?

I've never designed a base cabinet before so this may be a stupid question: Would it have been possible to make the base cabinet less deep, but wider from side to side and get the same response you wanted? I'm thinking of lost space in the trunk on either side of your base cabinet.

I know you've got the amp positioned in the most efficient location now for cabling, wire resistance, etc. but for some reason an exposed amp doesn't look right to me in a Z4. So I was wondering if it is possible to mount the amp separately from the base cabinet, say in a cubbyhole on the side? The would mean longer cabling and I'm not sure if that's issue for the amp.
 
teagueAMX said:
What formula did you use to calculate base cabinet volume required by your base speaker?
I have used JBL technical data notes: http://www.jbl.com/resources/Brands...cuments/en-US/BoxesandParameters/GTO 804D.pdf One of the applications is a sealed box volume of 8,5 liters (first page). You could design a box that only uses 15 cm of trunk depth, this is excluding the read wall cover, because this covers some hidden space. So I guess a box using the full width and height will only take ~7 cm of trunk space.

teagueAMX said:
Concerning the hole in the rear wall, for some reason I thought all e89 Z4's have the storage pass-thru capability, even if the hole isn't there. Did you find marks for the dealer to install the option?
In the Netherlands, the storage pass-thru is an option that I didn't order. So in the cabin the rear wall was completely carpeted. Instead of the storage door a plastic cover was installed.

teagueAMX said:
Would it have been possible to make the base cabinet less deep, but wider from side to side and get the same response you wanted? I'm thinking of lost space in the trunk on either side of your base cabinet.
Yes this is possible. Use also at least 22mm thick MDF. I just took the easy way. After 12 years Z driving, I used very rarely my trunk.

teagueAMX said:
So I was wondering if it is possible to mount the amp separately from the base cabinet, say in a cubbyhole on the side? The would mean longer cabling and I'm not sure if that's issue for the amp.
The professional system has mounted the amp on the right side of the trunk. I saw also that someone @Zpost forum mounted the ampler on this location, so it can nicely be covered with the original rear wall cover. See: http://e89.zpost.com/forums/showthread.php?t=310508&highlight=audio. But if you design a full width box, you could make an amplifier bay.

It could be that I replace the amplifier in the near future. But at the moment I have no idea how hot this amplifier will get, especially on hot summer days, top down and pumping up the volume! So this setup is just a try out.

TeagueAMX, keep us up to date how your project progresses.

EdP
 
Back
Top Bottom