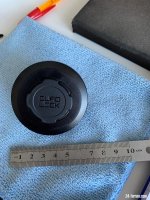
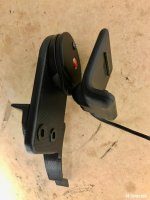
For several months I've been experimenting with various designs for a mount for my mobile phone. I use a navigation app (Scenic), and this can quickly run down the phone's battery on long tours - so what I actually need is a mount for a wireless phone charger.
My original approach was a large round mount that I secured to the top of the dashboard with 3M double sided tape. This seemed to work OK, but on long journeys, especially on hot days, the weight of the charger and phone, coupled with the stippled effect on the dashboard, resulted in the mount falling off quite regularly.
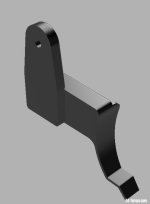
I therefore started looking at alternatives, and came across this thread, which in turn referenced a phone mount design that fitted around the instrument binnacle. Although this is a very neat approach, I could see two main issues with this design. Firstly it requires the use of supports to print it. With PETG or similar filaments these can be very difficult to remove, and you inevitably end up with damaged surfaces. Secondly, It relies solely on friction to hold it in place, and is unlikely to handle the combined weight of a charger and phone - especially with the leverage effect of the phone protuding further into the car. However, it's a very neat design, so I set about redesigning it - resulting in this:
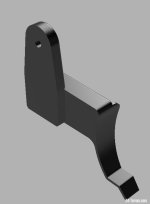
The mount extends over the top of the aluminium dash, with the correct profile for a snug fit. So as well as being wedged into the gap around the instrument binnacle, it is supported by the top of the dash, and is also secured to the dash using double sided tape. It's in two parts, which eliminates the need for supports. The two are then joined with countersink head M4 bolts.
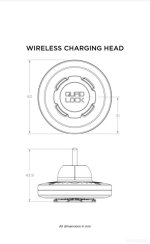
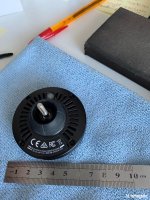
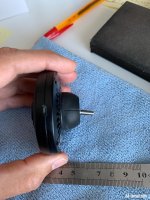
I separated the threaded ball joint from the mount supplied with the Auckly Qi charger and this then screws into the hole at the top of the new bracket using an M5 threaded insert.
The wedge part also neatly covers the USB cable required for the charger - it's routed around the instrument binnacle, and then concealed by the mount when it's pushed into place.
I had originally intended to use the "wedge" design for the Amazon Echo Auto I purchased recently. The advantage of this device is its very clever microphone array. It constantly monitors the sounds from each of the eight microphones, measuring the audio delays between each. Using noise cancellation technology, it can then separate voice commands from the background noise - which is perfect for an open top car!
Its magnetic mount normally clips to an air vent, but I wanted something less obtrusive - and ideally concealed so that I could leave the device in the car without it being stolen. I experimented with various orientations and positions, and finally decided upon mounting it in the instrument binnacle, between the speedo and the rev counter. So I designed this slide-in mount:
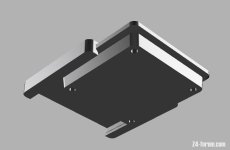
It's in three parts - the magnet holder (two parts joined by four small screws), and the slide-in bracket. The bracket is attached upside down to the top of the instrument binnacle using double sided tape. The Echo Auto is then attached to the holder by magnetic force, and this then slides into the bracket. The USB cable is routed around the speedo and the binnacle, and again is hidden by the phone charger mount "wedge".
I did some testing yesterday, and with the top down and the windows up I was able to successfully give Alexa voice commands at speeds of up to 60 mph. I've yet to test the quality of the microphone at the other end of a hands-free voice call in this configuration. However, previous experiments with it mounted to the dash resulted in really good quality voice reception with very little wind noise - much better than using the microphone supplied with my Connects2 bluetooth module. With it being located directly in front of me and recessed into the binncale and thus sheltered from air turbulence, it should now be even better.
Here are some photos of the mounts in place.
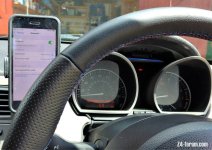
The blue line in the instrument binnacle is the status display on the Echo Auto.
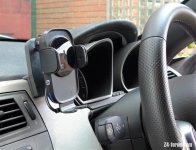
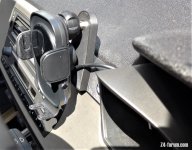
If anyone is interested in printing these mounts, I'll post the files and details up on Thingiverse. Note that as the phone charger mount is in two parts, the dashboard bracket could be used in isolation as a generic mount. For example, you could deisgn a holder for your specific phone, and then either glue it to the bracket, or incorporate two holes 20mm apart in your design for M4 threaded inserts and joining the two with M4 countersink head bolts.
My original approach was a large round mount that I secured to the top of the dashboard with 3M double sided tape. This seemed to work OK, but on long journeys, especially on hot days, the weight of the charger and phone, coupled with the stippled effect on the dashboard, resulted in the mount falling off quite regularly.
I therefore started looking at alternatives, and came across this thread, which in turn referenced a phone mount design that fitted around the instrument binnacle. Although this is a very neat approach, I could see two main issues with this design. Firstly it requires the use of supports to print it. With PETG or similar filaments these can be very difficult to remove, and you inevitably end up with damaged surfaces. Secondly, It relies solely on friction to hold it in place, and is unlikely to handle the combined weight of a charger and phone - especially with the leverage effect of the phone protuding further into the car. However, it's a very neat design, so I set about redesigning it - resulting in this:

The mount extends over the top of the aluminium dash, with the correct profile for a snug fit. So as well as being wedged into the gap around the instrument binnacle, it is supported by the top of the dash, and is also secured to the dash using double sided tape. It's in two parts, which eliminates the need for supports. The two are then joined with countersink head M4 bolts.
I separated the threaded ball joint from the mount supplied with the Auckly Qi charger and this then screws into the hole at the top of the new bracket using an M5 threaded insert.
The wedge part also neatly covers the USB cable required for the charger - it's routed around the instrument binnacle, and then concealed by the mount when it's pushed into place.
I had originally intended to use the "wedge" design for the Amazon Echo Auto I purchased recently. The advantage of this device is its very clever microphone array. It constantly monitors the sounds from each of the eight microphones, measuring the audio delays between each. Using noise cancellation technology, it can then separate voice commands from the background noise - which is perfect for an open top car!
Its magnetic mount normally clips to an air vent, but I wanted something less obtrusive - and ideally concealed so that I could leave the device in the car without it being stolen. I experimented with various orientations and positions, and finally decided upon mounting it in the instrument binnacle, between the speedo and the rev counter. So I designed this slide-in mount:

It's in three parts - the magnet holder (two parts joined by four small screws), and the slide-in bracket. The bracket is attached upside down to the top of the instrument binnacle using double sided tape. The Echo Auto is then attached to the holder by magnetic force, and this then slides into the bracket. The USB cable is routed around the speedo and the binnacle, and again is hidden by the phone charger mount "wedge".
I did some testing yesterday, and with the top down and the windows up I was able to successfully give Alexa voice commands at speeds of up to 60 mph. I've yet to test the quality of the microphone at the other end of a hands-free voice call in this configuration. However, previous experiments with it mounted to the dash resulted in really good quality voice reception with very little wind noise - much better than using the microphone supplied with my Connects2 bluetooth module. With it being located directly in front of me and recessed into the binncale and thus sheltered from air turbulence, it should now be even better.
Here are some photos of the mounts in place.

The blue line in the instrument binnacle is the status display on the Echo Auto.


If anyone is interested in printing these mounts, I'll post the files and details up on Thingiverse. Note that as the phone charger mount is in two parts, the dashboard bracket could be used in isolation as a generic mount. For example, you could deisgn a holder for your specific phone, and then either glue it to the bracket, or incorporate two holes 20mm apart in your design for M4 threaded inserts and joining the two with M4 countersink head bolts.
